Creating machine pools for GitHub Actions
To successfully use Build Hub for GitHub Actions, you need to:
-
Create a machine pool on Bitrise.
The machine pool requires authentication information. Enterprise plans can use either the Bitrise - Build Hub app or a GitHub personal access token; all other plans (free trial, Starter, Pro) can only use the app:
- Install the Bitrise - Build Hub GitHub app.
- Create a GitHub personal access token, on an Enterprise plan.
-
Configure your GitHub Actions workflow to use Bitrise infrastructure for your builds.
Creating a machine poolClick to copy link
Create a machine pool that allows running GitHub Action builds on Bitrise hardware. The process is slightly different depending on your authentication method: the GitHub app installed on a GitHub organization, the GitHub app installed on a personal GitHub account, or, on an Enterprise plan, a GitHub personal access token.
The GitHub app can be installed on a GitHub organization or on a personal GitHub account, and the two work slightly differently once you're back in the Bitrise wizard:
- An organization connection registers your runner into a runner group.
- A personal account connection registers it directly to a single repository, since personal accounts don't have runner groups.
- GitHub organization-based
- GitHub user-based
- GitHub personal access token
If you plan to run builds for a public repository, the runner group your machine pool registers into must have Allow public repositories enabled on GitHub (Organization settings → Actions → Runner groups). Without this, GitHub won't dispatch jobs from public repositories to your Build Hub runners: jobs stay queued indefinitely even though the pool, labels, and authentication are all healthy.
Enable this setting at your own risk. GitHub disables it by default for a serious security reason: fork PR workflows on public repositories can execute untrusted code from external contributors on your self-hosted Build Hub runners, exposing your build environment, secrets, and infrastructure. Before enabling, require approval for workflows on fork PRs at a minimum. See Approving workflow runs from public forks in the GitHub docs.
-
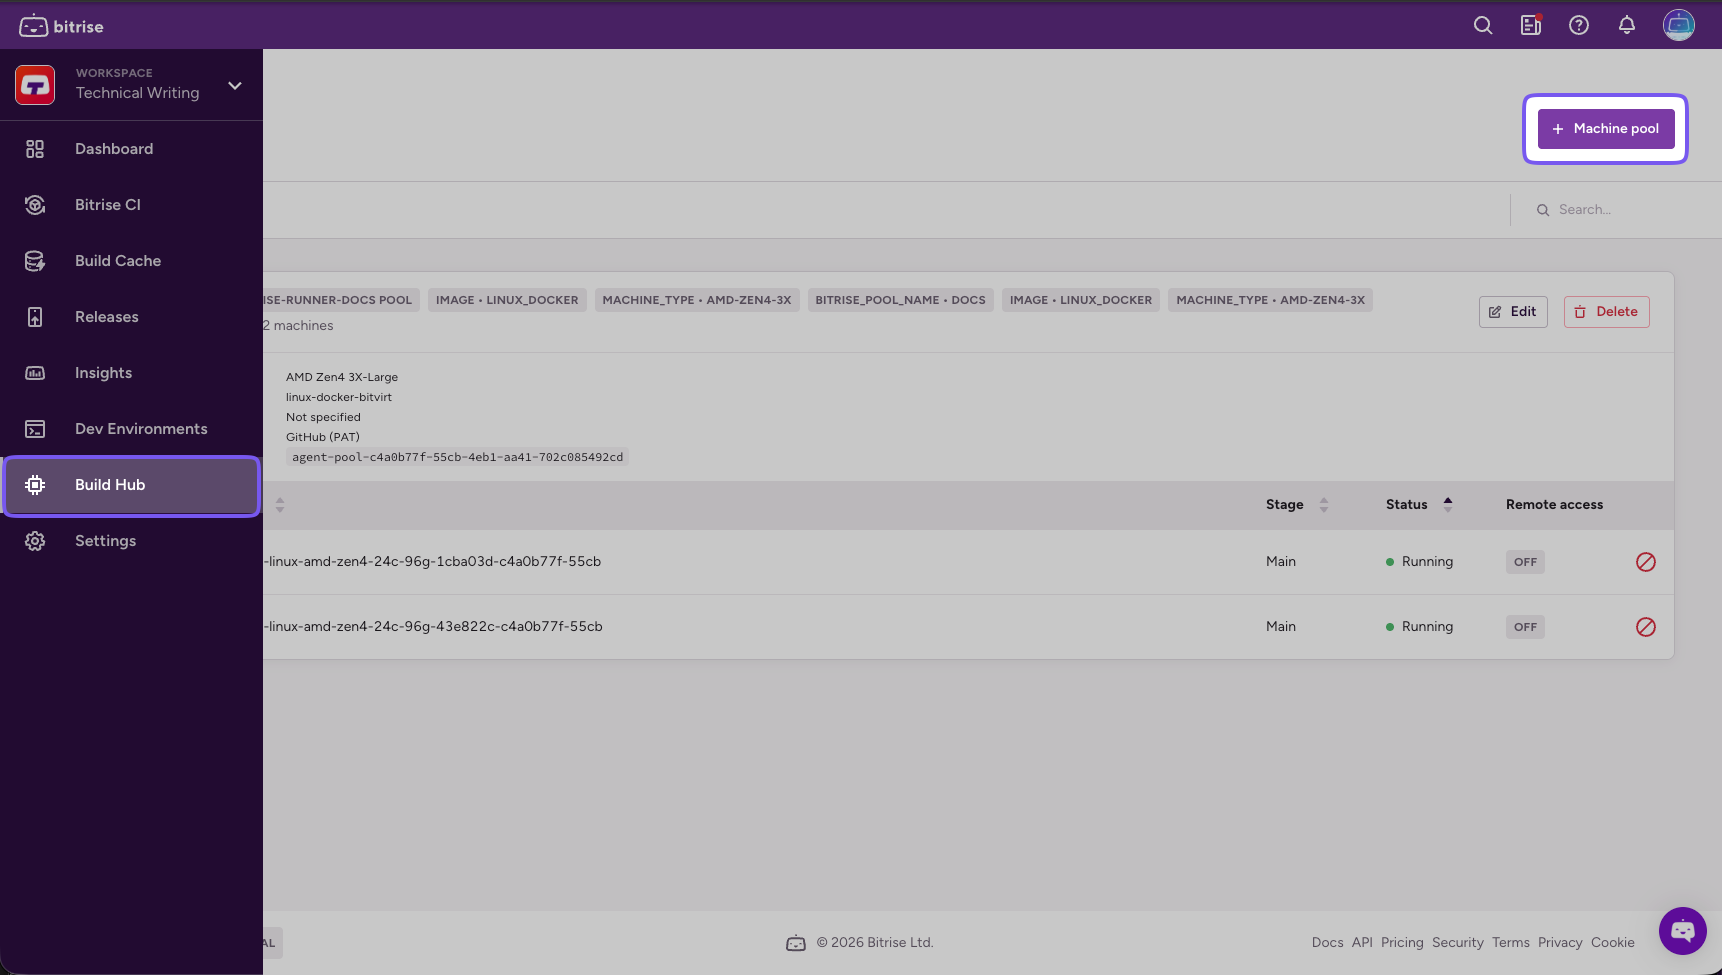
On the left navigation bar, select Build Hub.
-
Click Machine pool.
-
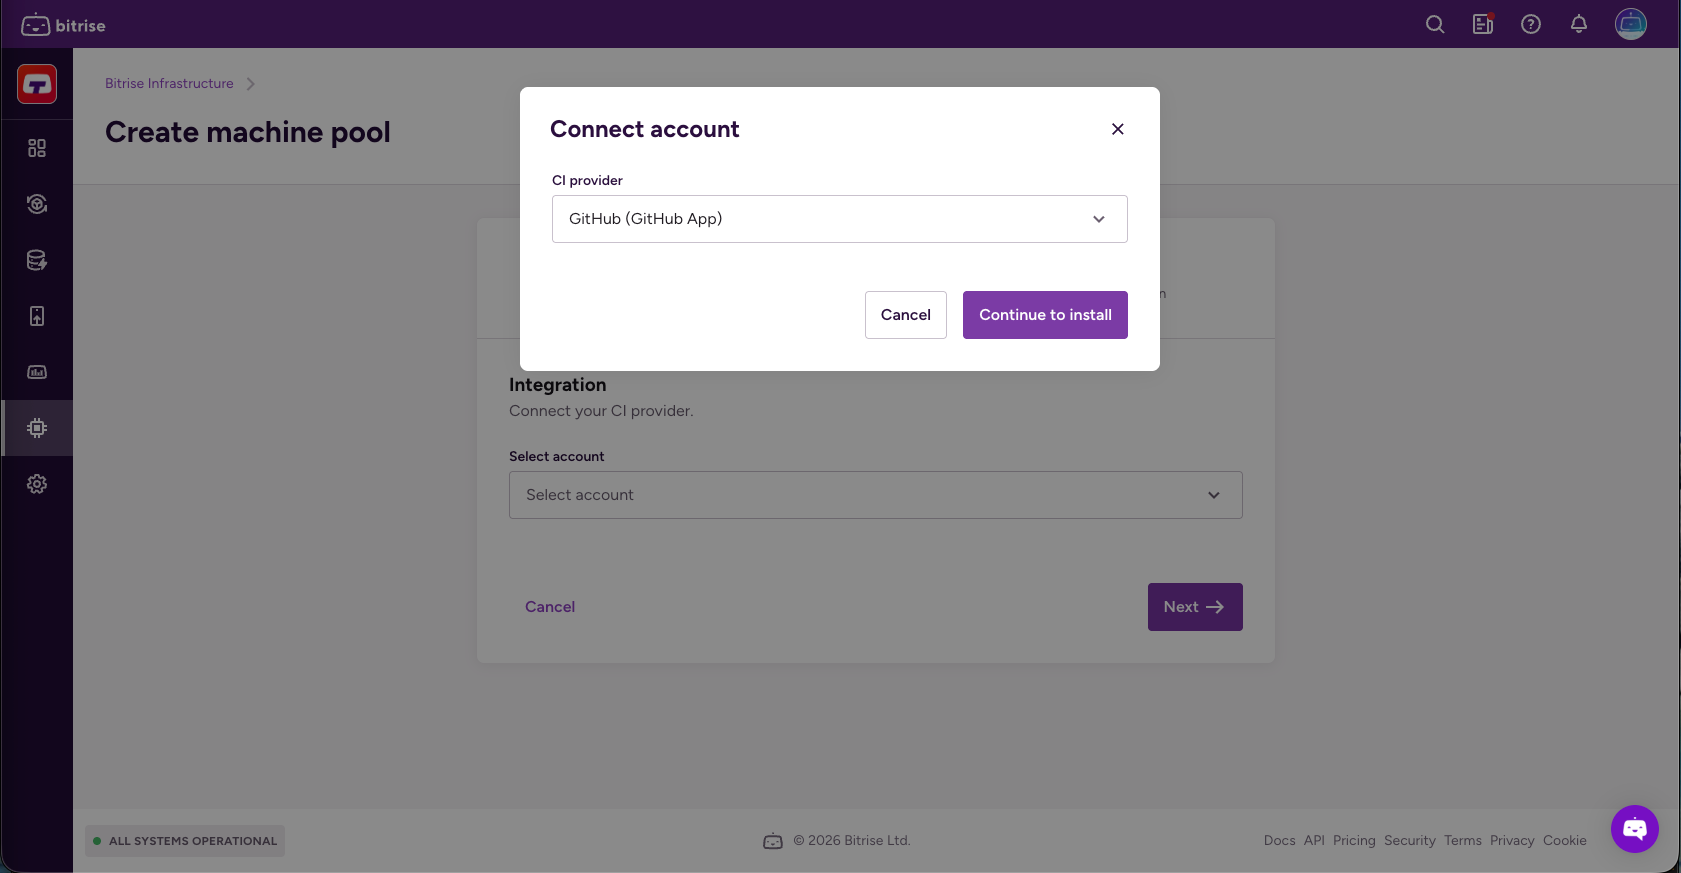
Open the CI provider dropdown menu. Select an already-connected account, or click Connect account to add a new one.
-
Select GitHub (GitHub App) and click Continue to install.
-
Select the resource owner: your GitHub organization.
-
Select the repository scope.
- All repositories: Applies to all current and future repositories owned by the organization. Also includes public repositories (read-only).
- Only select repositories: Select at least one repository. Also includes public repositories (read-only).
If you scope the installation to specific repositories, Bitrise can't dispatch jobs for any repository outside that list, even if its workflow's
runs-onlabels match this pool.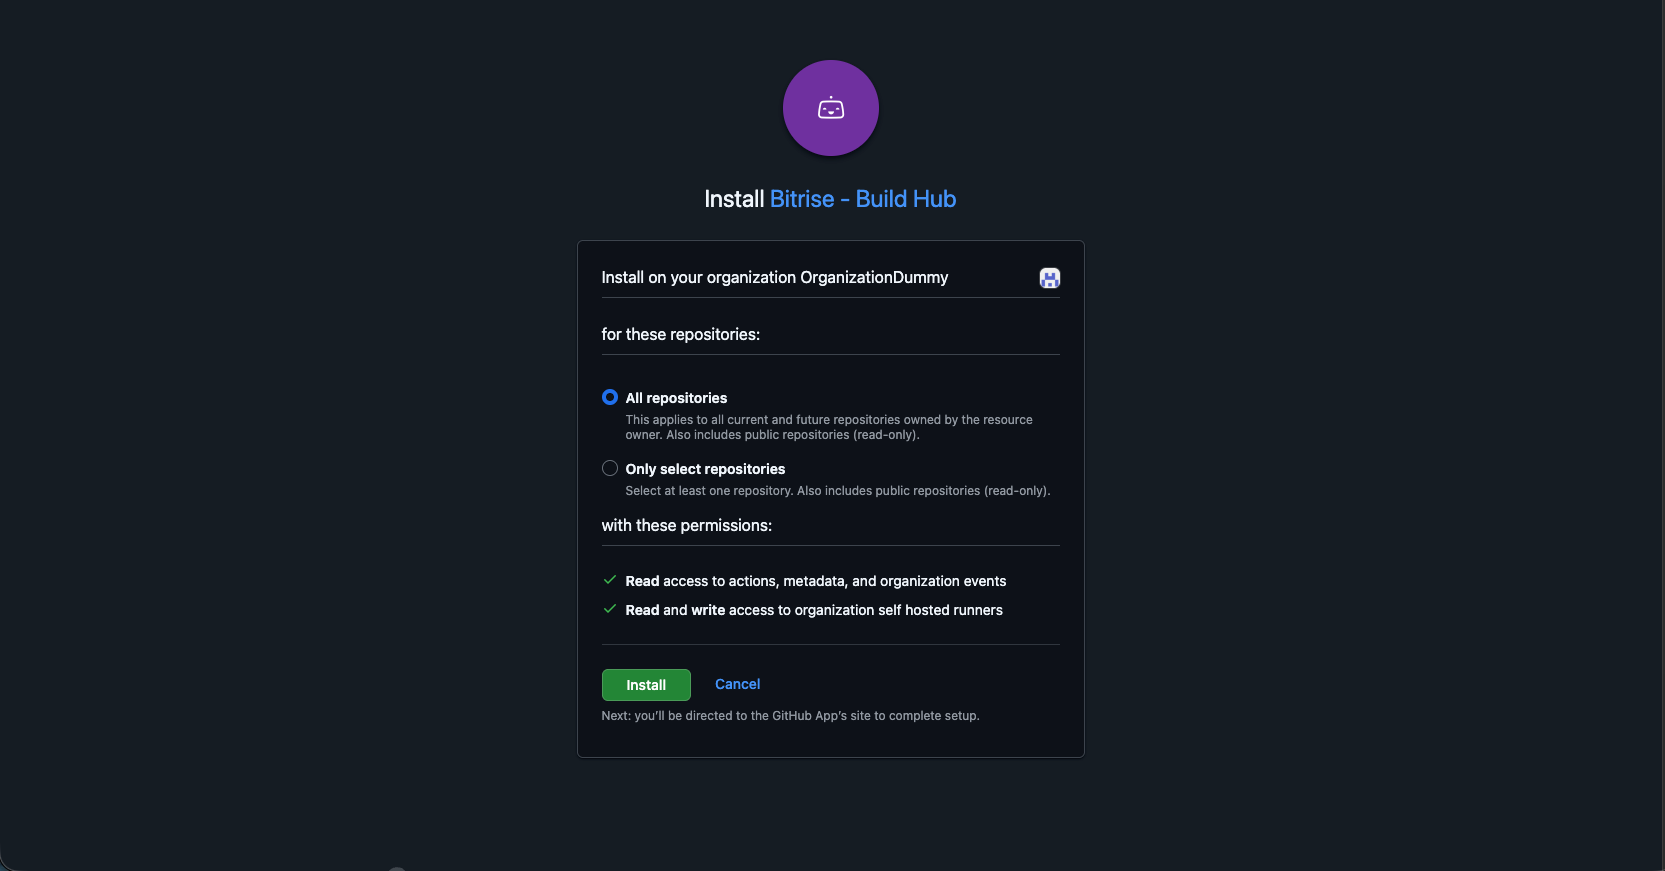
-
Set a unique Pool name. You can't change this after creation.
-
Select the connected account in the CI provider dropdown menu.
-
Add a Runner group.
Runner groups create a security boundary in GitHub that controls which repositories or organizations can dispatch jobs to your runners. If the group doesn't exist yet on GitHub, Bitrise creates it automatically. Runner groups aren't used to target this specific pool in your workflow: use labels and the
runs-onproperty for that instead.When done, click Next.
-
Select the image in the Image dropdown menu.
You can check the images on the stack reports page.
-
Select a machine type in the Machine type dropdown menu.
For more information about Bitrise machines, check out Build machines.
-
Set the pool's Capacity: its machine limits, up to the number available for the selected machine type.
- Maximum: the most machines this pool runs at once.
- Minimum: if this field is available for your workspace, it only appears for GitHub App connections. It keeps machines running so the next build starts instantly. Leave it at 0 to scale down to zero when there's no work.
When done, click Next.
-
Check Use Bitrise for GitHub Actions caching if you want Bitrise infrastructure to handle GitHub Actions cache requests instead of GitHub's cache backend.
This results in faster cache operations.
-
Optionally, add a warmup script to customize your build environment before your Workflow runs.
Leave it empty if you don't need a warmup script.
Non-zero exit codeTo prevent build start failures, make sure the script returns a non-zero exit code in case of an error.
When done, click Next.
-
Optionally, add extra labels to help target this pool in your workflow.
Bitrise always applies a default set of labels (the pool name, the image, and the machine type), and these can't be changed or removed. You can add your own labels alongside them; a label is a key-value pair, but only the key is mandatory. Labels are how your GitHub Actions configuration targets this pool, so make sure the
runs-onproperty in your workflow file uses the same labels you set here. -
Click Create pool.
-
On the left navigation bar, select Build Hub.
-
Click Machine pool.
-
Open the CI provider dropdown menu. Select an already-connected account, or click Connect account to add a new one.
-
Select GitHub (GitHub App) and click Continue to install.
-
Select the resource owner: your personal GitHub account.
-
Select the repository scope.
- All repositories: Applies to all current and future repositories owned by your account. Also includes public repositories (read-only).
- Only select repositories: Select at least one repository. Also includes public repositories (read-only).
-
Set a unique Pool name. You can't change this after creation.
-
Select the connected account in the CI provider dropdown menu.
-
Select a Repository.
Personal accounts don't have runner groups, so instead of a runner group, the runner registers directly to a single repository you pick here. This list only includes repositories your GitHub App installation can currently access. If you scoped the installation to "Only select repositories" and want to target a different one, update the installation's repository access on GitHub first.
When done, click Next.
-
Select the image in the Image dropdown menu.
You can check the images on the stack reports page.
-
Select a machine type in the Machine type dropdown menu.
For more information about Bitrise machines, check out Build machines.
-
Set the pool's Capacity: its machine limits, up to the number available for the selected machine type.
- Maximum: the most machines this pool runs at once.
- Minimum: if this field is available for your workspace, it only appears for GitHub App connections. It keeps machines running so the next build starts instantly. Leave it at 0 to scale down to zero when there's no work.
When done, click Next.
-
Check Use Bitrise for GitHub Actions caching if you want Bitrise infrastructure to handle GitHub Actions cache requests instead of GitHub's cache backend.
This results in faster cache operations.
-
Optionally, add a warmup script to customize your build environment before your Workflow runs.
Leave it empty if you don't need a warmup script.
Non-zero exit codeTo prevent build start failures, make sure the script returns a non-zero exit code in case of an error.
When done, click Next.
-
Optionally, add extra labels to help target this pool in your workflow.
Bitrise always applies a default set of labels (the pool name, the image, and the machine type), and these can't be changed or removed. You can add your own labels alongside them; a label is a key-value pair, but only the key is mandatory. Labels are how your GitHub Actions configuration targets this pool, so make sure the
runs-onproperty in your workflow file uses the same labels you set here. -
Click Create pool.
Personal access token authentication is available only on Enterprise plans.
-
On the left navigation bar, select Build Hub.
-
Click Machine pool.
-
Open the CI provider dropdown menu. Select an already-connected account, or click Connect account to add a new one.
-
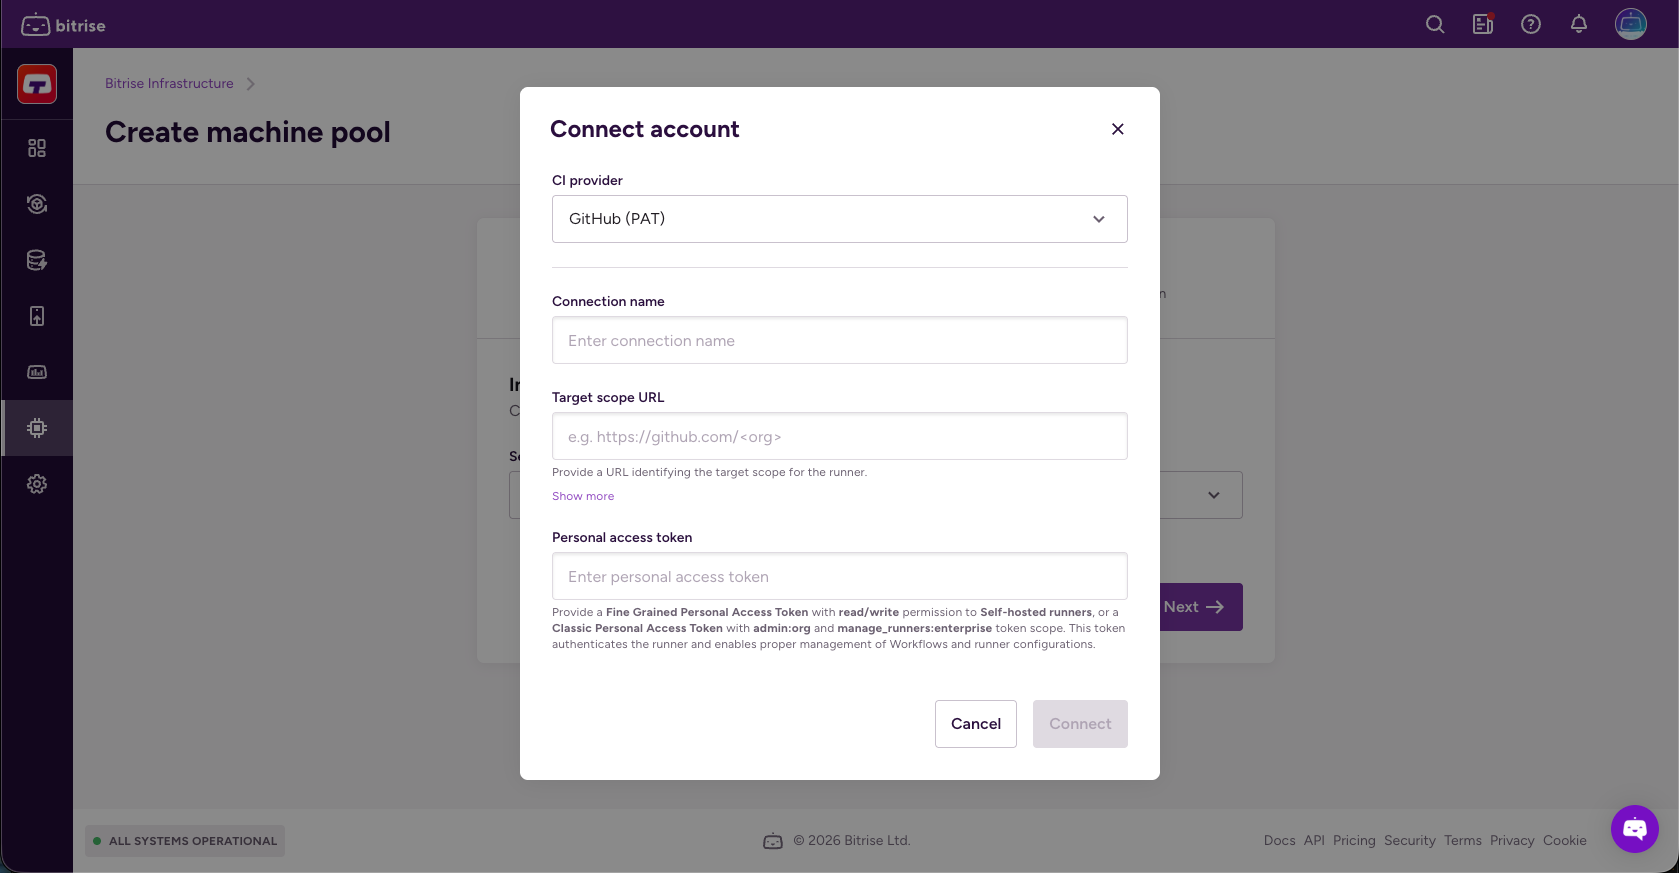
Click Connect account and select GitHub (PAT).
-
Set a connection name and a target scope URL.
Read more about target scopes here: Target scope
-
In the Personal access token field, add your GitHub personal access token then click Connect.
-
Set a unique Pool name. You can't change this after creation.
-
Select the connected account in the CI provider dropdown menu.
-
Add a Runner group.
Runner groups create a security boundary in GitHub that controls which repositories or organizations can dispatch jobs to your runners. If the group doesn't exist yet on GitHub, Bitrise creates it automatically. Runner groups aren't used to target this specific pool in your workflow: use labels and the
runs-onproperty for that instead.When done, click Next.
-
Select the image in the Image dropdown menu.
You can check the images on the stack reports page.
-
Select a machine type in the Machine type dropdown menu.
For more information about Bitrise machines, check out Build machines.
-
Set the pool's Capacity: its machine limits, up to the number available for the selected machine type.
- Maximum: the most machines this pool runs at once.
- Minimum: if this field is available for your workspace, it only appears for GitHub App connections. It keeps machines running so the next build starts instantly. Leave it at 0 to scale down to zero when there's no work.
When done, click Next.
-
Check Use Bitrise for GitHub Actions caching if you want Bitrise infrastructure to handle GitHub Actions cache requests instead of GitHub's cache backend.
This results in faster cache operations.
-
Optionally, add a warmup script to customize your build environment before your Workflow runs.
Leave it empty if you don't need a warmup script.
Non-zero exit codeTo prevent build start failures, make sure the script returns a non-zero exit code in case of an error.
When done, click Next.
-
Optionally, add extra labels to help target this pool in your workflow.
Bitrise always applies a default set of labels (the pool name, the image, and the machine type), and these can't be changed or removed. You can add your own labels alongside them; a label is a key-value pair, but only the key is mandatory. Labels are how your GitHub Actions configuration targets this pool, so make sure the
runs-onproperty in your workflow file uses the same labels you set here. -
Click Create pool.
Creating GitHub personal access tokens for Build HubClick to copy link
Personal access token authentication is available only on Enterprise plans. Free trial and self-serve workspaces must use the Bitrise - Build Hub GitHub App instead. See Authentication for Build Hub.
On an Enterprise plan, this step is optional: create a personal access token only if you're not using the GitHub App.
You can use a GitHub personal access token to authenticate Build Hub to GitHub Actions. You can use either a classic access token or a fine-grained access token, depending on your needs. Read more on how authentication works: Authentication for Build Hub.
To create the token on GitHub:
- Fine-grained
- Classic
-
Go through the process described here until you get to selecting a resource owner.
-
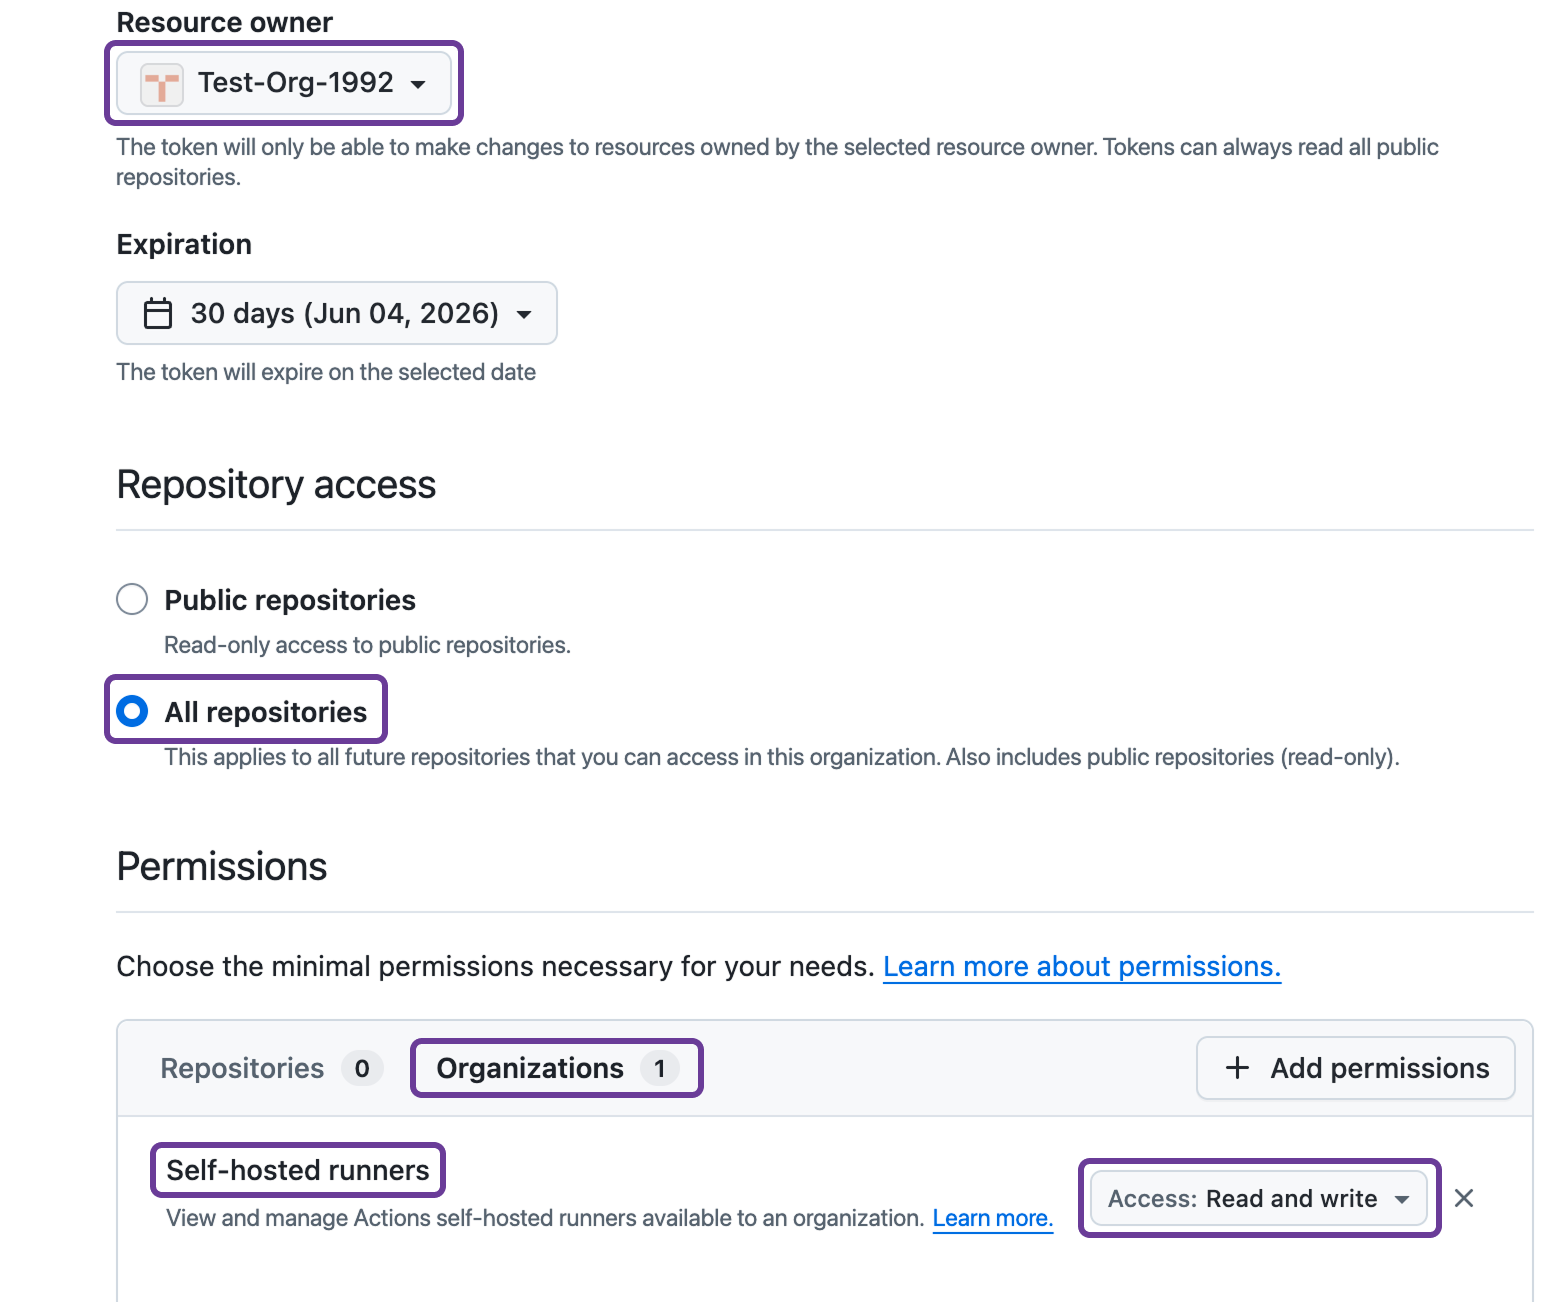
Select a resource owner: it should be the organization.
AuthorizationThe organization might require authorization for the token: for example, you might be prompted to log in via SSO.
-
Under Repository access, select All repositories.
-
Under Permissions, select Organizations.
-
Click Add permissions.
-
Select Self-hosted runners.
-
Set the access to Read and write.
-
Click Generate token.
-
Copy your personal access token: you won't be able to see it again but you need it when creating a machine pool.
-
Go through the process described here until you get to selecting the scopes.
-
Select the right scope: it depends on the target scope you need for your machine pool.
- GitHub Cloud organization (
https://github.com/<org>) and GHE organization (https://<hostname>/<org>): org:admin - GitHub Enterprise (GHE) Cloud (
https://github.com/enterprises/<enterprise>) and GHE Server (https://<hostname>/enterprises/<enterprise>): manage_runners:enterprise. - GitHub Cloud repository (
https://github.com/<owner>/<repo>) and GHE repository (https://<hostname>/<owner>/<repo>): workflow.
- GitHub Cloud organization (
-
Click Generate token.
-
Copy your personal access token: you won't be able to see it again but you need it when creating a machine pool.