Configuring Build Hub for GitHub Actions
To successfully use Build Hub for GitHub Actions, you need to:
-
Create a machine pool on Bitrise.
The machine pool requires authentication information. You can either:
- Install the Bitrise - Build Hub GitHub app while creating the machine pool. We recommend this authentication method.
- Create a GitHub personal access token.
-
Configure your GitHub Actions workflow to use Bitrise infrastructure for your builds.
Creating GitHub personal access tokens for Build HubClick to copy link
This step is optional. Create a personal access token only if you're not using the Bitrise Build Hub GitHub App.
You can use a GitHub personal access token to authenticate Build Hub to GitHub Actions. You can use either a classic access token or a fine-grained access token, depending on your needs. Read more on how authentication works: Authentication for Build Hub.
To create the token on GitHub:
- Fine-grained
- Classic
-
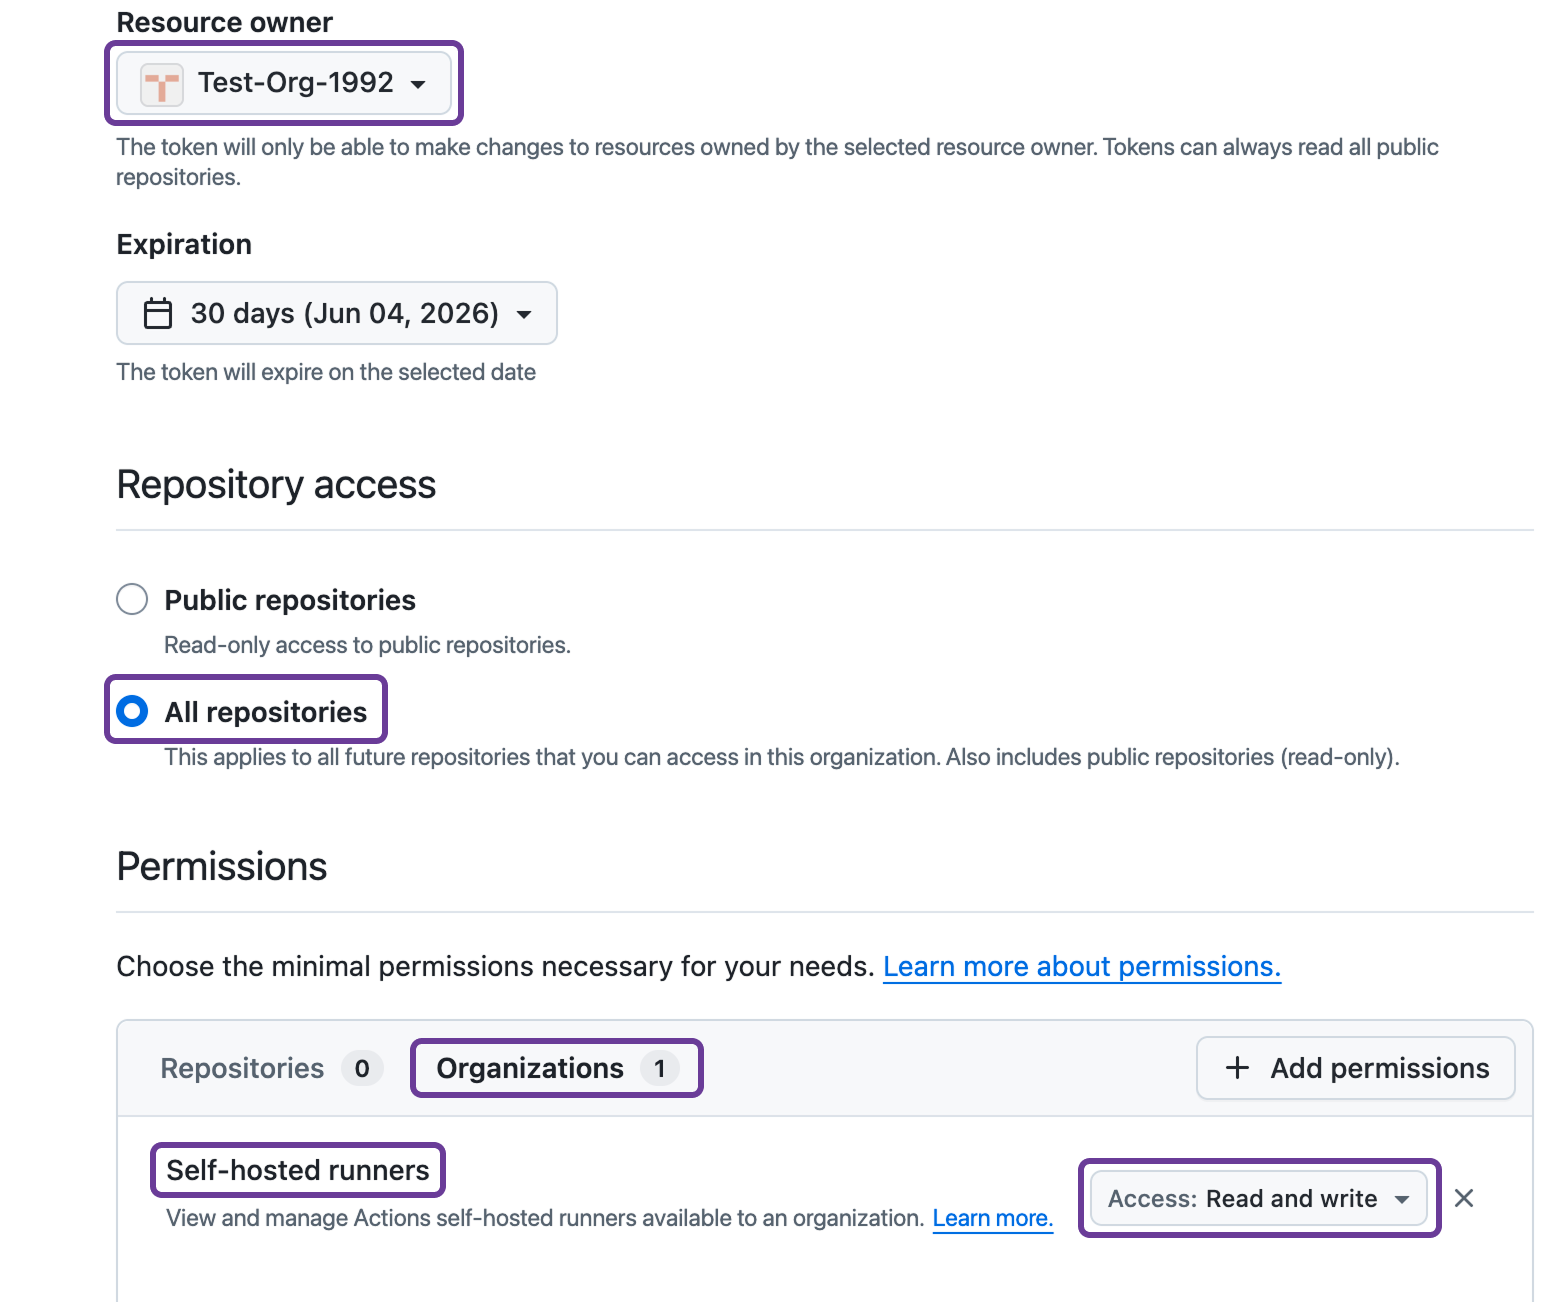
Go through the process described here until you get to selecting a resource owner.
-
Select a resource owner: it should be the organization.
AuthorizationThe organization might require authorization for the token: for example, you might be prompted to log in via SSO.
-
Under Repository access, select All repositories.
-
Under Permissions, select Organizations.
-
Click Add permissions.
-
Select Self-hosted runners.
-
Set the access to Read and write.
-
Click Generate token.
-
Copy your personal access token: you won't be able to see it again but you need it when creating a machine pool.
-
Go through the process described here until you get to selecting the scopes.
-
Select the right scope: it depends on the target scope you need for your machine pool.
- GitHub Cloud organization (https://github.com/<org>) and GHE organization (https://<hostname>/<org>): org:admin
- GitHub Enterprise (GHE) Cloud (https://github.com/enterprises/<enterprise>) and GHE Server (https://<hostname>/enterprises/<enterprise>): manage_runners:enterprise.
- GitHub Cloud repository (https://github.com/<owner>/<repo>) and GHE repository (https://<hostname>/<owner>/<repo>): workflow.
-
Click Generate token.
-
Copy your personal access token: you won't be able to see it again but you need it when creating a machine pool.
Creating a machine poolClick to copy link
Create a machine pool that allows running GitHub Action builds on Bitrise hardware. The process is slightly different based on whether you use a GitHub app or a GitHub personal access token for authentication.
- GitHub app authentication
- GitHub personal access token
-
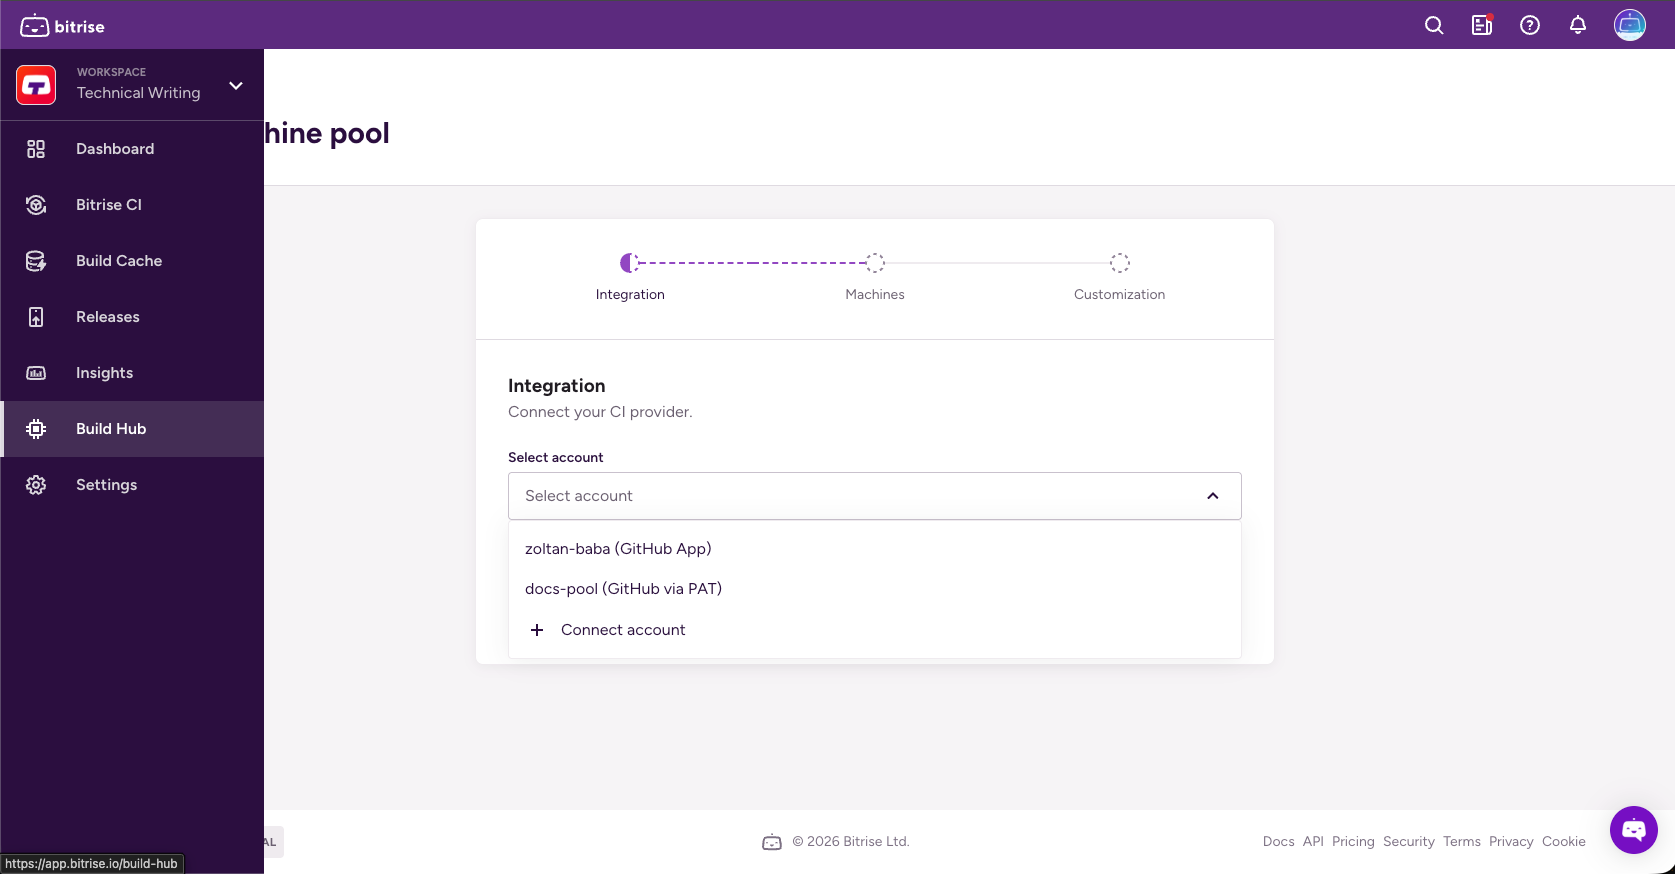
On the left navigation bar, select Build Hub.
-
Click +Machine pool.
-
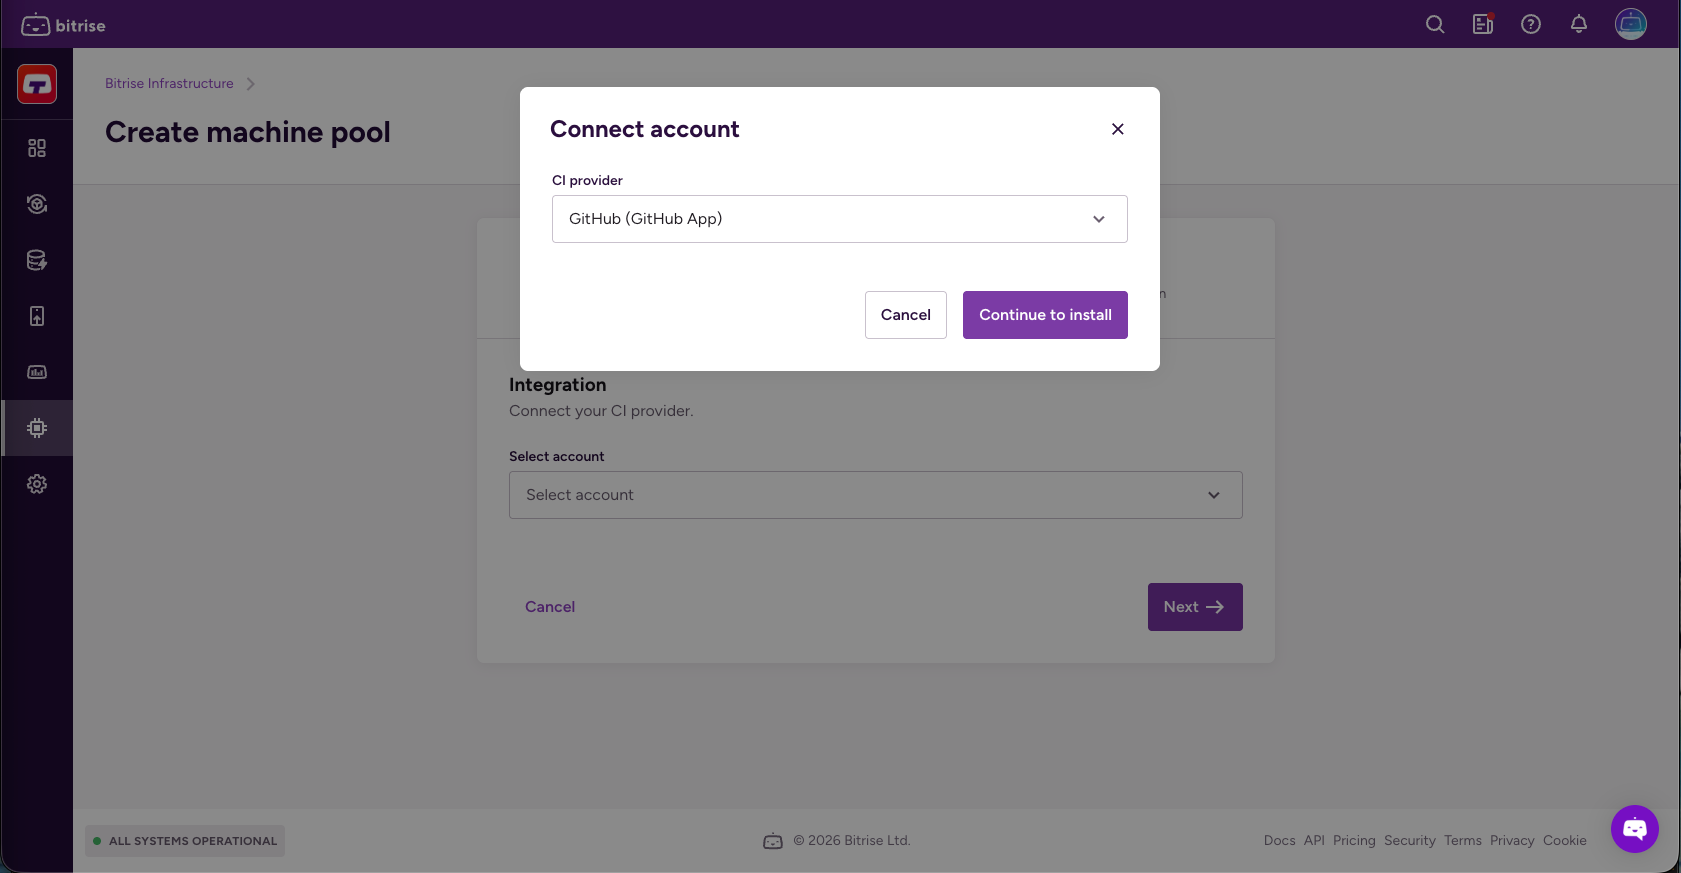
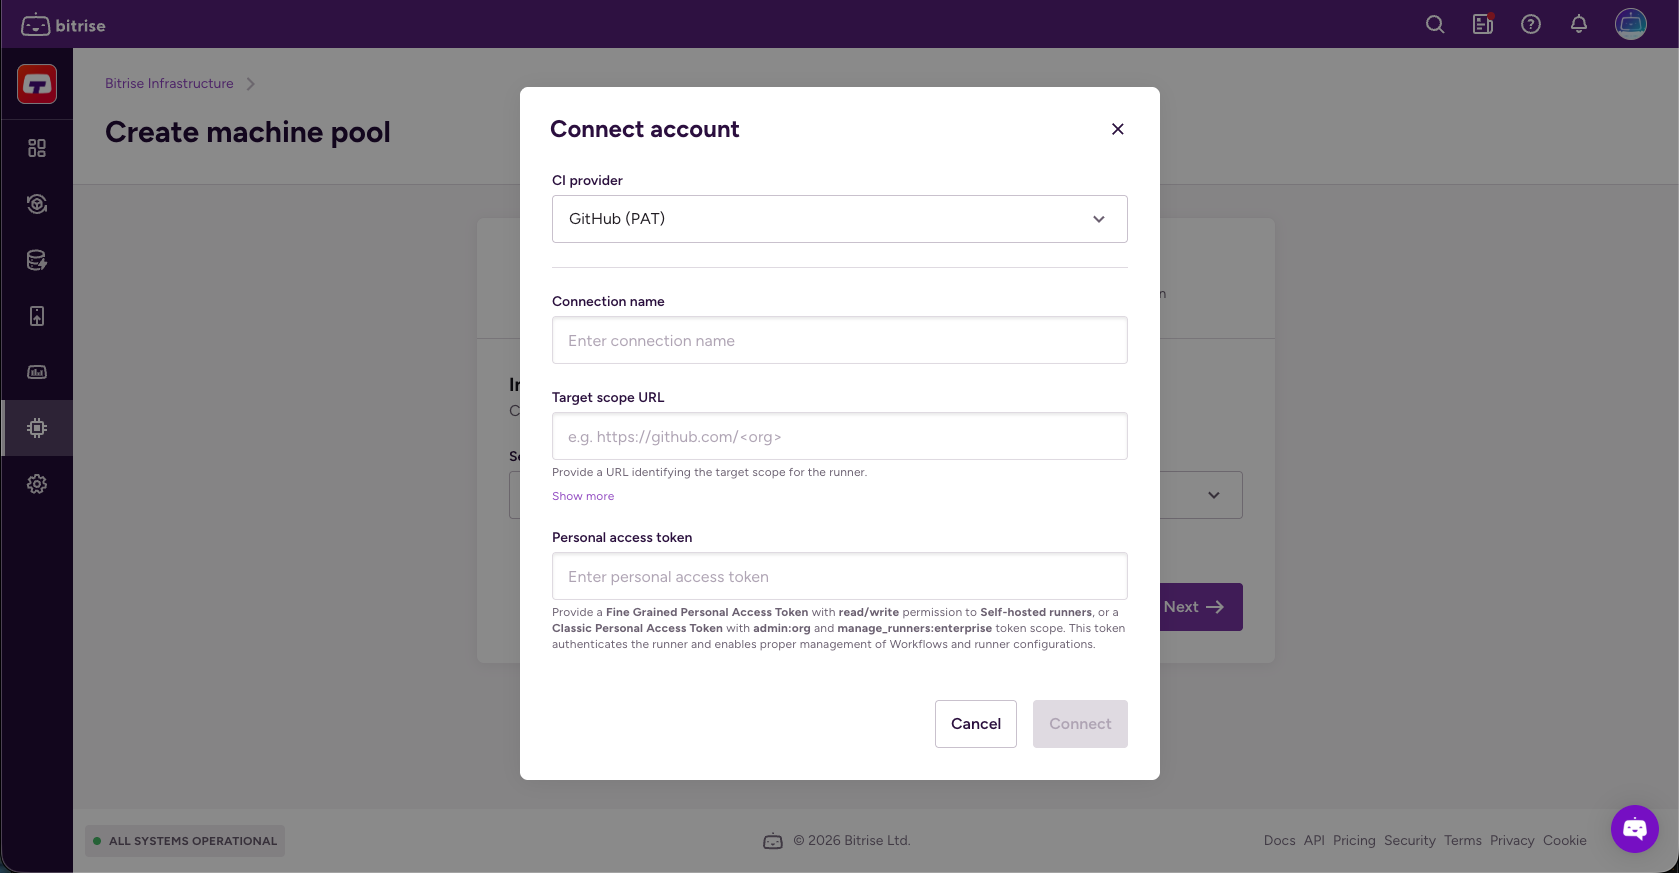
Open the Select account dropdown menu and click Connect account.
-
Select GitHub (GitHub App) and click Continue to install.
-
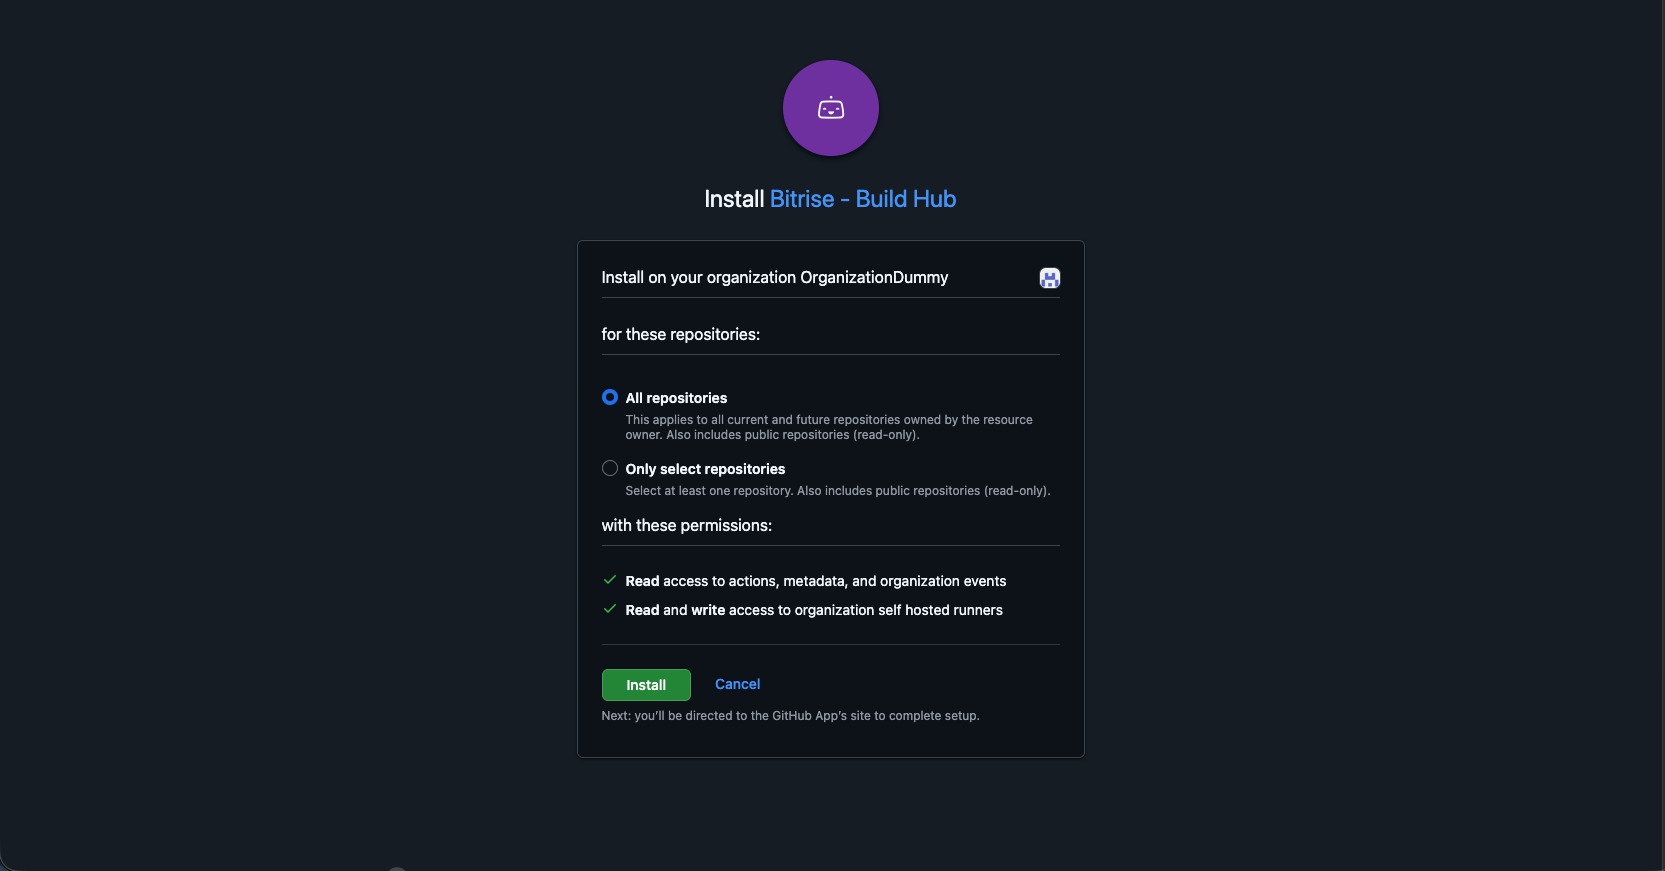
Select the resource owner.
-
Select the repository scope.
- All repositories: Applies to all current and future repositories owned by the resource owner. Also includes public repositories (read-only).
- Only select repositories: Select at least one repository. Also includes public repositories (read-only).
-
Add a runner group and optionally, a runner version.
- The runner version needs to be exact, such as v2.328.0. If you don't specify a runner version, the latest version will be used.
- Runner groups are used to collect sets of runners and create a security boundary around them.
-
Check Use Bitrise for GitHub Actions caching if you want Bitrise infrastructure to handle GitHub Actions cache requests instead of GitHub's cache backend.
This results in faster cache operations.
-
Click Next.
-
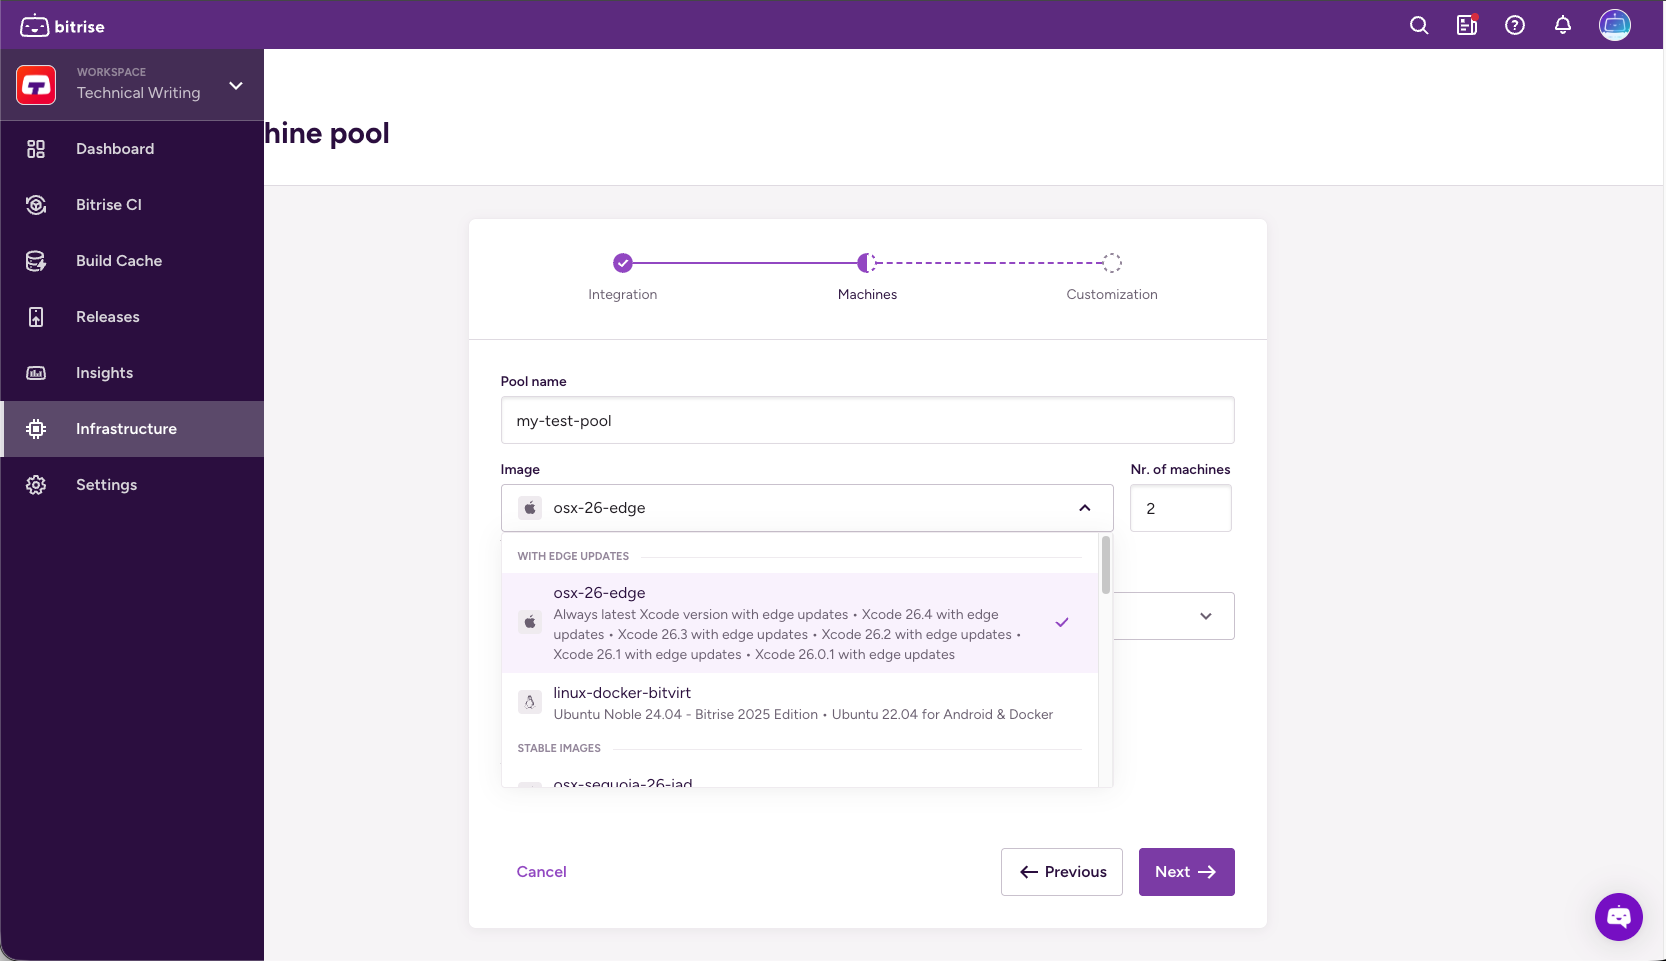
Set a unique name for the pool.
-
Select the image in the Image dropdown menu and the amount of machines you need in the Nr. of machines field.
You can check the images on the stack reports page.
-
Select a machine type.
For more information about Bitrise machines, check out Build machines.
-
Set a rolling update percentage: this is the amount of machines to be rebooted simultaneously after reconfiguration.
-
When done, click Next.
-
Create labels: they allow your GitHub Actions configuration to target your Bitrise runner pool. You must have at least one label.
Labels are a key-value pair but only the key is mandatory. By default, Bitrise suggests labels for the pool name, the image, and the machine type. You can change these at any time.
-
Optionally, add a warmup script to customize your build environment. When done, click Create pool.
Leave it empty if you don’t need a warmup script.
Non-zero exit codeMake sure that it returns a non-zero exit code in case of an error. The script will only fail if your script returns with a non-zero exit code.
-
On the left navigation bar, select Build Hub.
-
Click + Machine pool.
-
Open the Select account dropdown menu and click Connect account.
-
Click Connect account and select GitHub (PAT).
-
Set a connection name and a target scope URL.
Read more about target scopes here: Target scope
-
In the Personal access token field, add your GitHub personal access token then click Connect.
-
Add a runner group and, optionally, a runner version.
- The runner version needs to be exact, such as v2.328.0. If you don't specify a runner version, the latest version will be used.
- Runner groups are used to collect sets of runners and create a security boundary around them.
-
Check Use Bitrise for GitHub Actions caching if you want Bitrise infrastructure to handle GitHub Actions cache requests instead of GitHub's cache backend.
This results in faster cache operations.
-
Click Next.
-
Set a unique name for the pool.
-
Select the image in the Image dropdown menu and the amount of machines you need in the Nr. of machines field.
You can check the images on the stack reports page.
-
Select a machine type.
For more information about Bitrise machines, check out Build machines.
-
Set a rolling update percentage: this is the amount of machines to be rebooted simultaneously after reconfiguration.
-
When done, click Next.
-
Create labels: they allow your GitHub Actions configuration to target your Bitrise runner pool. You must have at least one label.
Labels are a key-value pair but only the key is mandatory. By default, Bitrise suggests labels for the pool name, the image, and the machine type. You can change these at any time.
-
Optionally, add a warmup script to customize your build environment. When done, click Create pool.
Leave it empty if you don’t need a warmup script.
Non-zero exit codeMake sure that it returns a non-zero exit code in case of an error. The script will only fail if your script returns with a non-zero exit code.
Configuring your GitHub Actions workflowClick to copy link
After you successfully create a machine pool, you need to configure your GitHub Actions workflow to use the machine pool when running your builds.
Use the runs-on property in your workflow to specify the Bitrise machines. You can target runners based on the labels assigned to them.
-
Open your GitHub repository and select Actions.
-
On the left, click the name of the Workflow.
-
Under the name of the Workflow, click deploy.yml.
-
Add the
runs-onproperty to the jobs you want to run on Build Hub. You must target the labels you create when creating or updating a machine pool.-
You can use a single label. This will allow the use of all runners that have the specified label:
jobs:build:runs-on: image:xcode-26 -
You can use an array of labels. A runner is only allowed if it has all the specified labels:
jobs:build:runs-on: [bitrise_pool_name:bitrise-runner, image:xcode-26]
-
For more information on the runs-on property, check out the GitHub Actions documentation.
Enabling Linux machines to access toolingClick to copy link
Linux machines require a workaround to access the preinstalled tools on the Linux image when running a GitHub Actions workflow on Build Hub.
When a GitHub Actions workflow uses the container: property to run steps inside a Docker container, the runner changes the environment in ways that break the image's tool setup. This means that the build can't access asdf as the tool manager and therefore preinstalled tools are not accessible.
To solve the problem:
-
Add an
envproperty to your container configuration in the GitHub Actions workflow. Set three Environment Variables to tellasdfwhere its core scripts and plugins, installed versions, and shims are, and to override the image'sBASH_ENV=/.bashrc.container:image: bitriseio/ubuntu-noble-24.04-bitrise-2025-android:latestenv:ASDF_DIR: /root/.asdfASDF_DATA_DIR: /root/.asdfBASH_ENV: /root/.asdf/asdf.sh -
Under the
defaultsproperty, set the default shell tobash.container:image: bitriseio/ubuntu-noble-24.04-bitrise-2025-android:latestenv:ASDF_DIR: /root/.asdfASDF_DATA_DIR: /root/.asdfBASH_ENV: /root/.asdf/asdf.shdefaults:run:shell: bash -
Under the
stepsproperty, add a step that copies the image's default tool versions to whereasdfexpects them.steps:- name: Setup environmentrun: |cp /root/.tool-versions "$HOME/.tool-versions" -
Tell Git to treat all working directories as safe. Without this, some commands might fail because of directory ownership mismatch.
steps:- name: Setup environmentrun: |cp /root/.tool-versions "$HOME/.tool-versions"git config --global --add safe.directory '*'