Jira用Bitriseアプリ
Bitrise for Jira アプリは、Bitrise のビルドおよびパイプラインのステータスを Jira の課題上に直接表示するため、Jira を離れることなくチームが作業状況を確認できます。
Bitrise for Jira アプリは Jira Cloud にのみ対応しており、セルフホスト型の Jira(Jira Data Center や Jira Server)はサポートしていません。
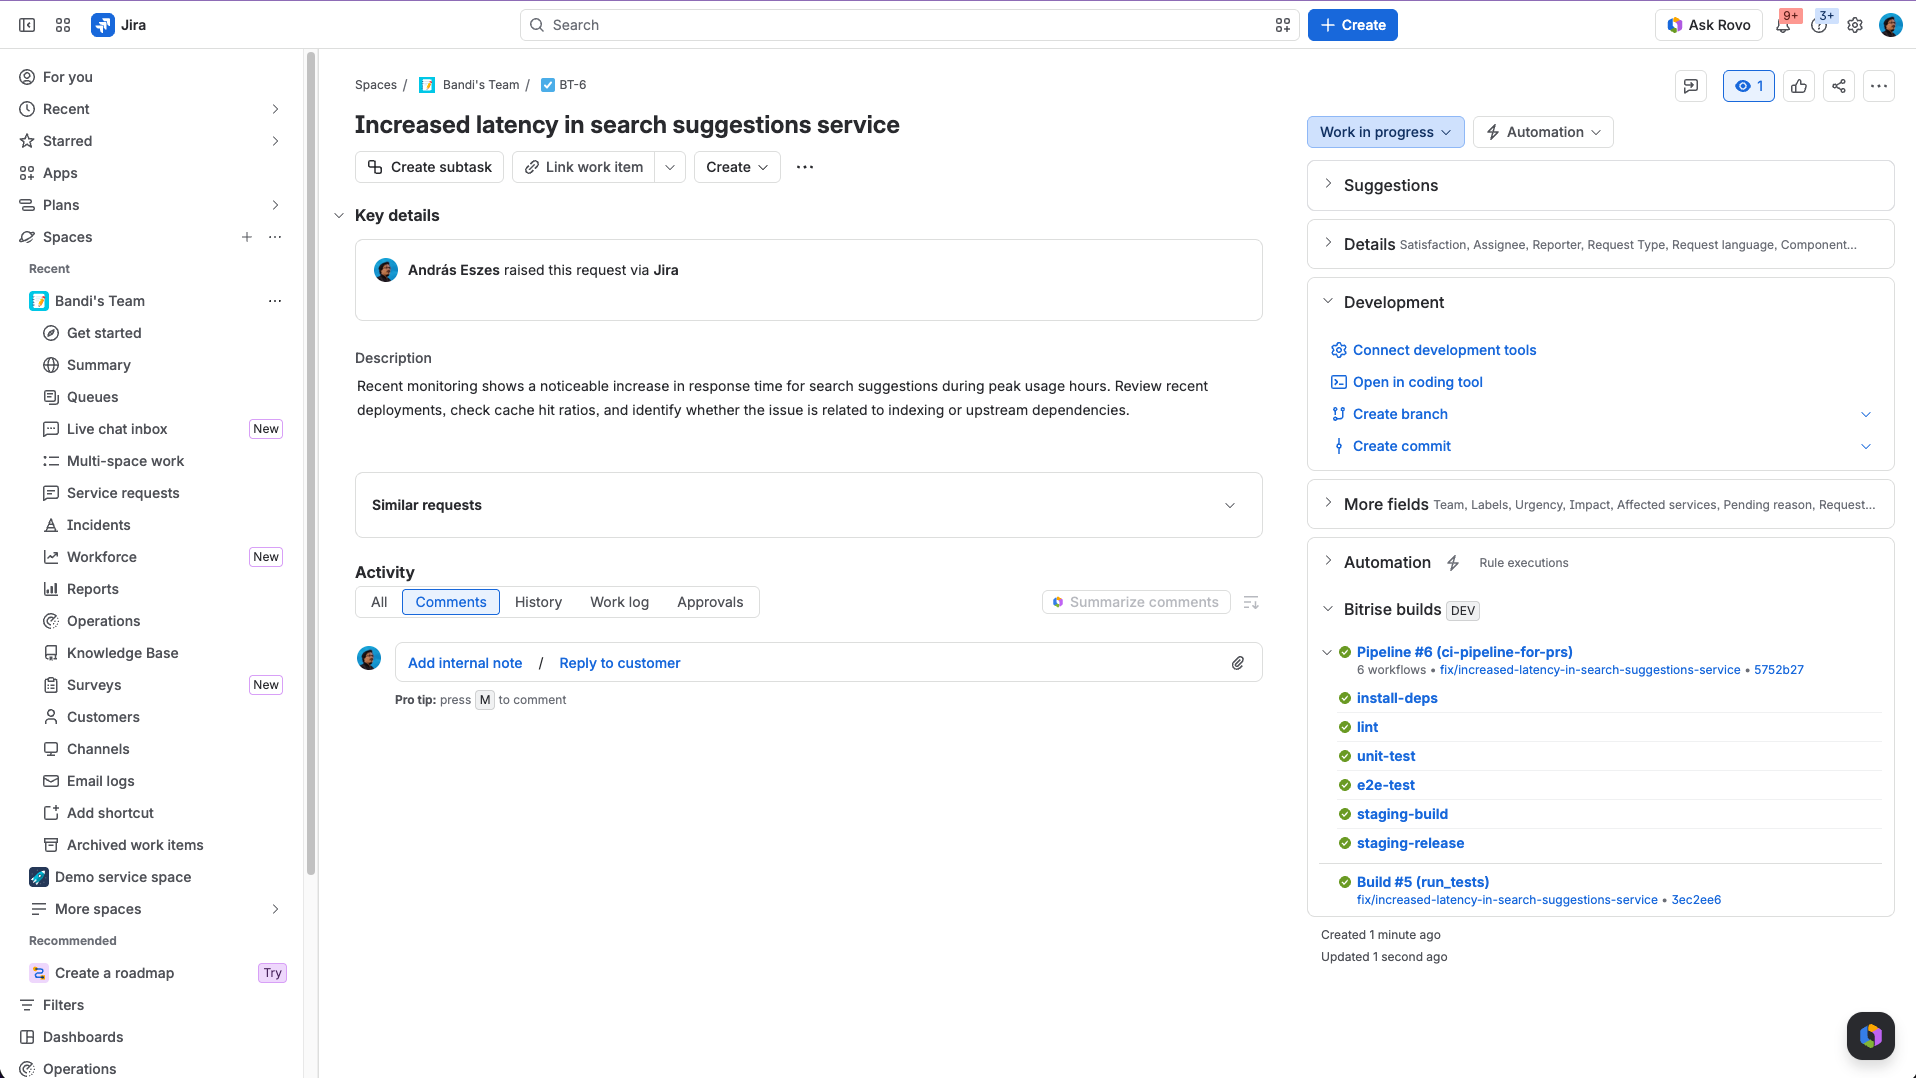
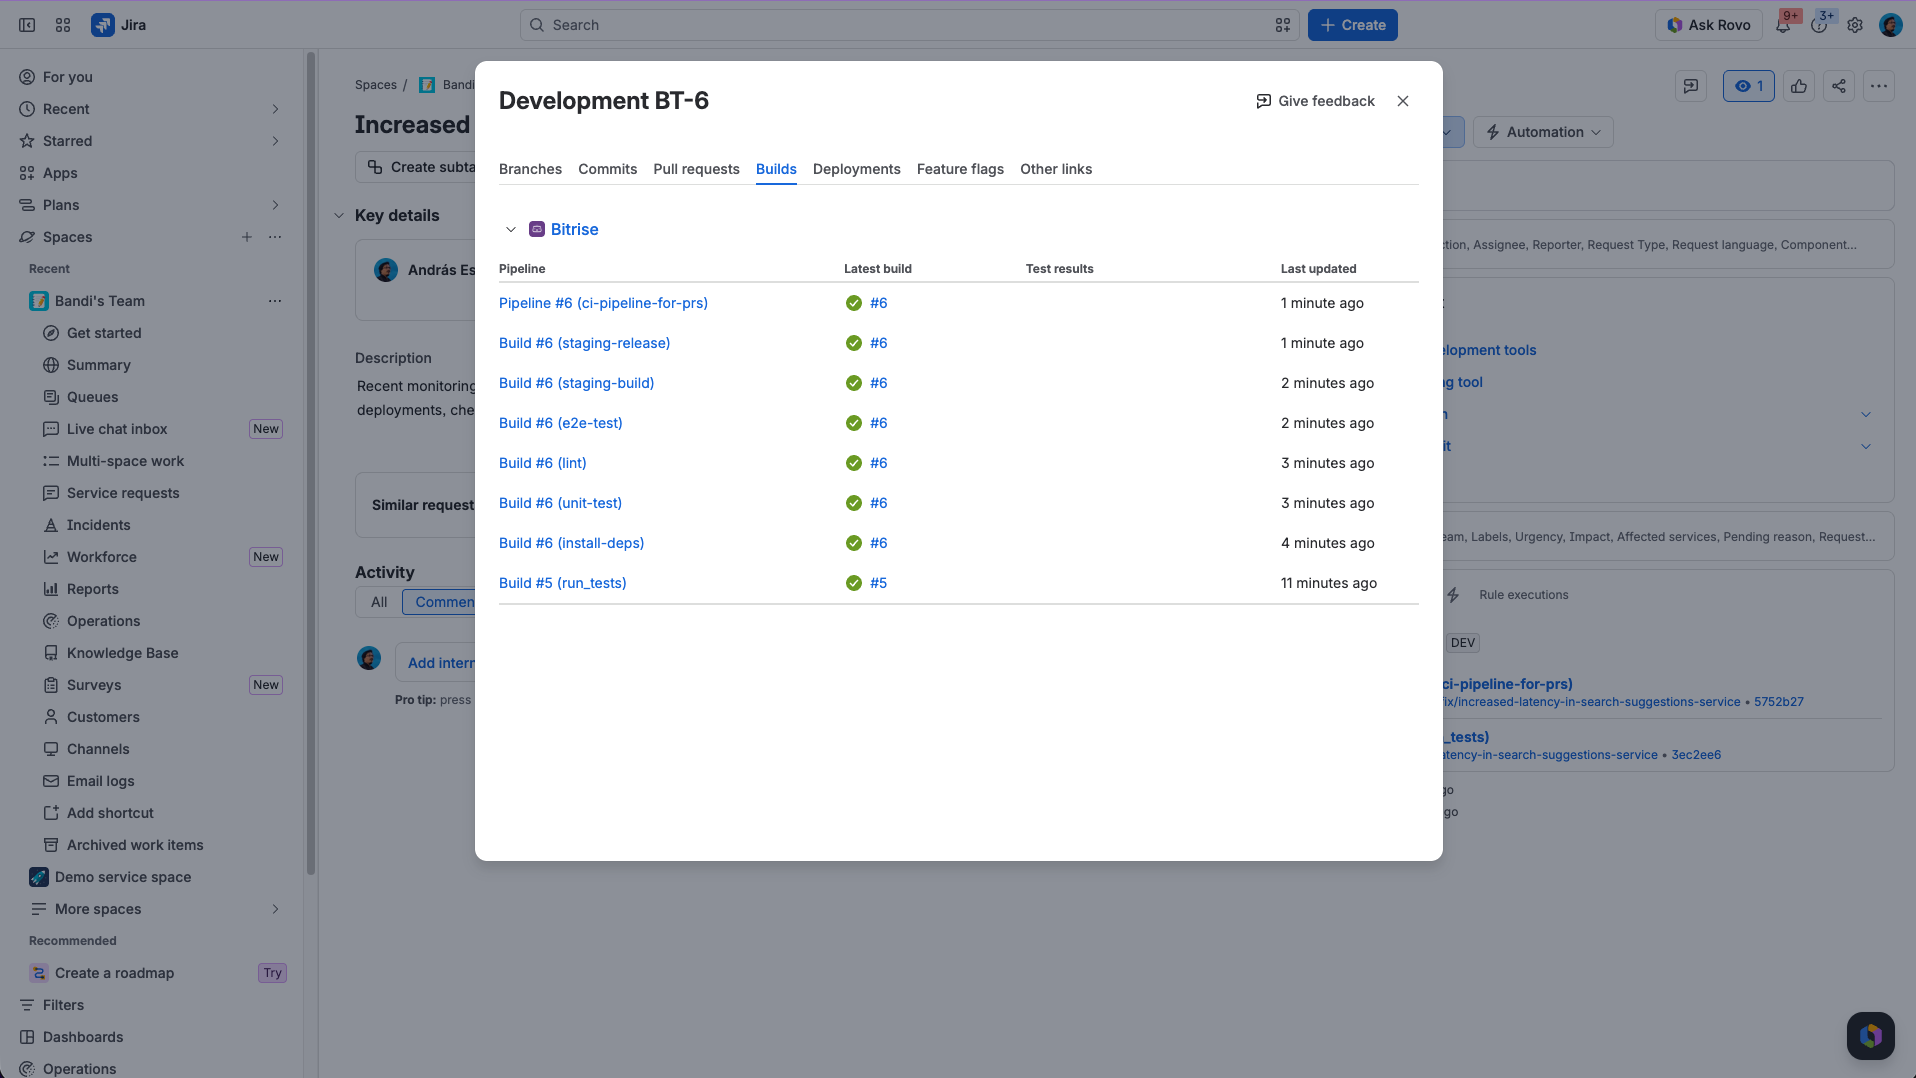
ビルド情報は、Jira の課題内の次の2つの場所に表示されます。
-
専用のBitrise buildセクション。ここからビルドの再実行や中止も行えます。
-
Jira の標準の開発パネルにあるBuildsタブ。
ビルド情報が Jira の課題に表示されるのは、課題キー(例: PROJ-123)が次のいずれかに含まれている場合のみです。
- branch name
- Git タグ
- プルリクエストのタイトル
- pull request description
- コミットメッセージ
アプリのセットアップには2つの側面があります。
- Jira 側: Jira 管理者がアプリをインストールし、接続を完了します。
- Bitrise側: トークンを作成でき、該当するプロジェクトに対して Platform Engineer(または Admin)権限を持つユーザーが、接続するプロジェクトを決定します。この権限レベルが必要な理由については、トークンの作成を参照してください。
このページでは、両方の側の作業を最初から最後まで説明します。各セクションには担当者が明記されています。
セットアップの概要Click to copy link
| タスク | 実施場所 |
|---|---|
| Jira へのアプリのインストール | Jira(Jira 管理者が実施) |
| トークンの作成 | Bitrise(トークンを作成する人が実施) |
| Bitrise projectの接続 | Bitrise、その後 Jira |
| 接続の確認 | Jira(Jira 管理者が実施) |
| Bitrise build セクションを特定の Jira プロジェクトに限定する(任意) | Jira(Jira 管理者が実施) |
Jira でのアプリのインストールClick to copy link
Jira サイトでアプリをインストールおよび設定する権限が必要です。
- Jira でApps > Explore more appsに移動し、Bitrise for Jiraを検索します。
- アプリを選択し、Get it nowをクリックしてインストールします。
Jira 管理者でない場合は、Request to installを使用して、管理者に承認をリクエストできます。
トークンの作成Click to copy link
このアプリは、APIトークン(workspace APIトークンまたは Personal access token のいずれか)を使用してBitriseに対して認証を行います。誰がトークンを作成できるか、どのようなアクセス権が必要かは、トークンの種類によって異なります。
| Workspace API token | Personal access token | |
|---|---|---|
| 所有者 | workspace | 個々のユーザー |
| スコープ | 単一のworkspace。特定のプロジェクトに限定することも可能 | ユーザーがアクセスできる、すべてのworkspacesにわたるすべてのリソース |
| 作成者 | workspaceの所有者、または Manager workspaceロールを持つメンバー | 任意のユーザー(自分のアカウント用) |
| 各接続プロジェクトで必要な権限 | トークンのBitrise CIプロダクトアクセスロールとして Platform Engineer | トークン所有者自身のプロジェクトロールとして Platform Engineer(またはそれ以上) |
| メンバーの離脱後も維持されるか | はい | いいえ — ユーザーがアクセス権を失うと接続が切断されます |
| 推奨用途 | ほとんどのセットアップ | 複数のWorkspaceにまたがるアプリの接続 |
Workspace APIトークンを使用してください。個人ではなくWorkspaceに紐づいており、アプリに接続したいBitrise projectだけにスコープを限定でき、チームメンバーが離脱しても接続が切れません。複数のWorkspaceにまたがるプロジェクトを接続する必要がある場合にのみ、Personal access token を選択してください。
接続された各プロジェクトで、このアプリはアウトゴーイングウェブフックを登録し(change_settings権限が必要)、ビルドの再実行や中止を行います(run_buildsが必要)。Platform Engineer は、この両方をカバーする最低限のBitrise CIロールです。Admin や Owner でも問題ありませんが、Developer や Tester/QA では権限が不足しています。
- Personal access token の場合、これはトークン所有者自身のプロジェクトにおけるロールです。
- Workspace APIトークンの場合、これはトークンに設定するBitrise CIプロダクトアクセスロールです。Workspaceロール(Viewer、Contributor、Manager)は別物で、トークンを管理できる人を制御するだけであり、接続されたプロジェクトでアプリが実行できる操作には関係しません。
- Workspace API token
- Personal access token
-
BitriseにLog inし、左側のナビゲーションバーにカーソルを合わせます。
-
Workspaceメニューで、正しいworkspaceが選択されていることを確認します。
-
Settingsを選択します。
-
左側でSecurityを選択します。
-
Create tokenをクリックし、次の設定でWorkspace APIトークンの作成の手順に従います:
- Workspace roleをManagerに設定します(これはトークンを管理できる人を制御するものであり、アプリが実行できる操作を制御するものではありません)。
- Configure access to productsでBitrise CIを有効にし、ロールをPlatform Engineerに設定します。これが、接続されたプロジェクトでアプリが実際に使用するアクセス権です。
- トークンをすべてのプロジェクトに適用するか、選択したプロジェクトのみに適用するかを選択します。
- Personal access token の作成。
- 接続したいすべてのプロジェクトで、自分のアカウントが少なくとも Platform Engineer ロールを持っていることを確認します。
トークンの値を確認できるのは、作成した瞬間のみです。Save tokenの手順を離れる前に、値をコピーして安全な場所に保管してください。
トークンを無期限に設定することもできます。有効期限を設定した場合、トークンの有効期限が切れると Jira との接続が機能しなくなります。詳細は接続の維持を参照してください。
Bitrise projectの接続Click to copy link
Bitrise projectを Jira に接続するには、APIトークンと、接続したいプロジェクトの一覧が必要です。接続は Jira 側で完了するため、その部分は Jira 管理者が実施する必要があります。
- Bitriseで: Jira に更新を送信するBitrise projectを決めます。特定のプロジェクトの一覧を作成するか、すべてを接続することにします。
- APIトークンとプロジェクトの一覧を、パスワードマネージャーやシークレット管理ツールなどの安全な経路で Jira 管理者に共有します。プレーンなメールやチャットでは共有しないでください。
- Jira で: Apps > Manage your apps > Bitrise for Jira に移動し、設定ページを開きます。
- Bitrise API token で、受け取ったトークンを貼り付け、Save をクリックします。
- Connected Bitrise project で、共有されたプロジェクトを選択し、Save をクリックします。
接続した各プロジェクトに対して、Bitriseでアウトゴーイング Webhook が自動的に作成されます。Webhook を手動で設定する必要はありません。
接続の確認Click to copy link
接続の確認は、Jira 管理者と一緒に行えます。
- 接続されたBitrise projectにおける作業のbranch name、Git タグ、プルリクエストのタイトル、pull request description、またはコミットメッセージにキーが含まれている Jira の課題を開きます。
- その課題のBitrise buildセクションと、開発パネルのBuildsタブにBitriseのビルドステータスが表示されることを確認します。
何も表示されない場合は、トラブルシューティングを参照してください。
Bitrise buildセクションを特定の Jira プロジェクトに限定するClick to copy link
デフォルトでは、Bitrise build セクションは、サイト上のすべての Jira プロジェクトの課題に表示されます。Jira プロジェクトの一部のみがBitriseを使用している場合は、それらのプロジェクトにセクションを限定できます。これは、Jira 管理者がアプリの設定ページで行います。
プロジェクトピッカーには新しい権限が必要なため、Jira はこれをアプリのメジャーアップデートとして扱います。既存のインストールでは、Jira 管理者が更新を承認すると、Connected Jira projects 設定が利用できるようになります。それまでは、セクションはすべてのプロジェクトで表示され続けます。
- Jira で、Apps > Manage your apps > Bitrise for Jira に移動し、設定ページを開きます。
- Connected Jira projects で、名前またはキーで Jira プロジェクトを検索し、セクションを表示するプロジェクトを選択します。
- Save panel visibility をクリックします。
これで、Bitrise build セクションはselected projectsの課題にのみ表示されます。再びすべてのプロジェクトに表示するには、selected projectsをすべて削除して保存します。
ピッカーには、閲覧可能な Jira プロジェクトのみが一覧表示されます。この設定が制御するのは Bitrise build セクションのみです。Jira の開発パネルの Builds タブは変更されません。また、どのBitrise projectが Jira にビルドの更新を送信するかを制御する Connected Bitrise project とは別の設定です。
接続の維持Click to copy link
- Tokenの有効期限切れまたは変更: APIトークンの有効期限が切れた場合、再生成された場合、または置き換えられた場合、接続は機能しなくなります。アプリの設定ページでトークンを更新し、接続済みのプロジェクトを再確認してください。
- New Bitrise project: Bitriseで Jira に表示したい新しいプロジェクトを追加した場合は、アプリの設定ページに戻り、Connected Bitrise project の下に追加してください。
トラブルシューティングClick to copy link
- 課題にbuild statusが表示されない: 課題キーがbranch name、Git タグ、プルリクエストのタイトル、pull request description、またはコミットメッセージに含まれていることを確認してください。次に、トークンがまだ有効であること、および該当するプロジェクトが Connected Bitrise project で選択されていることを確認してください。
- 1 つの Jira プロジェクトの課題でBitrise buildセクションが表示されない: Jira 管理者がセクションを特定のプロジェクトに限定している可能性があります。アプリの設定ページで Connected Jira projects を確認し、プロジェクトを追加するか、選択を解除してすべての場所に表示してください。Bitrise buildセクションを特定の Jira プロジェクトに限定するを参照してください。
- プロジェクトが一覧に表示されない: トークンがそのプロジェクトにアクセスできません。トークン(Personal access token の場合は、その所有者のプロジェクトロール)にそのプロジェクトが含まれていることを確認するか、トークンを作成した人に更新を依頼してください。
- 以前は表示されていたBuild statusが表示されなくなる: 通常の原因は、接続済みプロジェクトのアウトゴーイング Webhook で、誰かが Attach Bitrise OIDC token のチェックを外したことです(Bitrise)。アプリの Jira 設定ページの Activity セクションで、拒否された配信がないか確認してください。