Migrating from Jenkins to Bitrise
If you have been looking to switch from Jenkins to Bitrise to speed up your mobile CI/CD flow and ease dedicated manpower, look no further. This guide introduces the most important Bitrise features and how you can quickly settle into Bitrise from your Jenkins world.
Why bother migrating?Click to copy link
Jenkins is a self-hosted CI server where you have to manually install and maintain most of the functionalities before you could run any build. It also requires dedicated engineering resources for regular maintenance. When you switch to Bitrise, you get to experience the comfort of using a cloud-based, mobile first CI/CD platform which offers out-of-the box functionalities for all your mobile development needs on one platform. This means there is:
- No need to download anything.
- No need for any on-premise servers or plugins.
- No need to worry about infrastructure, tools and virtualization.
Bitrise takes care of all of the above. We have a vast array of automatized Steps, API, CLI, and up-to-date Stacks with a highly intuitive GUI, called Workflow Editor, all available at your fingertips.
Learn more about our security measures on our Security page which includes details on product, data, application, network, physical and business security.
Check out the world of automated mobile development with Bitrise!
- Discover how payments giant PagSeguro optimized mobile CI by moving from Jenkins to Bitrise: Read the case study.
- Looking for a feature-by-feature breakdown of Bitrise vs Jenkins? Check out our comparison page.
Quick start guideClick to copy link
This Quick Start Guide helps you start your first build on Bitrise with minimum config.
- Sign up for Bitrise if you don’t have an account yet.
- Connect a repo and run an automatically configured standard Workflow on any project.
- Once you’ve looked through the generated YML, make the changes you need: if you’re opting for a custom code, pop it into our Script Step, and run your first build. Or find the Steps in our Step Library to replicate your Jenkinsfile’s behaviors. You can also run builds locally on your computer by installing our Bitrise CLI, Bitrise's open source runner.
- After getting to your new Workflow’s first green build, set up other jobs by configuring automatic triggers or scheduled builds.
- Optimize your Workflows with key-based caching for faster, safer, and more reproducible builds.
- Need help? Contact us.
If you are interested in the main Jenkins-Bitrise differences and how Bitrise enhance your mobile development process, then continue with the guide below.
Managing builds on Jenkins and on BitriseClick to copy link
A build on Bitrise is the process specified by the app’s Workflow. It is a series of Steps, defined in a Workflow, executed by the Bitrise CLI on a clean virtual machine or locally on your machine. You can check your app’s builds on the Bitrise Dashboard or you can analyze your build logs on your app’s own Builds page.
Triggering builds on Jenkins and BitriseClick to copy link
In this section we describe how you can trigger builds on Bitrise:
- The Build Now function on Jenkins corresponds with starting a build manually: click the button on your builds page and either simply start a new build or tinker away with the Advanced configuration options.
- The Build periodically function of Jenkins is the Scheduling builds function on Bitrise. A big advantage of Bitrise is that you don’t have to set up a
cronjob, like you would on Jenkins, to schedule a specific time. Instead, you can use a visual scheduler to pick the days and time, or enter acronexpression directly if you prefer. - For any Git related events, such as code push, pull requests, and Git tags, you can configure triggers that automatically start a build on Bitrise.
- The Build after other projects function of Jenkins is equivalent to the chaining Workflows together on Bitrise where the Workflows run in succession. It’s surprisingly easy to chain Workflows together on Bitrise.
- You can trigger builds by any other remote system: use Webhooks overview. We’re integrated with GitHub, Gitlab, Bitbucket, Gogs, Slack, Visual Studio, Assembla, and Deveo.
- You can also push back build status reports to your Git provider (GitHub/GitLab/Bitbucket).
Environment Variables and Secrets on BitriseClick to copy link
Environment Variables (a key and value pair) can be defined on app, Workflow and Steps level.
You can do lots of interesting things with Env Vars:
- Expose them and reuse them in another Step.
- Copy an Env Var to another key.
- Overwrite an Env Var.
- Parameterize a build by adding custom Env Vars to a build.
- Set up Workflow-specific Env Vars on the Env Vars tab to run Workflows with Env Vars that are only available for that particular Workflow.
Secrets are a type of Environment Variables but special ones. They hide sensitive information in an encrypted format so that your private input is not exposed in the build logs or in the bitrise.yml. Secret Environment Variables, or Secrets in short, can be set by adding a key and the variable in the Secrets tab of the Workflow Editor. This is again a built-in feature of Bitrise which ensures the following:
- Your secrets are not shown in the
bitrise.yml. - Your secrets are stored encrypted.
- You can prevent exposing secrets on the UI by making them protected.
- Note that anyone might be able to do a workaround and log the value of secrets with a pull request, thus we advise NOT to expose secrets in PRs.
Build cachingClick to copy link
Every build on Bitrise runs on a clean virtual machine but it does not mean you have to do everything from scratch - you can cache contents of important files and preserve them between builds.
Jenkins plugins and Bitrise StepsClick to copy link
A Step is a pre-defined task in Bitrise just like the Jenkins Steps, however, a Bitrise Step can be easily configured on our intuitive UI or you can even pull in your own Step from your repository. You can configure the inputs and parameters that define a Step task, and view/reuse the outputs a Step generates. Reusing the output means that another Step in the same Workflow can use it as the value of one of its inputs.
As being a continuous integration tool itself, Jenkins integrates with other services with the help of plugins. Jenkins users have to manage plugins in a centralized place, called Manage plugins, install them globally (on their Jenkins server), then use them in their specific projects. If Jenkins notifies of a newer plugin version, Jenkins admins have to doublecheck with their teams if they’re running any builds since updating a plugin requires the server to restart. With Jenkins plugins, reverting to an older version is not possible, since only the latest version is available. In Bitrise, however, you do not have to install any Steps first, because you can add or remove any Step in your Bitrise Workflow at any time as you wish and it won’t block any running builds of the project. You can always revert back to a previous Step version too if that’s what you need.
What’s more: When editing your Workflow in the Workflow Editor, you can easily search for a Step based on functionality or platform you are looking for in the Step Library and add it to your Workflow straightaway - there is no need to install them prior to setting up your Workflow.
You can create your own custom Step too and store in a repository, then you can reference it by a URL in your Workflow.
Do you have a custom script you’d like to run in your Workflow? Select the Script Step from the Step Library and add your custom code to the Script content input.
Discover our Steps on our Integrations page or right when editing your Workflow.
Learn what else you can do with Steps:
- Adding Steps to a Workflow.
- Step versions.
- Enabling or disabling a Step conditionally.
- Developing your own Bitrise Step.
You can easily put your fastlane lanes to work on Bitrise too. All you have to do is add a Bitrise’s Fastlane Step to your Workflow and add your lane name into the Step. Start a build and your lane will run on Bitrise.
Jenkins Pipeline - Bitrise WorkflowClick to copy link
A Jenkins Pipeline is equivalent to a Bitrise Workflow, but the Bitrise Workflows are much easier to manage: you can quickly create new Workflows based on existing ones, chain multiple Workflows together in a single build, or delete Workflows that you no longer need.
A Bitrise Workflow is a series of Steps, such as test, code sign, build APK/ ipa and deploy. When you add an project to Bitrise, a primary Workflow, created based on the project scanner’s findings, gets kicked off/triggered automatically.
You can have several Workflows for a certain project. For example:
- For any PR events, create a Workflow that, once triggered, runs quickly and only executes basic tests such as smoke tests.
- For a meatier Workflow, that runs all your test, we recommend creating another Workflow and run it overnight or schedule it on 6/12/24 hour interval.
The Workflow Editor is the main place for configuring your Workflow. Jenkins Stages are equal to multiple Bitrise Workflows chained together inside a main Workflow. On Bitrise the Workflow Editor helps you to chain Workflows like one would chain toy trains after each other.
The Workflow Editor has other powerful features built in to assist you with mobile development:
- Code signing: Upload certificates, provisioning profiles, and keystores into Bitrise and and use our iOS and Android signing Steps to do all the code signing automatically for you before releasing an app to an app store.
- Secrets: check out your project's secret Environment Variables or add new ones.
- Environment Variables: there is no confusion of secrets and Env Vars in Bitrise. They are neatly organized into separate tabs so that you know where’s what. Add project Env Vars or Workflow specific Env Vars here. You can also reference Secrets as Env Vars with $.
- Triggers: You can configure triggers: code push events, pull requests, or tags can all be set up to automatically start builds on Bitrise.
- Stack: Check out the default stack of your project, select a new one from a dropdown menu or select a specific stack for one of your Workflows.
Dashboards in Jenkins and BitriseClick to copy link
This is the main landing page where you find yourself when logging into Bitrise. From here you can navigate to your projects, your CI builds, Bitrise Build Cache and Release Management.
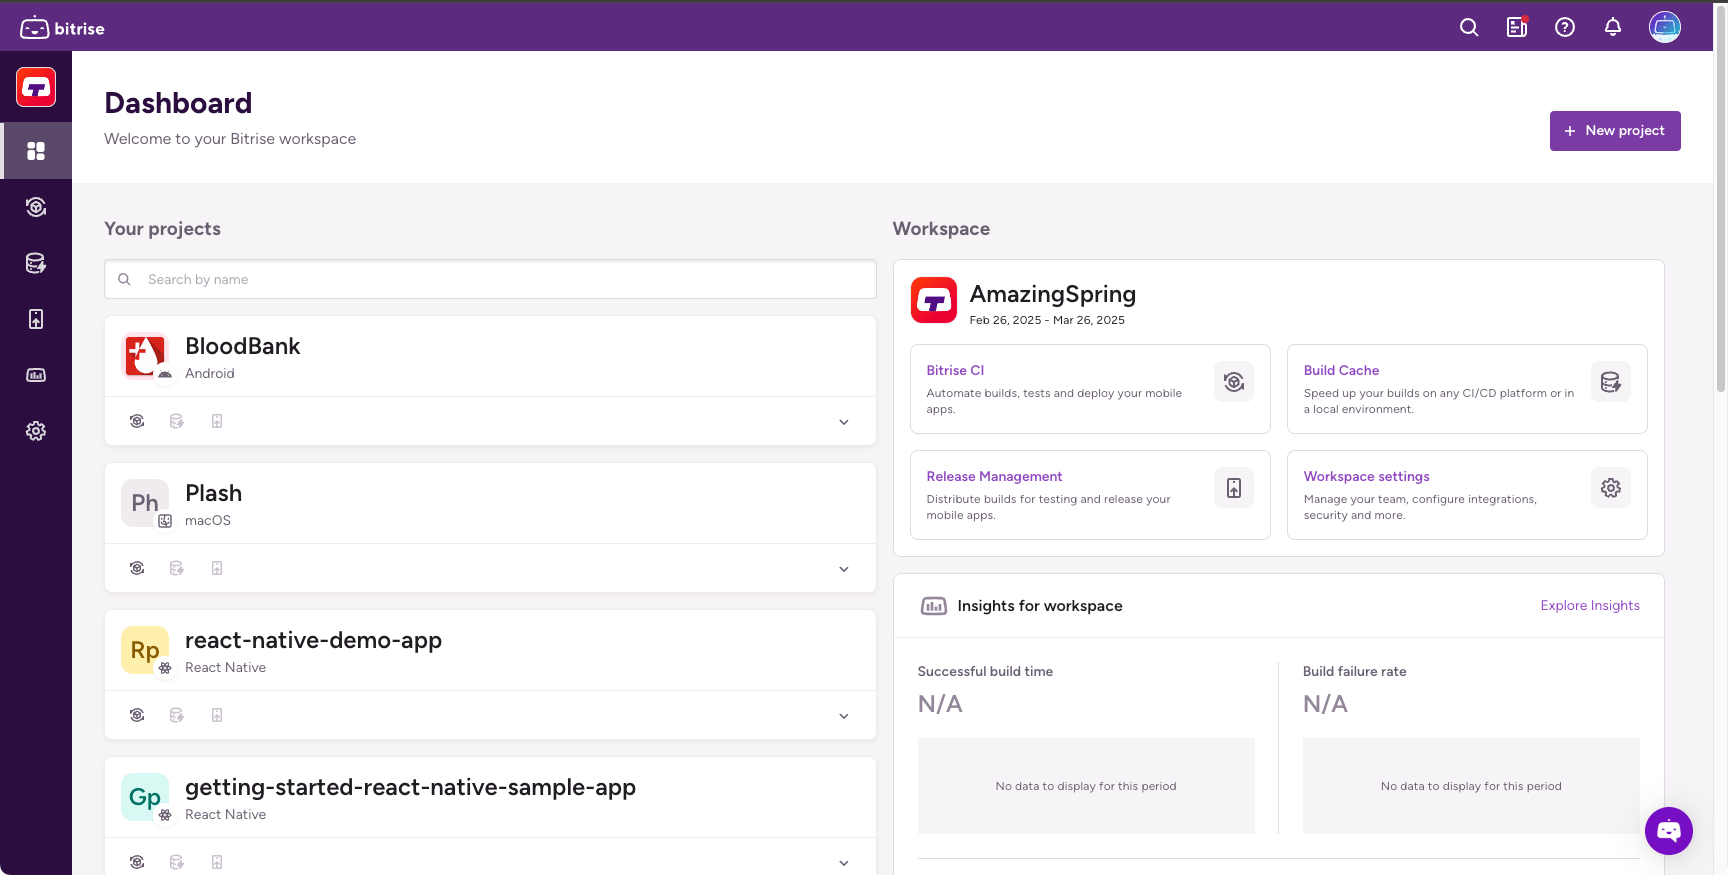
On Jenkins, build statuses are listed in the Build Executor Status or on the Blue Ocean Dashboard. When using Bitrise you get a user-friendly graphical interface right from the start, whereas, with Jenkins, you have to install the plugin first. Bitrise build statuses are shown on both the Dashboard, and on the Builds page of your app.
Adding a new app to BitriseClick to copy link
What New item means in Jenkins is the adding a new project flow on Bitrise, either on the web UI or from the CLI. This is a highly automated flow where minimal configuration is needed from you and literally within a minute your new build starts. Our flow takes you through all the important phases: setting privacy, connecting your repository, setting up repository access, choosing a branch, configuring your project, setting up your build configuration and configuring webhooks.
Webhooks on BitriseClick to copy link
Bitrise makes extensive use of webhooks, which you can enable with a simple click when connecting a project to Bitrise. It all makes sense to add the webhook during the initial setup and not having to search for this functionality when you try to quickly get your project to speed.
In short, there are two types of Webhooks:
- Incoming webhooks, registered with your Git service provider, are used to automatically trigger builds on Bitrise.
- Outgoing webhooks are used to send reports of build events to other services, such as Slack. They can be added either on the website or via the API overview.
Jenkinsfile - Bitrise YAMLClick to copy link
A Jenkins Pipeline uses groovy code, while Bitrise uses the more highly structured YAML format. All Workflows are defined in the bitrise.yml file in YAML format, which you can edit by clicking the bitrise.yml tab of the Workflow Editor.
You can store the bitrise.yml file of your app either on bitrise.io or in your repository. Don’t worry, your secrets (for example, credentials and IDs) are safe with us.
You can also download the current bitrise.yml configuration of your app with bitrise yml get, and run it locally with the Bitrise CLI. See Working with bitrise.yml via the Bitrise CLI.
Jenkinsfile - Bitrise yml file comparisonClick to copy link
If you have been using a Jenkinsfile (Pipeline project) in Jenkins and and considering to switch to Bitrise, you can easily match Jenkinsfile stages with Bitrise Steps. If you have been using the old-school Freestyle project, then you have to map your configuration’s settings with a matching Bitrise Step or a Bitrise function. For example, match the Build section of your Freestyle project with a Bitrise build Step, such as the Android Build Step, or map the Build Trigger section of Jenkins with the Triggers function of Bitrise. Make sure you check out our Step Library for more inspiration.
Check out our blogpost on how to migrate your Android project from Jenkins to Bitrise.
Master and agent on Jenkins - Bitrise stackClick to copy link
A stack is the type of virtual machine we use to run your build. For example, for a native iOS app, the best stack is one of our Xcode stacks. Stacks come with all of the necessary tools pre-installed, and are regularly updated to make sure they will serve all of your needs. This way you don’t have to bother with maintaining master and agent instances or adding a node machine to your groovy code to run a build on a certain platform.
When you add your app to Bitrise, our project selector automatically detects the type of your project and based on its platform type, adds a default stack to it. Your first build will run on this stack, which is a virtual machine with all the required tools pre-installed on it. Should you wish to use another stack, you can simply select it from the Default Stack dropdown menu on the Stacks & Machines tab. If you click the More information link, you can see the preinstalled tools with their versions.
We support the latest Xcode version shortly after its official release.
In our system reports you can check the installed tools and their versions on each stack.
Learn more about our macOS stack update policy.
If you are interested in how to have a Bitrise-managed infrastructure on your AWS environment, check out our guides. You can also run Bitrise on your self-hosted infrastructure if you follow this guide.
Managing teams and roles in Jenkins and BitriseClick to copy link
A Bitrise user is an individual with a Bitrise account and belongs to one or more workspace/s. A workspace is a group of users who collaborate on projects. You can create multiple workspaces and a contributor can be invited to multiple workspaces by other Bitrise contributors. A contributor must be assigned to a project to be able to work on it.
Learn how you can add contributors to a project on the web UI either by adding existing workspace members or inviting outside contributors.
Contributors can have different roles in workspaces that determine what they can do and cannot do:
- When it comes to Bitrise CI, we differentiate Owner, Admin, Platform Engineer, Developer, Testers/QA roles
- When it comes to Release Management, we differentiate workspace-level roles (Workspace Owner, Workspace Manager, Contributor and Viewer) and Release-level roles (Release Manager and App tester). Check out roles and permission tables on Release management apps and build distribution and releases.
You need a workspace to have a paid subscription plan on Bitrise. Each of your workspaces can have a different subscription plan which determines how many credits your workspace's projects can use.
You can use SAML SSO or SCIM to securely onboard or offboard an enterprise to your workspace.
Integrated SSO management on BitriseClick to copy link
While in Jenkins you have to install an authorization plugin for SSO management, in Bitrise it comes as an integral part of our paid plans. Workspace with such plans can set up SAML SSO as their single gateway to their Workspace on Bitrise. No more remembering usernames and credentials! All the Workspace owner has to do is set up Bitrise as a SAML SSO app on the SAML SSO provider and invite Workspace members to the Bitrise Org. We have specific guides to the different SAML SSO providers to guide you through the steps.