Storing an app's configuration YAML
Please note that the total, combined size of the bitrise.yml and the bitrise.secrets.yml file cannot exceed 400KB.
There are two ways to store the configuration YAML file of your project:
- Keep the file in your Git repository: with this solution, you have full control over maintaining and versioning the file.
- Keep it on bitrise.io: Bitrise will store your configuration, and you can access it any time on the website. With this solution, the configuration file is fully independent from your repository.
You can switch between the two solutions at any time.
For full configuration YAML syntax reference, see Configuration YAML reference.
Storing the bitrise.yml file in your repositoryClick to copy link
When you store your configuration YAML file(s) in your repository, the build process on Bitrise will use that file to run your builds. This means that:
- You have full control over versioning your configuration file.
- Every time you make a change to your Workflows/Pipelines or your triggers, the changes need to be committed to the file in the repository. The Workflow Editor can do this for you directly, or you can commit the file manually.
You don’t need to create your own configuration YAML file in advance: you can use the file stored on bitrise.io.
The feature requires service credential integration or the GitHub App integration. Hosting the YA file in a privately hosted repository where neither is available needs a workaround.
To store the configuration file in your repository, you need to manually commit it the first time. On subsequent changes, you can use the Workflow Editor to commit the file directly to your repository if you use GitHub or GitLab. If you use Bitbucket Cloud, you will need to commit the file manually every time.
-
Open the project on Bitrise and go to the Project settings page.
-
Select Collaboration.
-
Check the Service credential user section. The service credential user must be a Bitrise user who has at least
readaccess to the repository.GitHub App integrationIf you use the GitHub App integration, you don't need the service credential user to store the configuration YAML file in your repository.
-
Open the Workflow Editor.
-
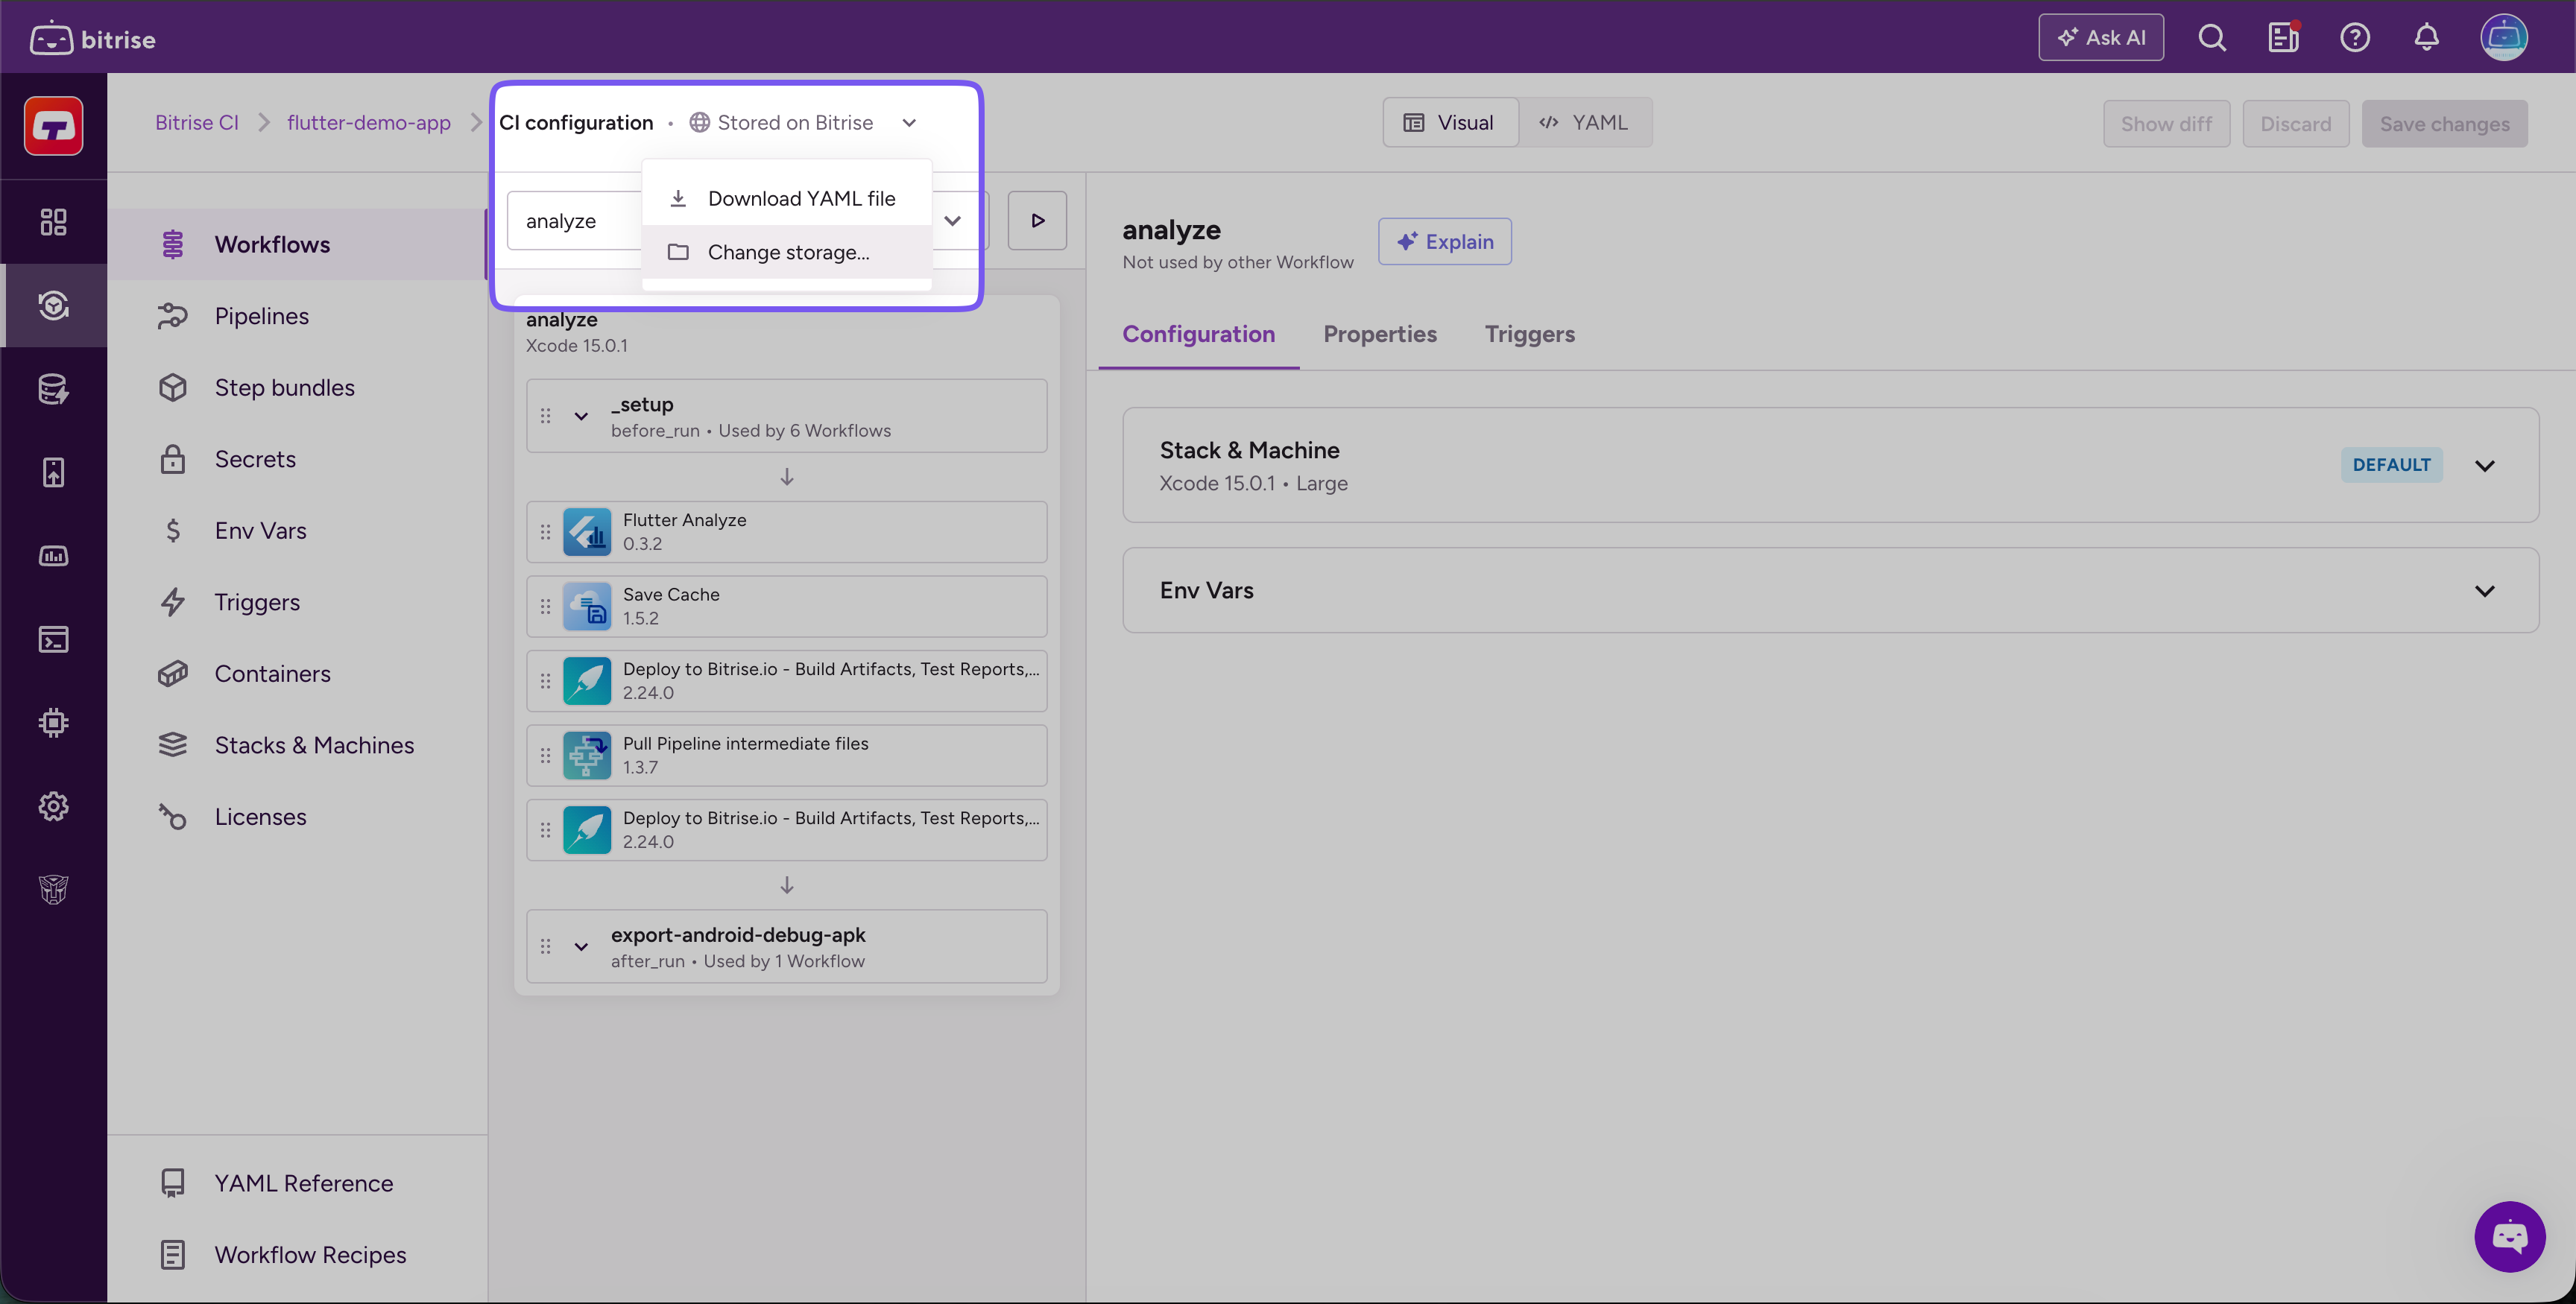
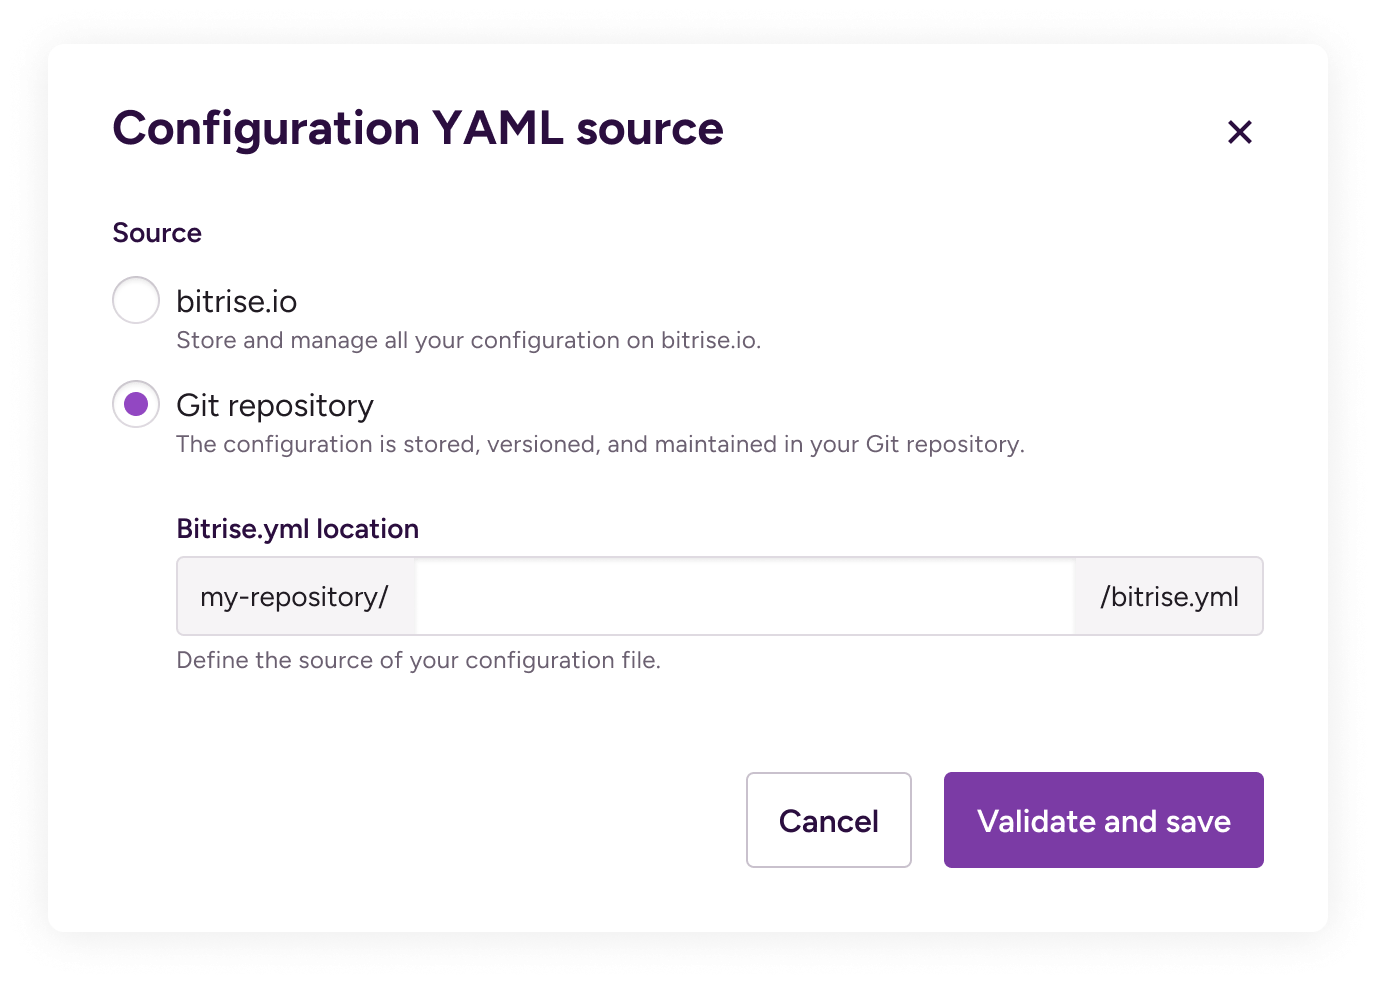
Click the chevron next to Stored on Bitrise (or the branch name) in the header and select Change storage....
-
When prompted to add the
bitrise.ymlto your project's repository, you have two options:- Copy the content of the current
bitrise.ymlfile to the clipboard. You can then create your own file and copy the contents into it. - Download the current
bitrise.ymlfile.
- Copy the content of the current
-
In your repository, commit the
bitrise.ymlfile.You can either:
- Commit the file to the root of the repository.
- Commit the file to some other location. In this case you will need to provide the path on Bitrise.
Default branchThe default branch of your app must always have a
bitrise.ymlfile on it. You can store differentbitrise.ymlfiles on other branches and load any of them in the Workflow Editor: Storing a bitrise.yml file on multiple branches in the repository.You can check your Bitrise project's default branch on bitrise.io by going to the Settings tab and finding the DEFAULT BRANCH option.
-
Back on Bitrise, set a path to your configuration file in the Bitrise.yml location field:
- If you store the config file in the root of your repository, leave the field empty.
- If you store the file somewhere else in the repository, provide the path.
-
Click Validate and save.
ValidationThe
bitrise.ymlfile in your repository always must be valid! If it contains incorrect syntax, it can break your builds.
If all goes well, you should receive confirmation of successfully changing your bitrise.yml storage settings.
If you use some form of self-hosted solution for storing your code, you might need to allowlist the static IP addresses of the Bitrise website and its background workers. This allows you to use such features as storing the <GlossTerm baseform="bitrise.yml">bitrise.yml</GlossTerm> file in your own repository, or receiving build status updates from Bitrise: IP addresses for the Bitrise website.
Privately hosted repositoriesClick to copy link
Unfortunately, this feature is not yet supported for users who can't use the service credential user integration or the GitHub App integration; for example, if the repository is is only accessible under a private IP subnet. There's a workaround, however: Storing the bitrise.yml in a privately hosted repository.
For GitHub Enterprise, we offer an integration that allows you to store your bitrise.yml file in a GitHub Enterprise repository: Integrating GitHub Enterprise with Bitrise.
Setting a custom path for your configuration YAMLClick to copy link
By default, Bitrise looks for your configuration YAML in the root of your repository when running builds but you can store the file elsewhere in the repository.
To do so:
-
Commit the configuration YAML file to your repository.
-
Log in to Bitrise and select Bitrise CI on the left, then select your project.
-
Click the Workflows button on the main page.
-
Click the chevron next to Stored on Bitrise (or the branch name) in the header and select Change storage....
-
In the Bitrise.yml location field, set the path where you committed the file.
Updating a bitrise.yml stored in the repositoryClick to copy link
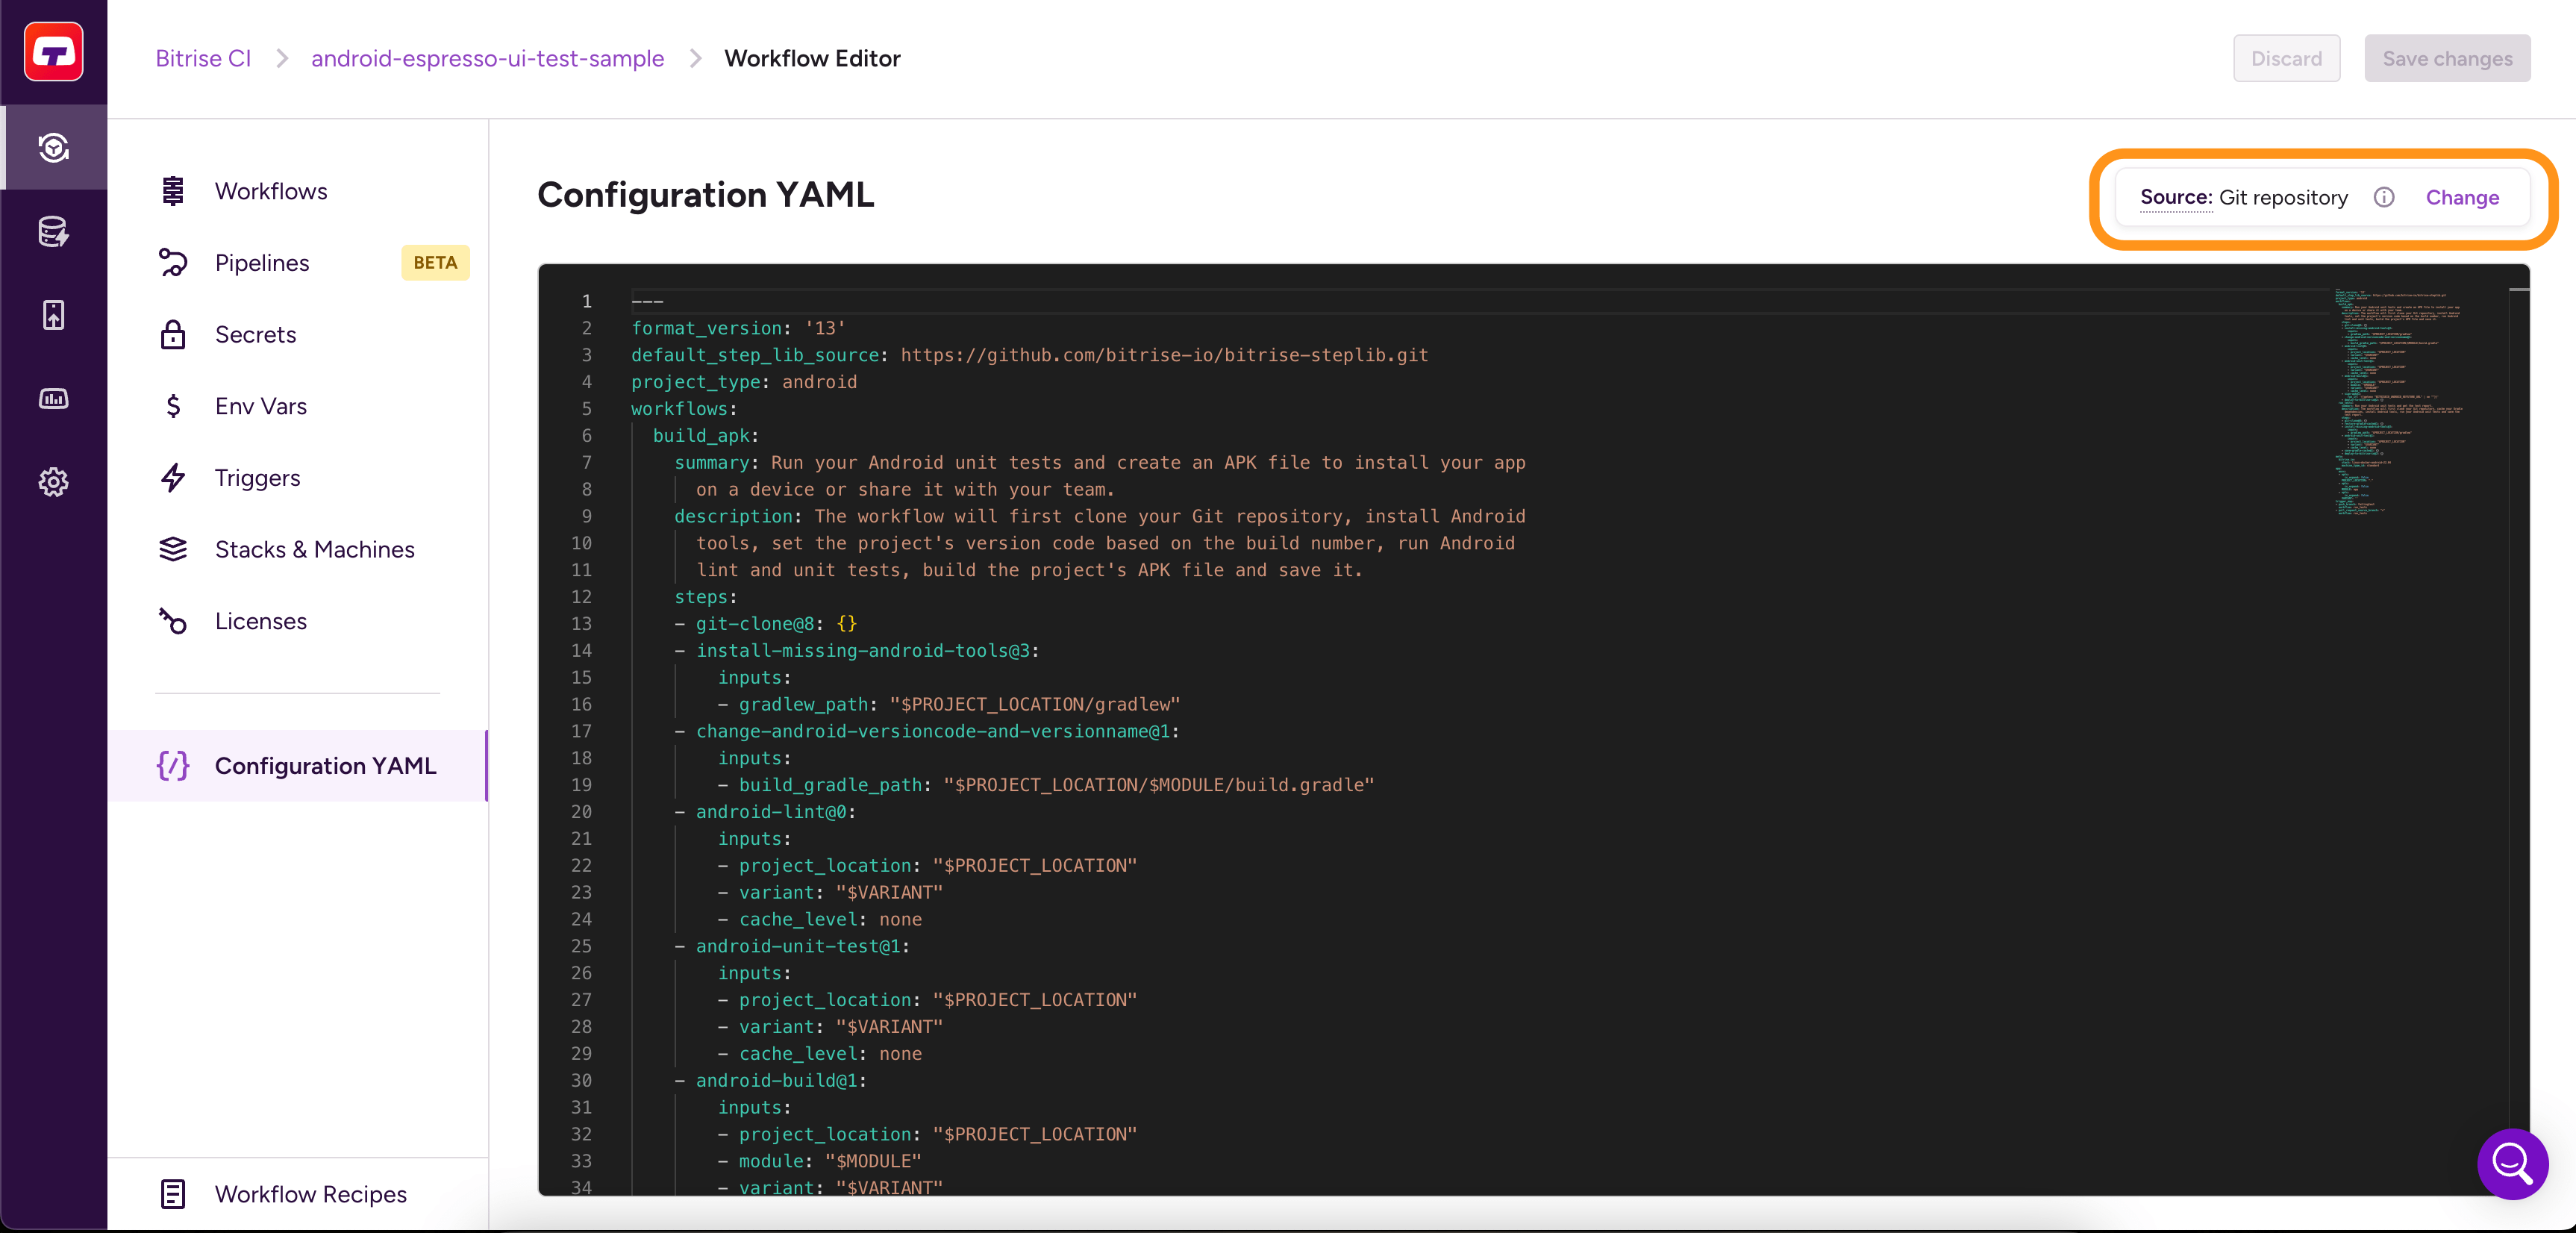
When your bitrise.yml is stored in your repository, the Workflow Editor can push changes directly to it. No copy-paste or manual commits required.
-
Log in to Bitrise and select Bitrise CI on the left, then select your project.
-
Click the Workflows button on the main page.
-
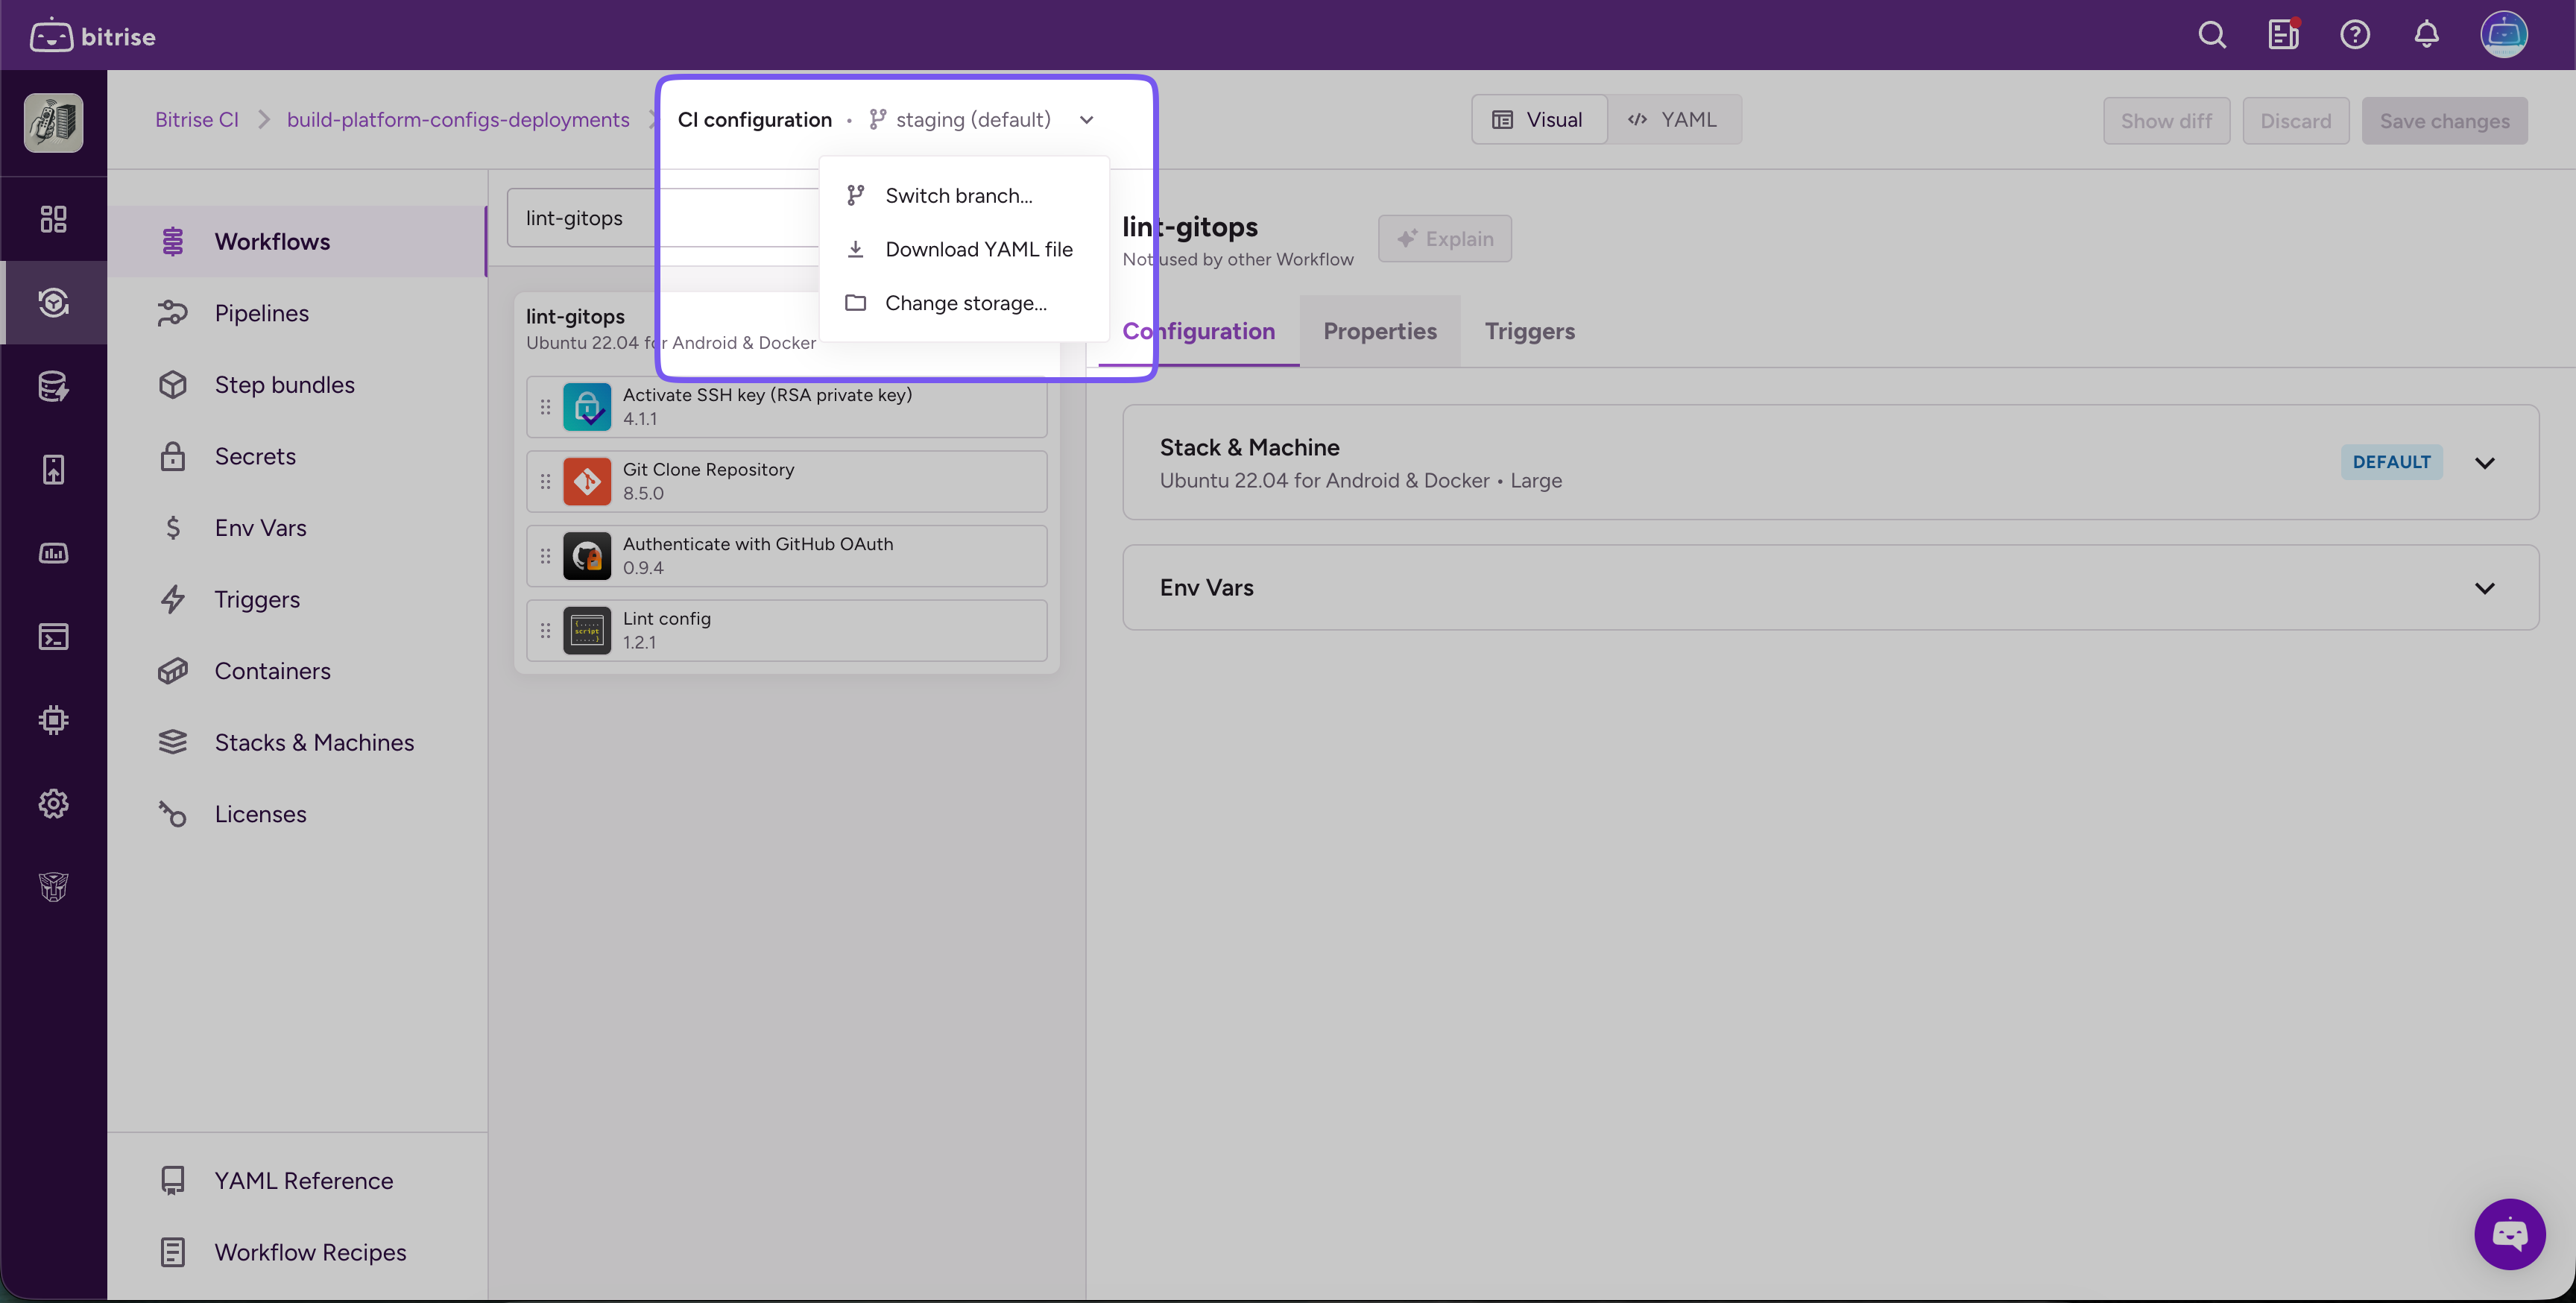
If you want to edit a branch other than your default, click the chevron next to the branch name in the header and select Switch branch....
-
Make your changes in the Workflow Editor.
-
Click Save changes in the top right corner.
-
Choose how to save:
- Push to current branch: commits and pushes directly to the branch you loaded from.
- Create new branch: pushes to a new branch of your choice, useful for code review.
- Manual update: download or copy the YAML and commit it yourself.
noteYou can only push directly from the Workflow Editor if you use GitHub or GitLab. If you use Bitbucket Cloud, you will need to commit the file manually every time.
If your repository has branch protection rules that require pull requests before merging, Push to current branch can fail with a generic
Failed to push changes. Please try again.error. If you run into this, branch protection is a likely cause: use Create a new branch instead, which commits your changes to a new branch and gives you a link to open a pull request from it. -
Write a commit message and click Push changes.
Storing a bitrise.yml file on multiple branches in the repositoryClick to copy link
When you first add the bitrise.yml to your repository, it must be committed to the default branch. If you store the bitrise.yml file in the repository, the default branch must always have a bitrise.yml.
However, once you did the initial configuration to set up using the bitrise.yml from your repository, you can store bitrise.yml files on other branches and use any of them to run builds. If you want to build a branch of your repository on Bitrise, you need to have a bitrise.yml file on that branch. And don’t forget that you always need to keep a bitrise.yml file on the default branch.
You can load the bitrise.yml from any branch directly in the Workflow Editor. Select the branch at the top of the editor before making changes, and save back to that branch when you're done.
Bitrise setup with bitrise.yml files on multiple branches
Let’s say you have an app called FantasticApp. In FantasticApp’s Git repository, the default branch is called main. There is also a deploy branch.
Any code push or pull request to main triggers a Workflow called main-workflow. Any code push or pull request to deploy triggers a Workflow called deploy-workflow.
In the repository, there is a bitrise.yml file on both the main and the deploy branch, containing both Workflows. When making changes to the Workflows, the FantasticApp team commits the modified bitrise.yml file to both branches to ensure that their Workflows are up to date on both.
Moving the bitrise.yml file back to bitrise.ioClick to copy link
The default setting is to store the bitrise.yml file on bitrise.io: when you add a new app, we automatically create a bitrise.yml file for you and it’s stored on our website. If this works for you, then you don’t need to change anything!
If, however, you changed your storage settings to keep the configuration file in your repository, you can easily change it back any time to store the file on bitrise.io.
-
Log in to Bitrise and select Bitrise CI on the left, then select your project.
-
Click the Workflows button on the main page.
-
Click the chevron next to the branch name in the header and select Change storage....
-
Choose which
bitrise.ymlfile should be used on bitrise.io from now.You can copy the content of the
bitrise.ymlfile stored in the app’s repository.You can copy the last version of the
bitrise.ymlfile that you used on bitrise.io.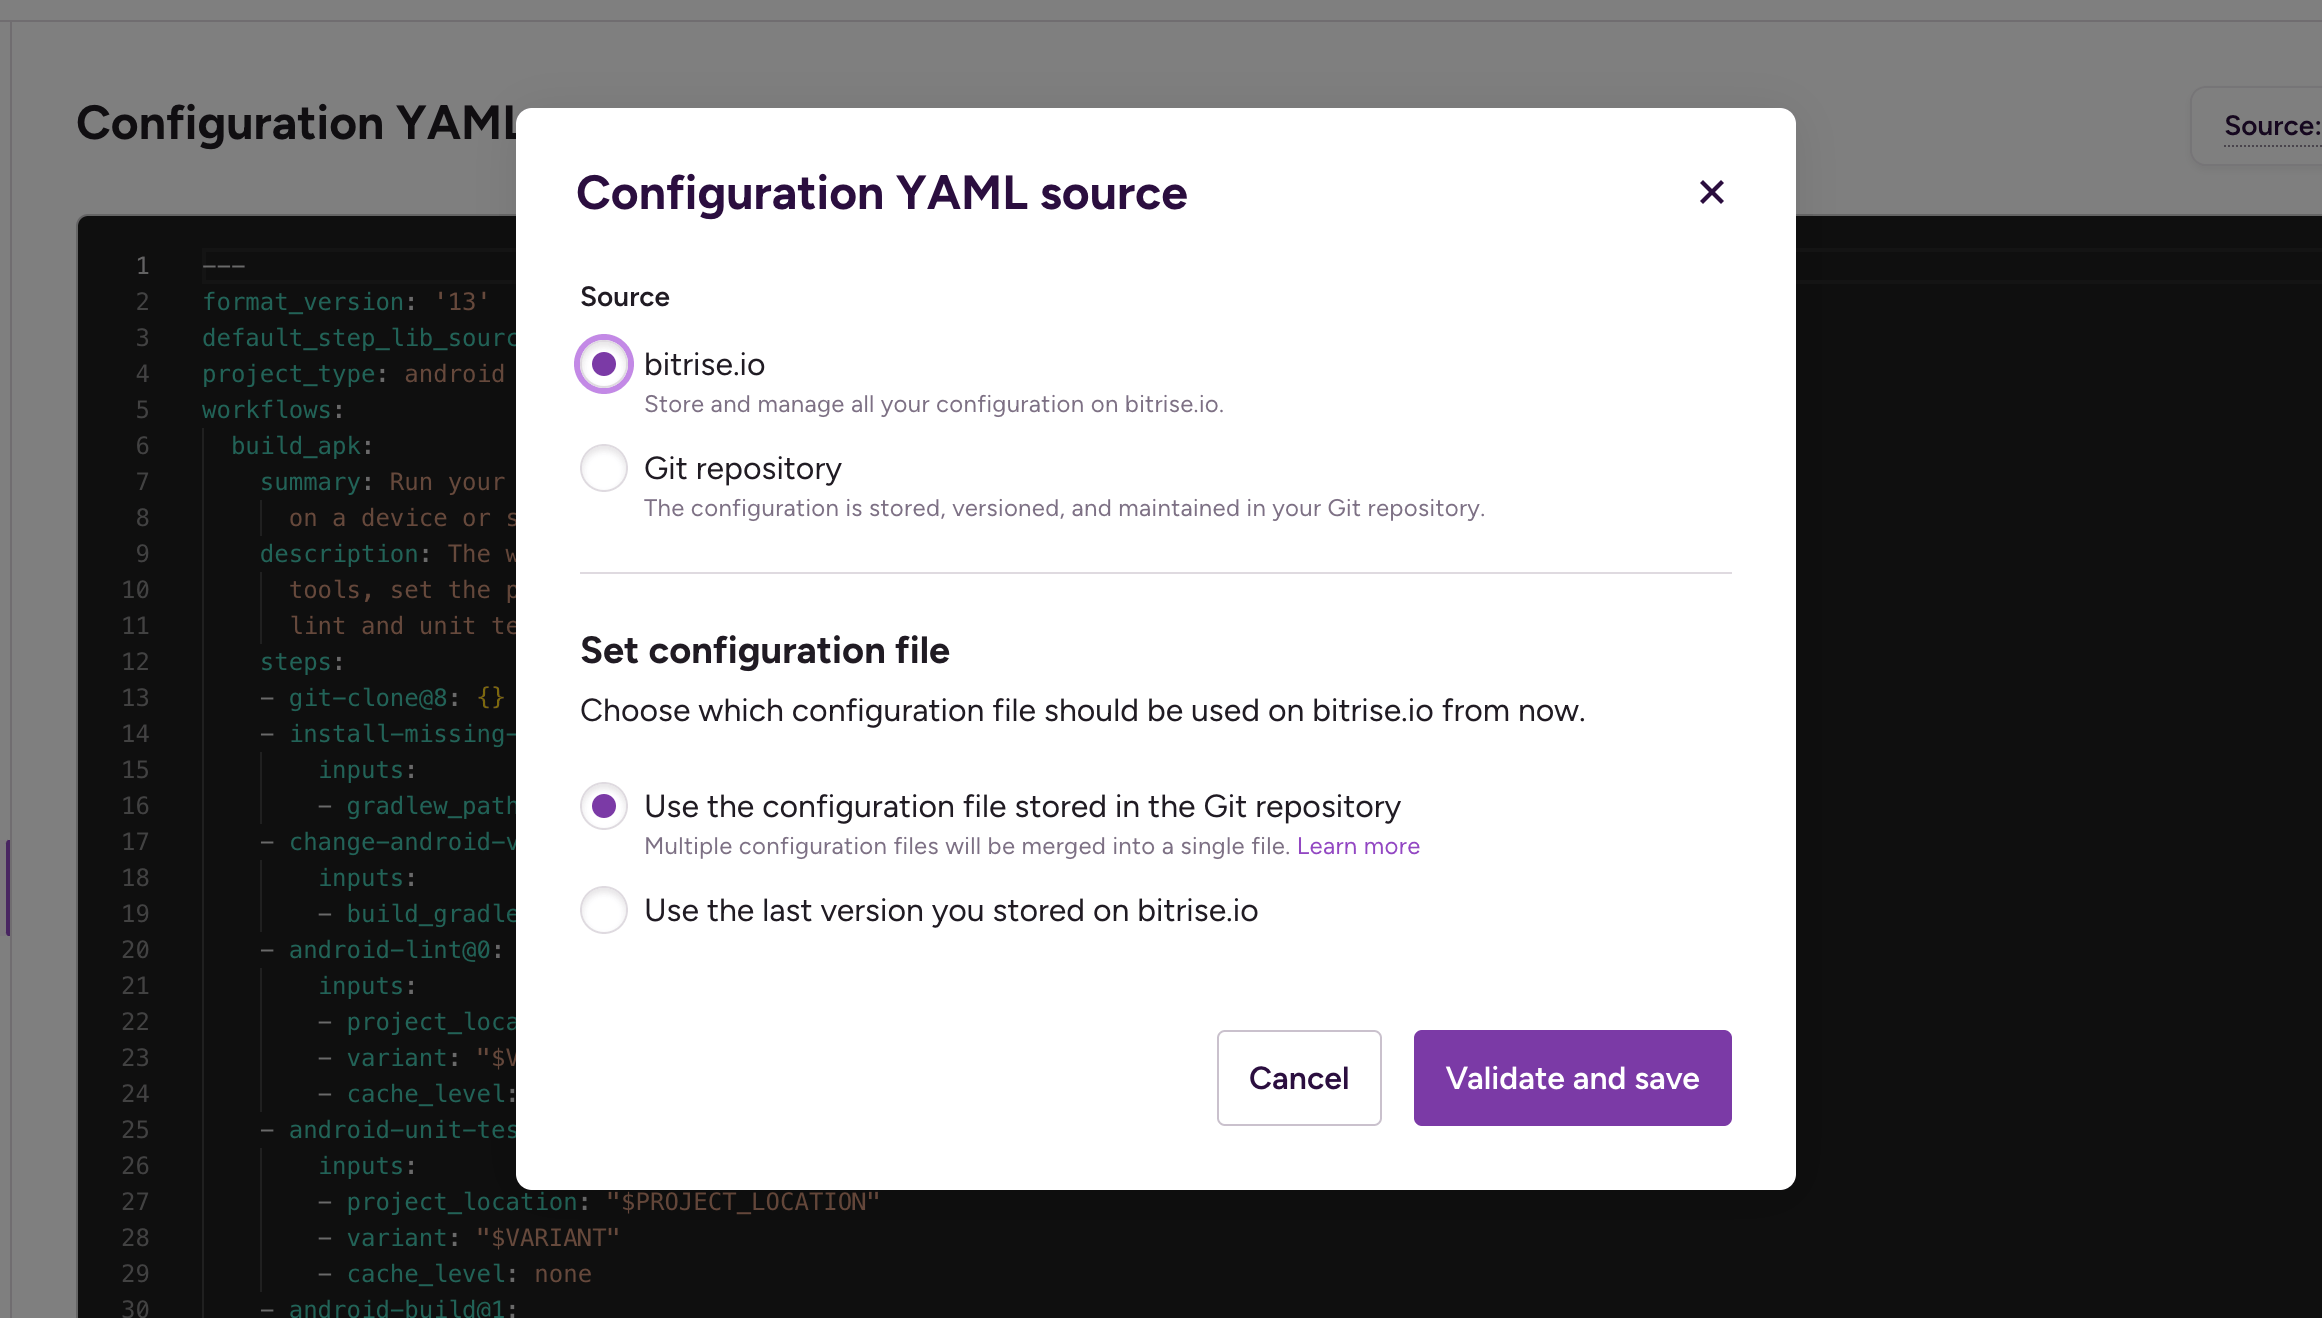
-
Click Validate and save.
If all goes well, you should receive confirmation of successfully changing your bitrise.yml storage settings.