Deploying and viewing test results
View your test results in one place after a Bitrise CI build. All tests will be available on the build page, even if you have multiple testing Steps in your Workflows. Our goal is to make sure you have accessible and actionable test results on Bitrise, leading to faster time to recover from test failures and a better overall developer experience.
Deploying test resultsClick to copy link
Deploy your test results on the build page with minimal configuration. The requirements depend on your setup:
- Using the official Bitrise testing Steps to run tests
- Using other Steps to run tests
Deploying results from the official Bitrise testing StepsClick to copy link
The supported testing Steps are the following:
- Android Unit Test: Android unit tests.
- Android Instrumented Test: Running instrumented tests for Android apps.
- Xcode Test for iOS: Running unit and UI tests for iOS apps.
- iOS Device Testing: Device testing for iOS.
- Virtual Device Testing for Android: Device testing for Android.
- Flutter Test: Testing Flutter apps.
If you use any of these Steps, make sure you have the Deploy to Bitrise.io Step in your Workflow. Bitrise will automatically deploy your test results to the build page.
If your tests generate attachments or you want Bitrise to show flaky tests, the Deploy to Bitrise.io Step must be of version 2.19.1 or newer. To link attachments to test cases by filename, it must be version 2.26.0 or newer: Naming attachments after their test case.
Deploying results from other StepsClick to copy link
If you run your tests using other Steps (for example, you can use Script Steps for a fully custom testing solution), you need some additional configuration.
-
Add the Step running your tests to your Workflow.
-
Add the Export test results to the Test Reports Step to your Workflow.
-
Configure the Step: Using the Export test results to the Test Reports Step.
-
Make sure you have the Deploy to Bitrise.io Step in your Workflow.
Attachments and flaky testsIf your tests generate attachments or you want Bitrise to show flaky tests, the Deploy to Bitrise.io Step must be of version 2.19.1 or newer. To link attachments to test cases by filename, it must be version 2.26.0 or newer: Naming attachments after their test case.
Viewing test resultsClick to copy link
If you use rich HTML test reports, you can still find those on the Artifacts tab.
To view your results, open the build page and select the Tests tab. Your tests are sorted into different tabs based on their status:
- Failed
- Passed
- Skipped
- Error
- Flaky
By default, Bitrise shows the list of failed tests. You can view test run details within each of these categories.
Click any test to check the details: the duration of the test, the output, and any attachments that the test generated. For easier debugging of failures, test reports display attached image files in line with their associated test cases.
Currently, we support the following file formats for attachments:
.jpg, .jpeg, .png, .txt, .log, .mp4, .webm, .ogg
You can view flaky tests on the Flaky tab. Flaky tests are tests that sometimes fail and sometimes succeed without any changes in the code. If a test fails and then succeeds on an automatic retry, Bitrise marks the test as flaky, and you can view it on the Flaky tab. It also displays the details and attachments for each retry of the test. You can find more information on how to detect flaky tests and how to quarantine them, if needed, in Detecting and quarantining flaky tests.
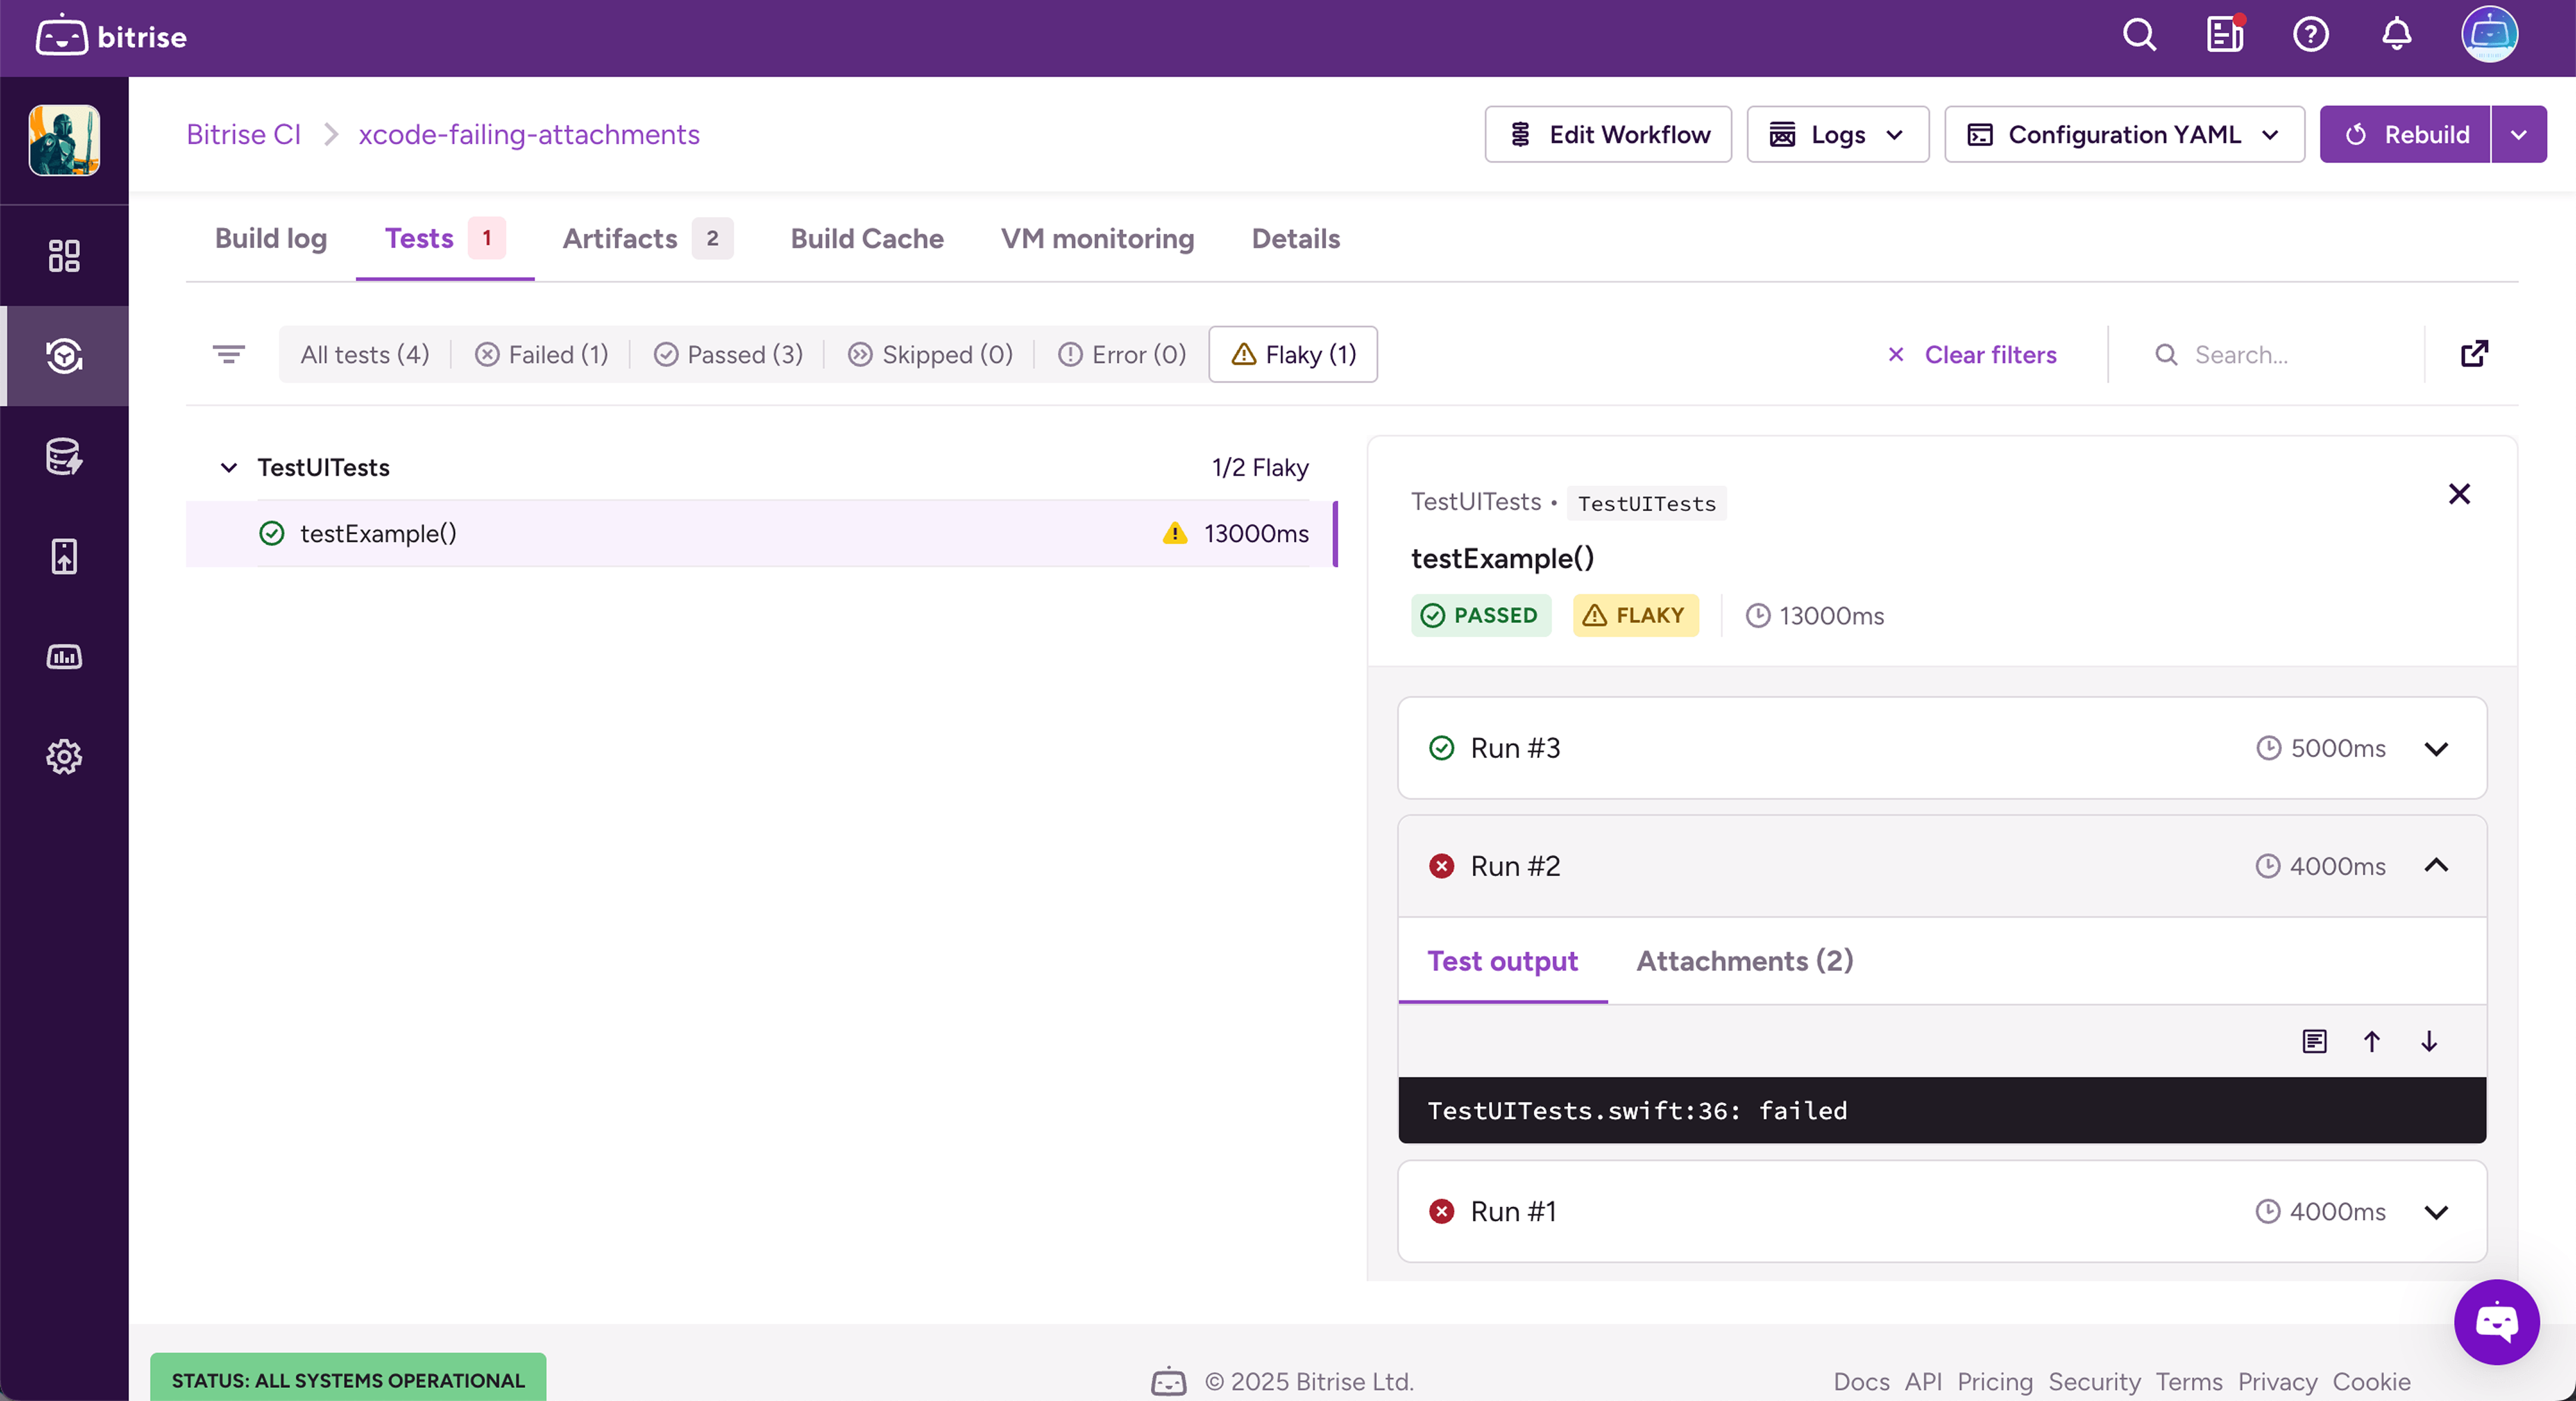
Test reports also support the use of the system-out tag in JUnit. If a test case includes this tag, we display its contents on the Test output tab. If a test case has both a system-out tag and produces an error message, we display both.
Collating test attachments with test resultsClick to copy link
Many tests generate image files: screenshot tests, XCUITests, and so on. Bitrise can show these attachments under their associated test cases, so you can view them on the Tests tab of your build page. How to collate the test attachments with test results depends on your test tool and whether it generates an xcresult file:
- If your tests generate an
xcresultfile, Bitrise automatically collates the attachments with their test cases. This requires no further configuration. - If your tests don't generate an
xcresultfile, you can:- Name each file after its test case: Naming attachments after their test case.
- Reference each file in the JUnit XML: Referencing attachments in the JUnit XML.
Currently, we support the following file formats for attachments:
.jpg, .jpeg, .png, .txt, .log, .mp4, .webm, .ogg
Naming attachments after their test caseClick to copy link
Name a screenshot, recording, or log after the test case that produced it, and Bitrise shows it under that test on the Tests tab.
This requires the Deploy to Bitrise.io Step version 2.26.0 or newer. If you use the Export test results to Test Reports Step, it must be version 1.3.0 or newer.
You need to:
- Use the correct filename structure.
- Set up your test tool to name the attachments correctly.
- Export the attachments with a Bitrise Step.
About the filename structureClick to copy link
The filename should have the following structure:
<classname>__<name>[__run<k>]__<label>.<ext>
For example, com.example.LoginTest__emptyState__1.png.
To get the correct filename:
- Copy
classnameandnamefrom the<testcase>element of your JUnit XML, and replace any of the" * / : < > ? \ |characters with_. Bitrise applies the same replacement to the names in the JUnit XML, so either spelling matches. - Always add a label, such as a counter. The label can't contain
__or start with_. - If the same tests run on more than one device, put the device in the label, for example
api34_1. Otherwise, files with the same name are skipped, and the attachments don't appear. - To attach a file to a later run of the same test case, add
__run2,__run3, and so on before the label.
Setting up your test toolClick to copy link
Set up the naming once, in your test configuration. The following examples do this for some popular test tools:
- Espresso
- Paparazzi
- Roborazzi
- Detox
- Playwright
Register a RunListener that takes a screenshot when an Espresso check fails:
// app/build.gradle.kts
android {
    defaultConfig {
        testInstrumentationRunnerArguments["listener"] = "com.example.testing.BitriseScreenshotListener"
        testInstrumentationRunnerArguments["useTestStorageService"] = "true"
    }
}

dependencies {
    androidTestUtil("androidx.test.services:test-services:1.6.0")
}
// app/src/androidTest/java/com/example/testing/BitriseScreenshotListener.kt
package com.example.testing

import android.content.res.Resources
import android.os.Build
import androidx.test.core.app.takeScreenshot
import androidx.test.core.graphics.writeToTestStorage
import androidx.test.espresso.Espresso
import androidx.test.espresso.base.DefaultFailureHandler
import androidx.test.platform.app.InstrumentationRegistry
import org.junit.runner.Description
import org.junit.runner.notification.RunListener

private fun clean(value: String) = value.replace(Regex("""["*/:<>?\\|]"""), "_")

class BitriseScreenshotListener : RunListener() {
    override fun testStarted(test: Description) {
        val default = DefaultFailureHandler(InstrumentationRegistry.getInstrumentation().targetContext)
        Espresso.setFailureHandler { error, viewMatcher ->
            val screen = Resources.getSystem().displayMetrics.run { "${widthPixels}x$heightPixels" }
            val name = "${clean(test.className)}__${clean(test.methodName)}__api${Build.VERSION.SDK_INT}_${screen}_failure"
            takeScreenshot().writeToTestStorage(name)
            default.handle(error, viewMatcher)
        }
    }
}
Plain JUnit assertions don't get a screenshot.
Create your Paparazzi rules through a shared function that adds a snapshot handler. The handler saves every snapshot under the attachment name as well:
// src/test/java/com/example/testing/BitrisePaparazzi.kt
package com.example.testing

import app.cash.paparazzi.DeviceConfig
import app.cash.paparazzi.HtmlReportWriter
import app.cash.paparazzi.Paparazzi
import app.cash.paparazzi.Snapshot
import app.cash.paparazzi.SnapshotHandler
import app.cash.paparazzi.SnapshotVerifier
import java.awt.image.BufferedImage
import java.io.File
import javax.imageio.ImageIO

private fun clean(value: String) = value.replace(Regex("""["*/:<>?\\|]"""), "_")

fun bitrisePaparazzi(deviceConfig: DeviceConfig = DeviceConfig.PIXEL_5) =
    Paparazzi(deviceConfig = deviceConfig, snapshotHandler = BitriseSnapshotHandler())

class BitriseSnapshotHandler(
    maxPercentDifference: Double = 0.1,
    private val delegate: SnapshotHandler =
        if (System.getProperty("paparazzi.test.verify") == "true") SnapshotVerifier(maxPercentDifference)
        else HtmlReportWriter(),
) : SnapshotHandler by delegate {
    override fun newFrameHandler(snapshot: Snapshot, frameCount: Int, fps: Int): SnapshotHandler.FrameHandler {
        val frames = delegate.newFrameHandler(snapshot, frameCount, fps)
        val test = snapshot.testName
        val label = snapshot.name?.replace(Regex("_+"), "_")?.removePrefix("_") ?: "snapshot"
        val name = "${clean("${test.packageName}.${test.className}")}__${clean(test.methodName)}__$label"
        val file = File(System.getProperty("paparazzi.build.dir"), "bitrise-snapshots/${System.getProperty("bitrise.test.task")}/$name.png")
        return object : SnapshotHandler.FrameHandler by frames {
            override fun handle(image: BufferedImage) {
                file.parentFile.mkdirs()
                ImageIO.write(image, "png", file)
                frames.handle(image)
            }
        }
    }
}
In your tests, replace Paparazzi(...) with bitrisePaparazzi(...). Then add the following to the module's build.gradle.kts. The first block lets the handler use java.awt on Android Gradle plugin 8, and the second one gives each test task its own folder, removes the snapshots of the previous run, and keeps the current ones in the build cache:
tasks.withType<org.jetbrains.kotlin.gradle.tasks.KotlinJvmCompile>().configureEach {
    if ("UnitTest" in name) compilerOptions.noJdk.set(false)
}

tasks.withType<Test>().configureEach {
    val snapshots = layout.buildDirectory.dir("bitrise-snapshots/$name")
    systemProperty("bitrise.test.task", name)
    outputs.dir(snapshots)
    doFirst { snapshots.get().asFile.deleteRecursively() }
}
The example is for Paparazzi 1.3.5. On Paparazzi 2.0, create the report writer with HtmlReportWriter(maxPercentDifference = maxPercentDifference).
Copy Roborazzi's screenshots under the attachment name after each Roborazzi run:
// app/build.gradle.kts
val bitriseScreenshots by tasks.registering(Sync::class) {
    from(layout.buildDirectory.dir("outputs/roborazzi")) { include("*.png") }
    into(layout.buildDirectory.dir("bitrise-screenshots"))
    rename("""(.+)\.([^.]+?)(?:_(\d+))?(_actual|_compare)?\.png""", "$1__$2__screenshot$3$4.png")
}
tasks.named { it == "finalizeTestRoborazziDebug" }.configureEach { finalizedBy(bitriseScreenshots) }
Roborazzi writes screenshots only when you run recordRoborazziDebug, verifyRoborazziDebug, or compareRoborazziDebug. Parameterized tests don't get attachments.
Point artifacts.pathBuilder in your Detox configuration to this file. It names every screenshot, video, and log the way jest-junit names the test with its default settings:
// e2e/bitrisePathBuilder.js
const path = require('path');

const clean = (value) => value.replace(/["*/:<>?\\|]/g, '_');

module.exports = class BitrisePathBuilder {
  constructor({ rootDir }) {
    this.rootDir = rootDir;
  }

  buildPathForTestArtifact(artifactName, testSummary) {
    if (!testSummary) return path.join(this.rootDir, artifactName);

    const { title, fullName } = testSummary;
    const key = clean(`${fullName.slice(0, -title.length).trim()} ${title}`);
    const ext = path.extname(artifactName);
    const label = path.basename(artifactName, ext).replace(/_+/g, '_').replace(/^_/, '');
    return path.join(this.rootDir, `${key}__${key}__${label}${ext}`);
  }
};
Turn on includeProjectInTestName for the junit reporter, and add a reporter that copies the screenshots and videos of each test under the attachment name:
// playwright.config.ts
reporter: [
  ['junit', { outputFile: 'test-results/junit.xml', includeProjectInTestName: true }],
  ['./bitrise-reporter.ts'],
],
use: { screenshot: 'only-on-failure', video: 'retain-on-failure' },
// bitrise-reporter.ts
import fs from 'node:fs';
import path from 'node:path';
import type { Reporter, TestCase, TestResult } from '@playwright/test/reporter';

const clean = (value: string) => value.replace(/["*/:<>?\\|]/g, '_');
const supported = /\.(png|jpe?g|mp4|webm|ogg|txt|log)$/i;

export default class BitriseAttachments implements Reporter {
  onTestEnd(test: TestCase, result: TestResult) {
    const [, project, file, ...titles] = test.titlePath();
    const key = `${clean(file)}__${clean((project ? `[${project}] ` : '') + titles.join(' › '))}`;
    const files = result.attachments.filter((a) => a.path && supported.test(a.path));
    files.forEach((a, i) => {
      const label = (result.retry ? `retry${result.retry}_` : '') + (i + 1);
      const target = path.join('test-attachments', `${key}__${label}${path.extname(a.path!)}`);
      fs.mkdirSync(path.dirname(target), { recursive: true });
      fs.copyFileSync(a.path!, target);
    });
  }
}
Exporting the attachmentsClick to copy link
This requires the Deploy to Bitrise.io Step version 2.26.0 or newer. If you use the Export test results to Test Reports Step, it must be version 1.3.0 or newer.
The Deploy to Bitrise.io Step is always required: it deploys the correctly named attachments alongside your test results. What else you need depends on the Step that runs your tests:
- Official Bitrise testing Steps: No further configuration is needed. The Deploy to Bitrise.io Step exports the attachments together with the test results. For the list of Steps, see Deploying results from the official Bitrise testing Steps.
- Other Steps, such as Script or npm Steps: Add the Export test results to Test Reports Step after the Step that runs your tests. It finds the attachments and moves them to the location the Deploy to Bitrise.io Step deploys from. Set its Test result base path input to a folder that contains both your test results and your attachments, for example
app/build/. See Using the Export test results to Test Reports Step.
Troubleshooting missing attachmentsClick to copy link
If an attachment doesn't show up, check the build log:
- The Export test results to Test Reports Step logs a warning for names that match more than one test or file, or that have an invalid
__runnumber or no label. Other skipped files appear only with verbose logging: set its Enable verbose logging? input toyes. - The Deploy to Bitrise.io Step logs a warning for every file in the report that it can't link to a test case.
Referencing attachments in the JUnit XMLClick to copy link
If you can't name the files after their test cases, reference them in the JUnit XML instead:
- Workflow Editor
- Configuration YAML
-
Generate a
JUnit.xmlfile from your tests.The general file structure should look something like this:
<?xml version="1.0" encoding="UTF-8"?><testsuites time="15.682687"><testsuite name="Tests.Registration" time="6.605871"><testcase name="testCase1" classname="Tests.Registration" time="2.113871" /></testsuite></testsuites> -
Add a
<properties>element to associate an attachment with atestcase.The
nameattribute of the element must be set with a valueattachment_#where#is the ordered index of the attachment file, and the value is the filename. Bitrise will show attachments for any test with the attachment properties, but it's most common to only attach screenshots to failed tests. Mark a test as failed with a<failure>element.<testcase name="testCase1" classname="Tests.Registration" time="2.113871" /><failure message="Assertion error message" type="AssertionError">Call stack printed here</failure><properties><property name="attachment_1" value="pp1.jpg" /><property name="attachment_2" value="pp2.jpg" /></properties></testcase> -
Add the Export test results to Test Reports Step to your Bitrise Workflow. It should be version 1.1.0 or higher.
-
Set a test name in the The name of the test input.
-
Set the path to your JUnit XML file in the Test result search pattern input.
-
Add the Deploy to Bitrise.io Step to the end of your Workflow.
You don't have to change the default input values.
-
Generate a
JUnit.xmlfile from your tests.The general file structure should look something like this:
<?xml version="1.0" encoding="UTF-8"?><testsuites time="15.682687"><testsuite name="Tests.Registration" time="6.605871"><testcase name="testCase1" classname="Tests.Registration" time="2.113871" /></testsuite></testsuites> -
Add a
<properties>element to associate an attachment with atestcase.The
nameattribute of the element must be set with a valueattachment_#where#is the ordered index of the attachment file, and the value is the filename. Bitrise will show attachments for any test with the attachment properties, but it's most common to only attach screenshots to failed tests. Mark a test as failed with a<failure>element.<testcase name="testCase1" classname="Tests.Registration" time="2.113871" /><failure message="Assertion error message" type="AssertionError">Call stack printed here</failure><properties><property name="attachment_1" value="pp1.jpg" /><property name="attachment_2" value="pp2.jpg" /></properties></testcase> -
Add the
custom-test-results-exportStep to your Bitrise Workflow after generating your JUnit XML file. It should be version 1.1.0 or higher.workflows:inline_attachment:steps:- generate-text-file:inputs:- file_name: junit.xml- file_content: "xml content with references to image files here"- custom-test-results-export: -
Set a test name in the
test_nameinput.- custom-test-results-export@1:inputs:- test_name: example_tests -
Set the path to your JUnit XML file in the
search_patterninput.- custom-test-results-export@1:inputs:- test_name: example_tests- search_pattern: junit.xml -
Add the
deploy-to-bitrise-ioStep to the end of your Workflow.You don't have to change the default input values. The full Workflow in your configuration YAML file might look something like this:
workflows:inline_attachment:steps:- generate-text-file@0:inputs:- file_name: junit.xml- file_content: "xml content with references to image files here"- custom-test-results-export@1:inputs:- test_name: example_tests- base_path: "."- search_pattern: junit.xml- script@1:inputs:- content: |#!/usr/bin/env bashset -exset -o pipefailTEST_RESULTS_DIR=$(find "$BITRISE_TEST_DEPLOY_DIR" -type d -name "example_tests" -print -quit)cp ~/*.jpg $TEST_RESULTS_DIRtitle: Copy image files to test directory- deploy-to-bitrise-io@2: {}
Using the Export test results to Test Reports StepClick to copy link
You can use the Export test results to Test Reports Step to make sure your test results appear on the Tests tab, even if you use Steps that don’t automatically export their results.
With the correct configuration, the Step finds the test results in your project’s repository and puts them in the export directory.
-
Log in to Bitrise and select Bitrise CI on the left, then select your project.
-
Click the Workflows button on the main page.
-
Add the Export test results to Test Reports Step to your Workflow after the Step that runs your tests.
-
In the The name of the test input, set the name of the test run.
-
In the Test result base path input, set the path where your test results can be found.
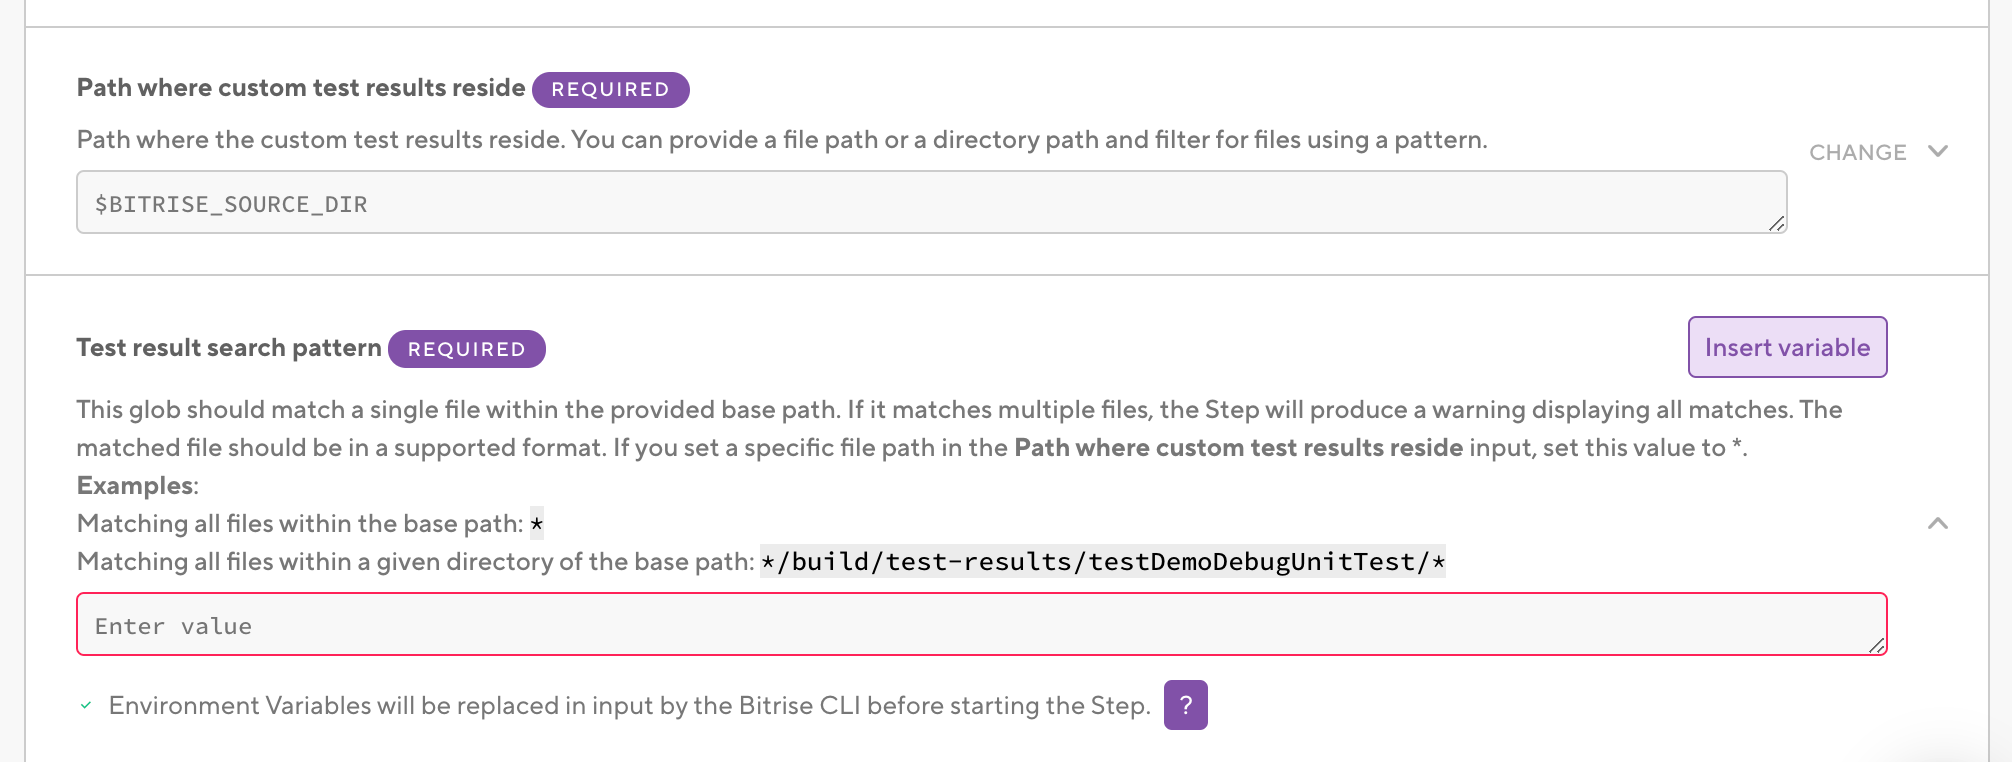
We recommend setting a folder here, though you can also set a specific filepath. The default value is the source directory of your project. Example patterns:
- If your project’s root directory is
app:app/build/test-results/testDemoDebugUnitTest/ - If your test results are within a project folder but
appis not the root directory: ./app/build/test-results/testDemoDebugUnitTest/
To export attachments named after their test case, set a folder that contains both your test results and your attachments, for example
app/build/. - If your project’s root directory is
-
In the Test result search pattern input, set a pattern that matches your test result file.
This search pattern is used to search every file and folder of the path that was set in the Path where custom test results reside input.
If there is more than one match, the Step will export the first match with a warning in the logs. If you set a specific filepath in the previous input, just set * here.
Example patterns:
- Matching all files within the base path:
* - Matching all files within a given directory of the base path:
*/build/test-results/testDemoDebugUnitTest/* - Matching a single JUnit XML when the base path is a wider folder, such as
app/build/:*/test-results/testDemoDebugUnitTest/TEST-com.example.ScreenshotTest.xml
- Matching all files within the base path:
-
In the Step’s test result directory input, make sure the path is correct.
Do NOT modify this input’s value: this is the folder where the Deploy to Bitrise.io Step will look for the test results to export them. It should be set to the
$BITRISE_TEST_RESULT_DIREnv Var. -
Make sure you have a Deploy to Bitrise.io Step in your Workflow.
If your tests generate attachments, make sure the Step is of version 2.19.x or newer.