Viewing Xcode test results in rich HTML format
Enhanced Xcode reporting allows you to immediately view your Xcode test results in a rich HTML format. It will show both successful and failed test cases, as well as any videos and screenshots generated by the test.
To use it, your build needs to do two things:
- Run your Xcode tests and place the
.xcresultfile in the correct location. The Xcode Test for iOS and the Xcode Test for Building Steps do this by default and require no further configuration. You can also use other Steps, for example, fastlane, but you need to specify where Xcode should place the.xcresultfile. - Run the Generate Xcode HTML report Step: it takes the
.xcresultfile and generates the report. If you use the Xcode Test for iOS Step to run your tests, this Step requires no configuration. When using other Steps, you have to manually set the location of your.xcresultfile.
We strongly recommend using the official Xcode Test for iOS Step to run your tests: this Step generates an .xcresult file and the Generate Xcode HTML report Step finds it without any additional configuration.
To view the rich test results:
- Workflow Editor
- Configuration YAML
-
Add a Step that runs your Xcode tests to your Workflow.
We recommend using the Xcode Test for iOS StepUsing our Xcode Test for iOS Step (as well as the Xcode Test without building Step) means you don't need any additional configuration to export your results.
You can use other Steps to run your tests and then view the rich results afterwards. In that case, you have to make sure that the Step generates an
.xcresultfile and point the Generate Xcode HTML report Step to its location. For example, you can use the fastlane Step or your own Script Step.For more information on configuring the Step to run your Xcode tests, see Running unit and UI tests for iOS apps.
-
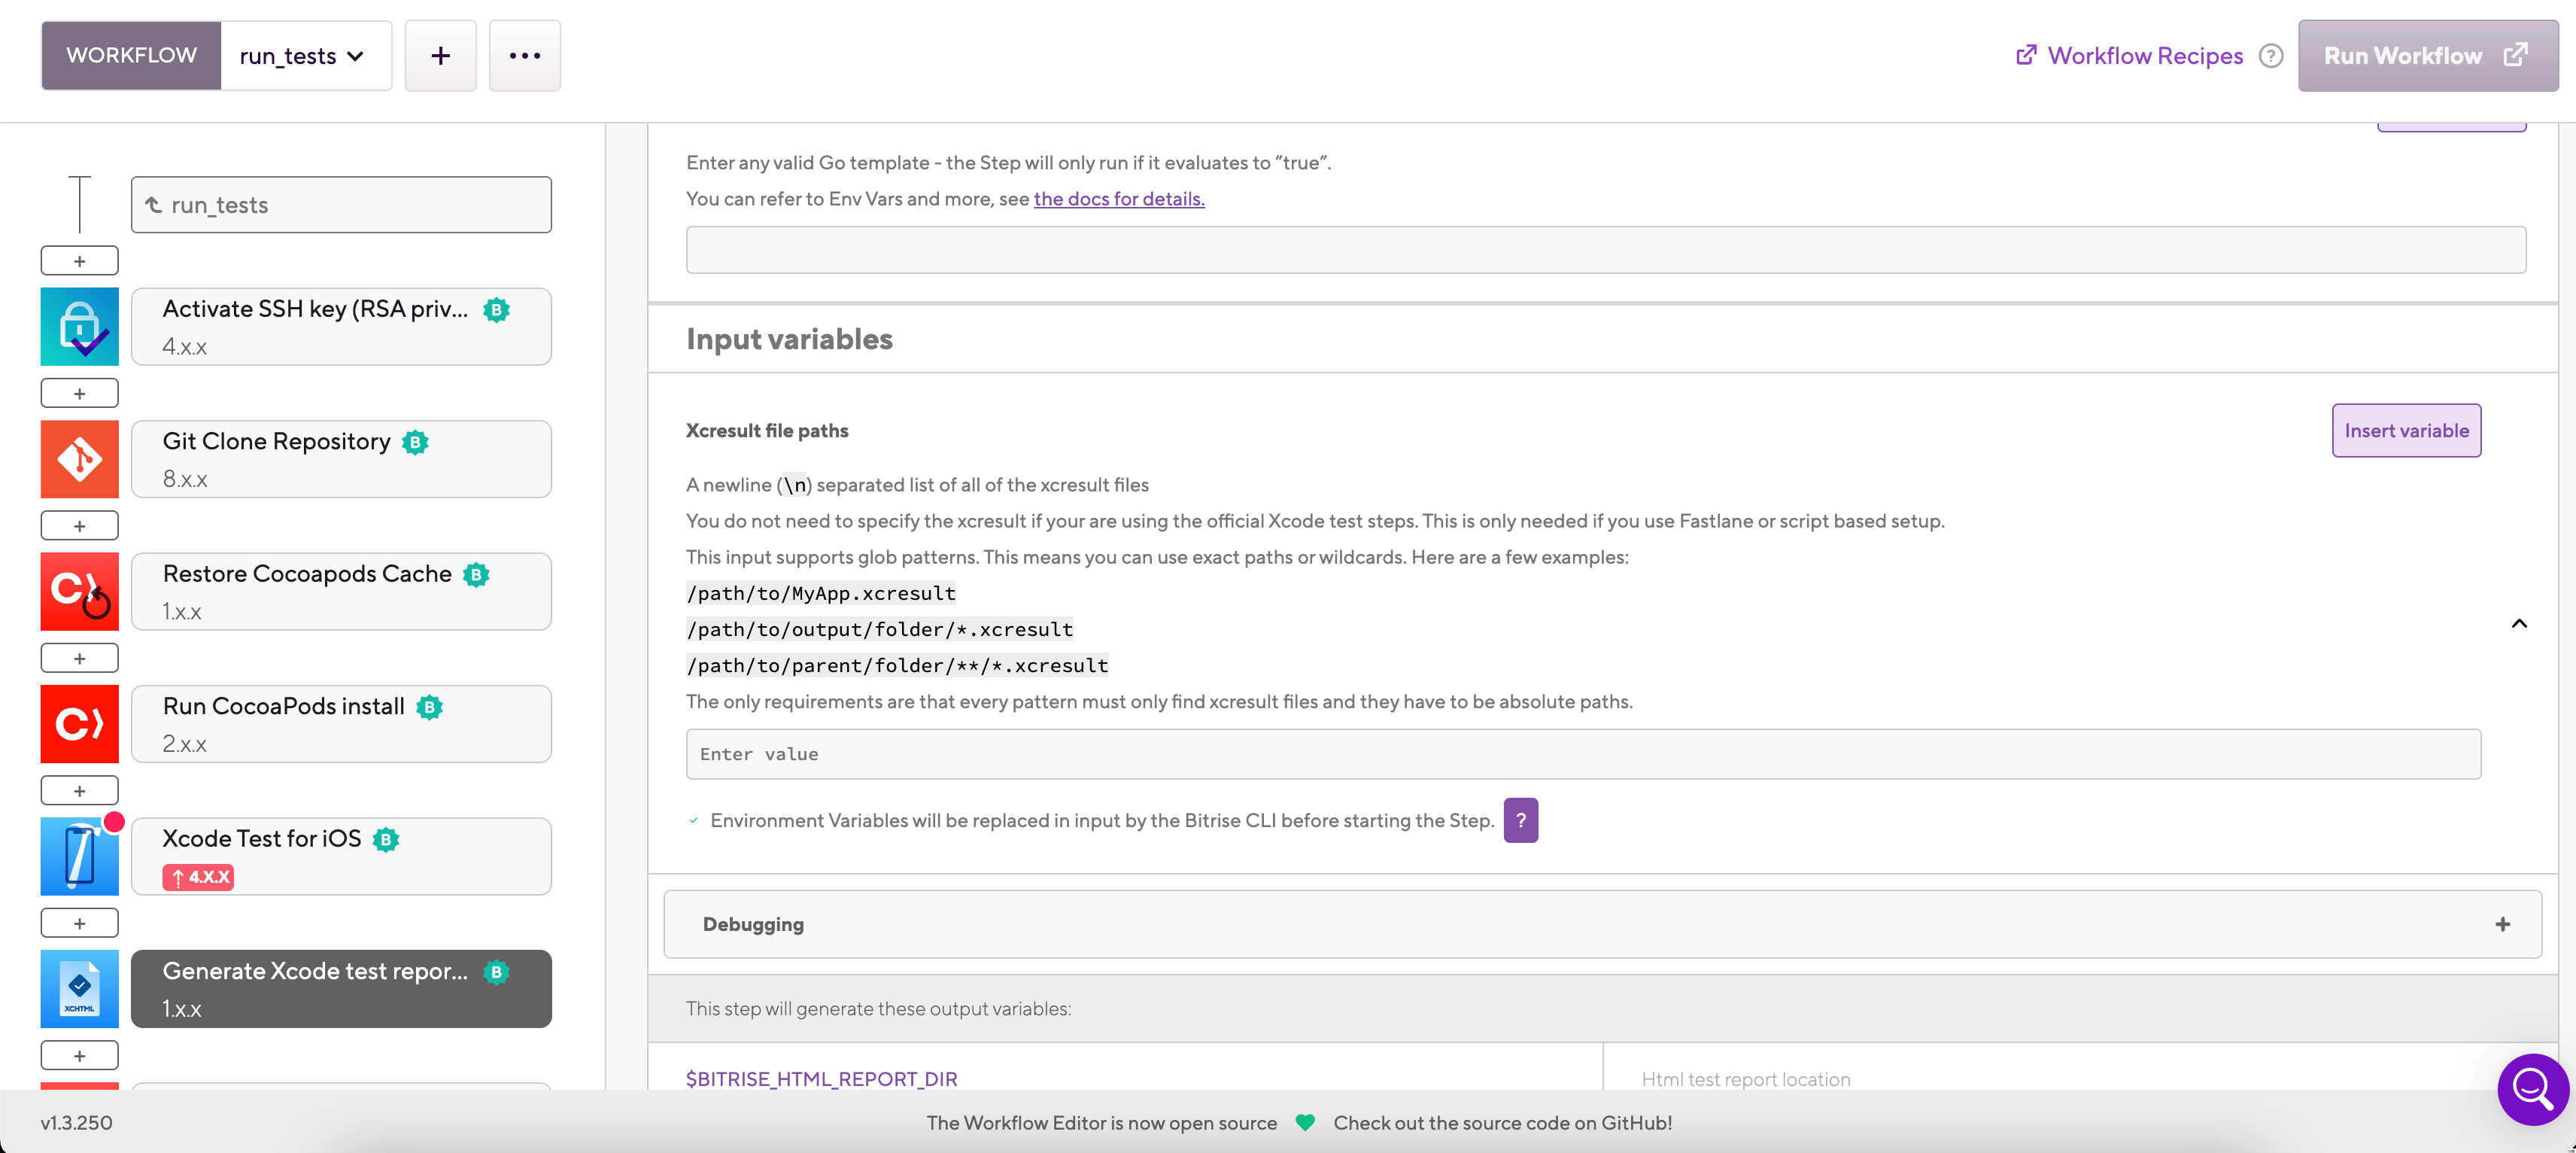
Add the Generate Xcode HTML report Step to your Workflow.
It should, of course, come after the Step that runs your tests.
-
Make sure the Xcresult file paths input points to the location of your
.xcresultfiles.You can add multiple
.xcresultfiles to this input, either by specifying one or more directories or by specifying filepaths, separated by a newline (/n). Each file will have its own report.No configuration requiredIf you use the Xcode Test for iOS Step, you don't have to modify this input!
-
Make sure the Workflow includes the Deploy to Bitrise.io Step at the end.
Without this Step, the results won't be exported.
Version requirementThe Step must be version 2.7.2 or newer.
-
After the build is finished, go to the build summary page.
Failed buildsThe test results will be available even if the build fails.
-
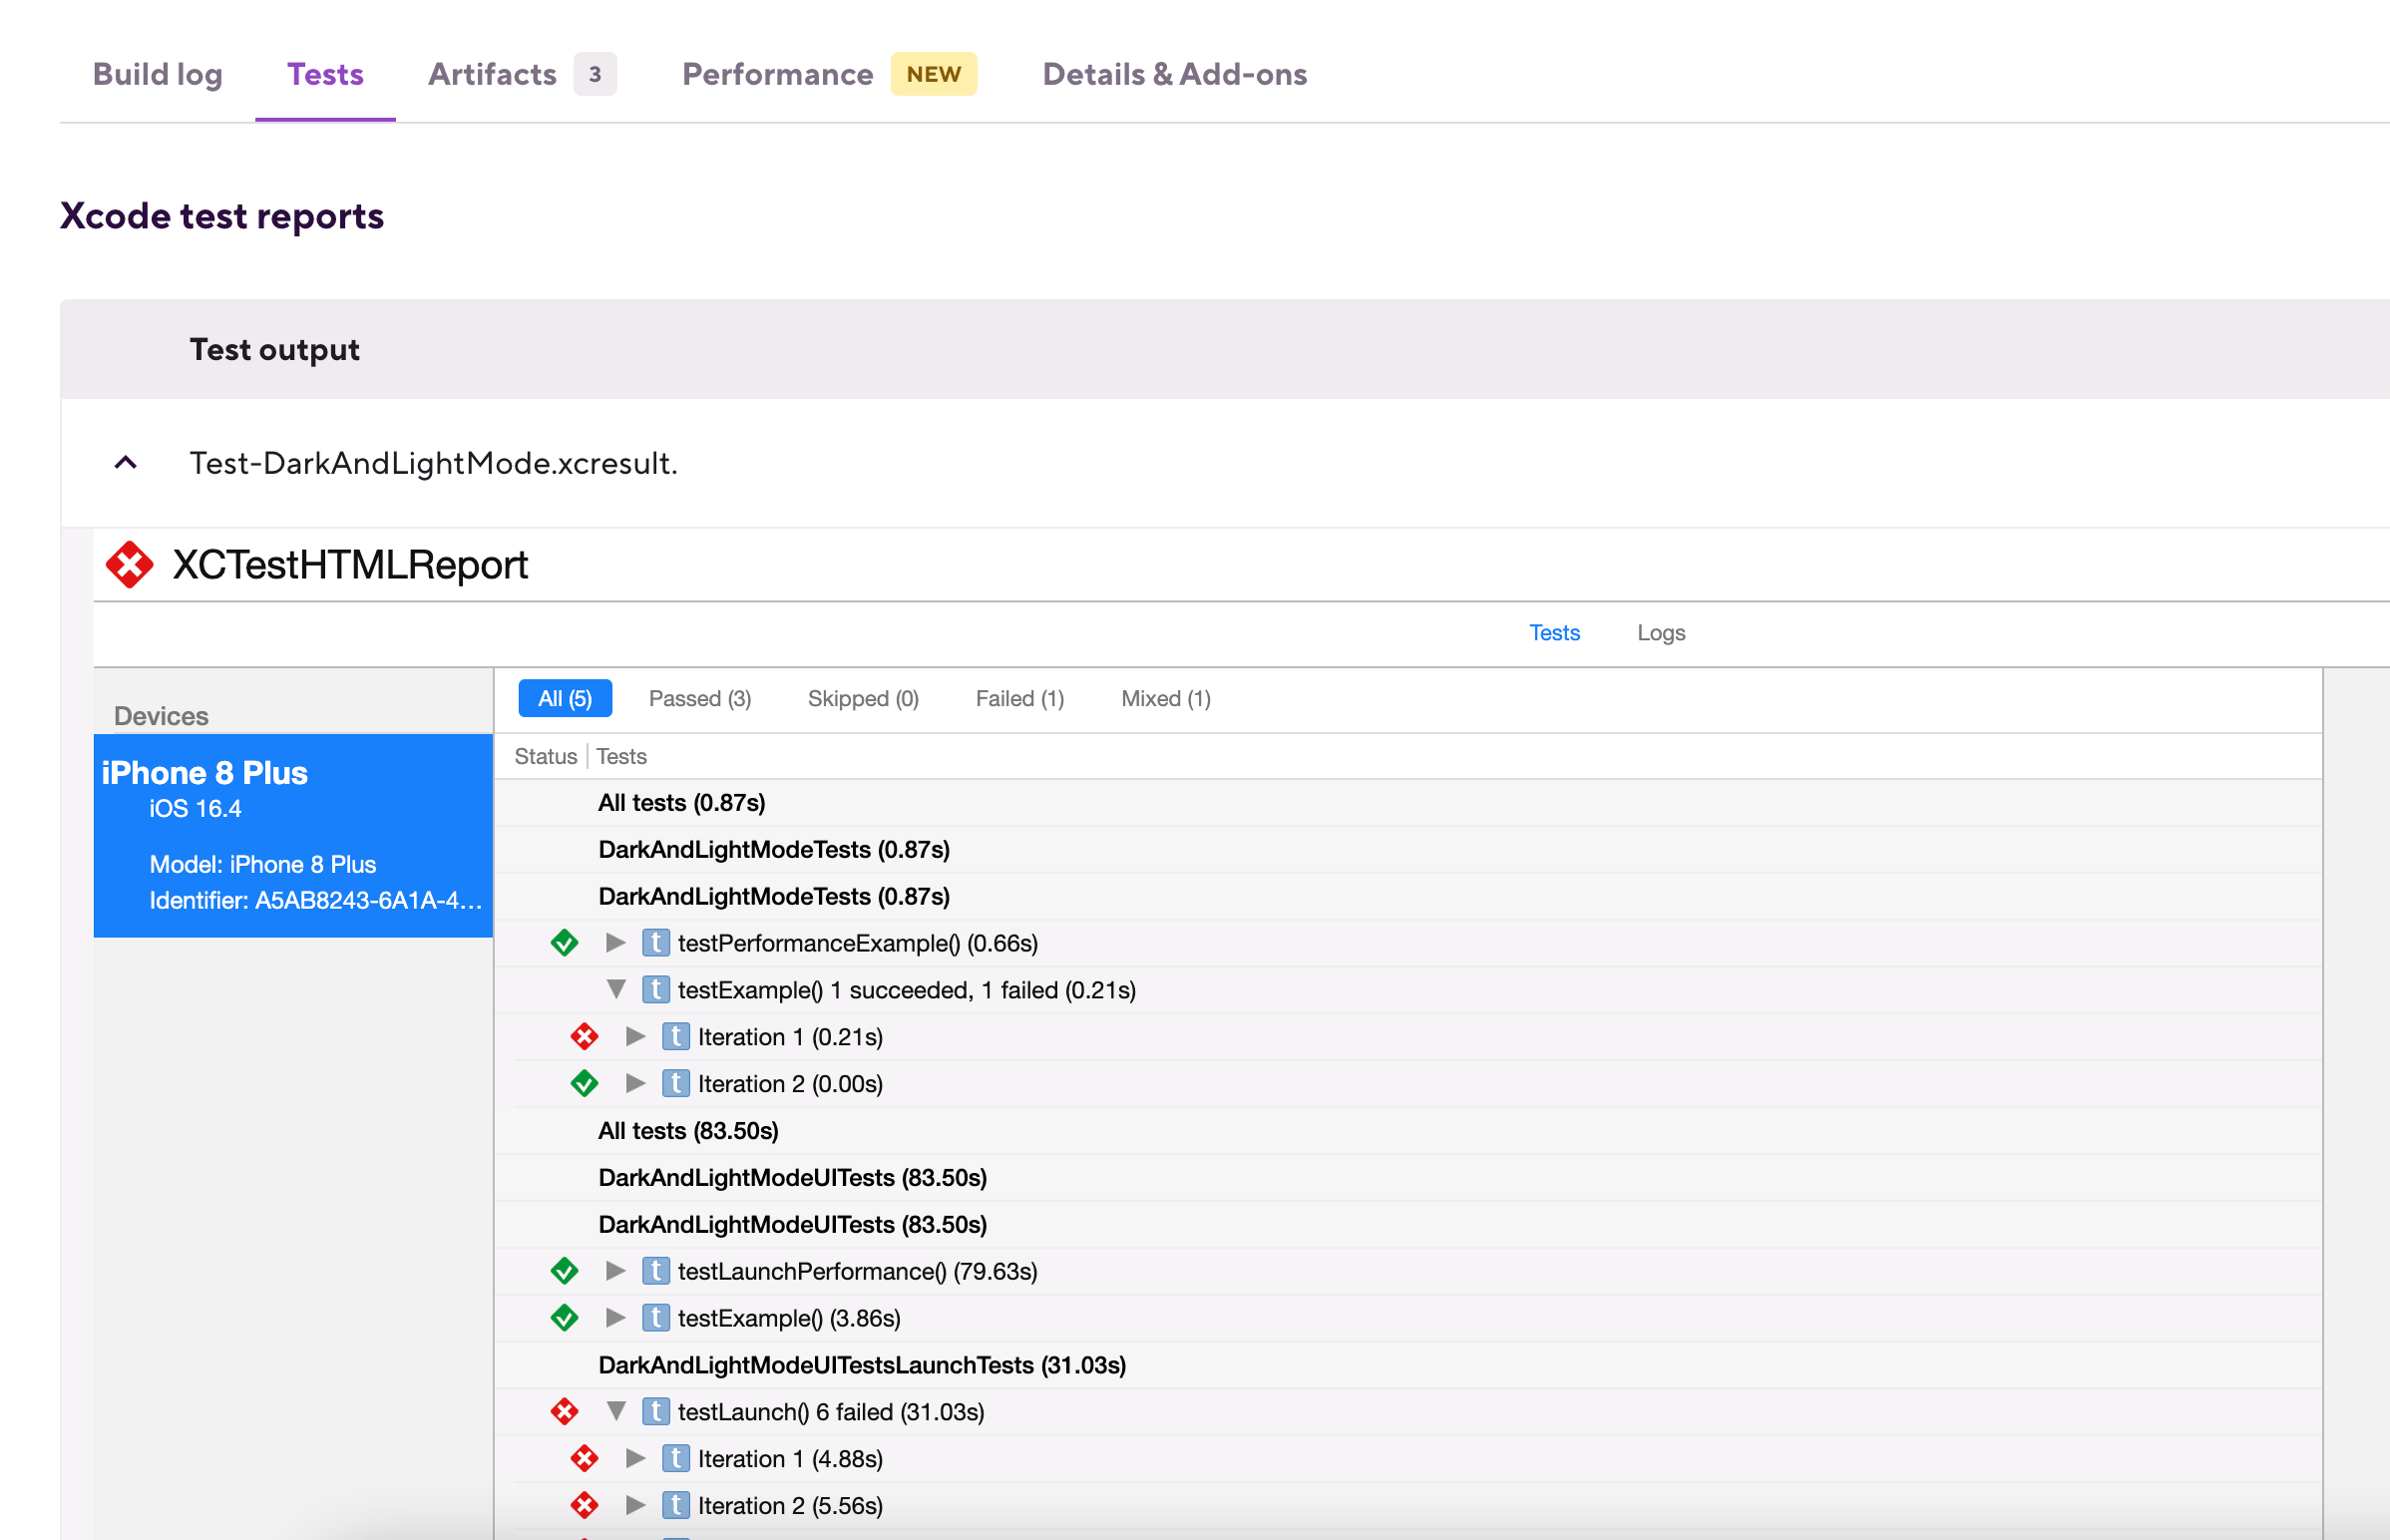
Select the Tests tab to view the results.
Expiry dateThe HTML test reports are available for seven days after they are generated. After seven days, you can no longer access them.
-
Add a Step that runs your Xcode tests to your Workflow.
We strongly recommend using the
xcode-testStep for this.my-workflow:steps:- xcode-test: {}We recommend using the xcode-test StepUsing our
xcode-testStep (as well as thexcode-test-without-buildingStep) means you don't need any additional configuration to export your results.You can use other Steps to run your tests and then view the rich results afterwards. In that case, you have to make sure that the Step generates an
.xcresultfile and point thegenerate-xcode-html-reportStep to its location. For example, you can use thefastlaneStep or your ownscriptStep.For more information on configuring the Step to run your Xcode tests, see Running unit and UI tests for iOS apps.
-
Add the
generate-xcode-html-reportStep to your Workflow.It should, of course, come after the Step that runs your tests.
my-workflow:steps:- xcode-test: {}- generate-xcode-html-report: {} -
Make sure the
xcresult_patternsinput points to the location of your.xcresultfiles.You can add multiple
.xcresultfiles to this input, either by specifying one or more directories or by specifying filepaths, separated by a newline (/n). Each file will have its own report.my-workflow:steps:- xcode-test: {}- generate-xcode-html-report:is_always_run: trueinputs:- xcresult_patterns: /path/to/MyApp.xcresultNo configuration requiredIf you use the Xcode Test for iOS Step, you don't have to modify this input!
-
Make sure the Workflow includes the
deploy-to-bitrise-ioStep at the end.Without this Step, the results won't be exported.
Version requirementThe Step must be version 2.7.2 or newer.
my-workflow:steps:- xcode-test: {}- generate-xcode-html-report:is_always_run: trueinputs:- xcresult_patterns: /path/to/MyApp.xcresult- deploy-to-bitrise-io: {} -
After the build is finished, go to the build summary page.
Failed buildsThe test results will be available even if the build fails.
-
Select the Tests tab to view the results.
Expiry dateThe HTML test reports are available for seven days after they are generated. After seven days, you can no longer access them.
Please note that the generated HTML report is not official Bitrise content! It is generated entirely according to your Workflow configuration. Bitrise has no direct control over what appears in the report.