Getting started with Ionic/Cordova projects
You can use Cordova and Ionic frameworks to develop cross-platform apps. Bitrise can help you with its automated testing, code signing and deployment procedures so that you can ship your iOS and/or Android app/s to the respective marketplace in no time! If your Workspace has more than one concurrency, you can have Android and iOS builds run simultaneously. Now let us guide you through the process!
Make sure you have signed up to bitrise.io and can access your Bitrise account. There are multiple ways of registering an account:
Adding an Ionic/Cordova project to BitriseClick to copy link
Add your project the same way as any other: see Adding a new project for the full walkthrough of the wizard. This section covers what's specific to Ionic and Cordova.
How the scanner tells Ionic and Cordova apartClick to copy link
The project scanner checks for an ionic.config.json file first, or the legacy ionic.project file. If it finds one, it registers the project as Ionic and doesn't check for config.xml at all.
If neither Ionic file is present, the scanner looks for a config.xml file with a cordova.apache.org namespace and registers the project as Cordova. If it also finds an Ionic config file alongside that config.xml, it defers to Ionic instead.
What you can configureClick to copy link
During the CI configuration stage, the wizard shows:
- Directory of the config.xml file: shown only if your config file isn't at the root of your repository.
- Platform: which platform to build for, Android, iOS, or both.
Installing JavaScript dependenciesClick to copy link
If the Bitrise project scanner has successfully scanned your project, Run npm command or Run yarn command Steps will be included in your default Workflows. These Steps can install the missing JavaScript dependencies for your app.
For native Android dependencies, you can use the Install missing Android SDK components Step.
For native iOS dependencies, you can use, among others, the Brew install Step or the Run CocoaPods install Step.
To install JavaScript dependencies with npm:
In this guide, we're using npm to install JavaScript dependencies. However, you can use the Run yarn command Step: it can install missing JS dependencies without any additional configuration required.
-
Log in to Bitrise and select Bitrise CI on the left, then select your project.
-
Click the Workflows button on the main page.
-
Make sure your Workflow includes the Run npm command Step.
-
In The 'npm' command with arguments to run input variable, type
install. Using the
npm cicommand instead ofnpm installIf you already have an up to date
package-lock.jsonfile in your project, we recommend using thecicommand in The 'npm' command with arguments to run input. Usingnpm cican not only result in much faster build times compared tonpm installbut more reliable builds as well.
Testing Ionic/Cordova appsClick to copy link
You can run unit tests for Ionic/Cordova apps on Bitrise by using our Karma Jasmine Test Runner or Jasmine Test Runner Steps.
If your Cordova/Ionic project has a Karma Jasmine dependency in its package.json file and a karma.conf.js file in the project root, our scanner will detect it when you're adding your app and automatically insert the respective testing Step into your Workflow. If this dependency is missing from your project, you can manually insert one of our testing steps to your Workflow using our Workflow Editor.
-
Log in to Bitrise and select Bitrise CI on the left, then select your project.
-
Click the Workflows button on the main page.
-
Make sure you have a testing Step in your Workflow.
Installing dependenciesMake sure you've completed Installing JavaScript dependencies before you run tests.
You can choose between the Karma Jasmine Test Runner and the Jasmine Test Runner Steps.
Cordova app configuration with Karma Jasmine Test Runner
In this example, you can find a bitrise.yml configuration that includes a Workflow called primary. This Workflow includes the Karma Jasmine Test Runner Step.
primary:
steps:
run_if: '{{getenv "SSH_RSA_PRIVATE_KEY" | ne ""}}'
title: Do anything with Script step
inputs:
- command: install
Code signing Ionic/Cordova projectsClick to copy link
If you want to build an app for iOS or Android, you need to upload the platform-specific files on the Project settings page. You can also generate builds for both platforms which requires uploading all code signing files of the platforms.
iOS code signing for Ionic and Cordova projectsClick to copy link
Naturally, Bitrise supports iOS applications built with either Ionic or Cordova. However, the code signing process is slightly different compared to a native Xcode project.
Bitrise supports both manual and automatic provisioning for Ionic and Cordova apps as well - and once again, the processes are somewhat different.
Ionic/Cordova code signing with manual code signing asset managementClick to copy link
-
Generate the native Xcode project locally from your Ionic or Cordova project by calling
cordova platform add iosorionic cordova platform add ios. -
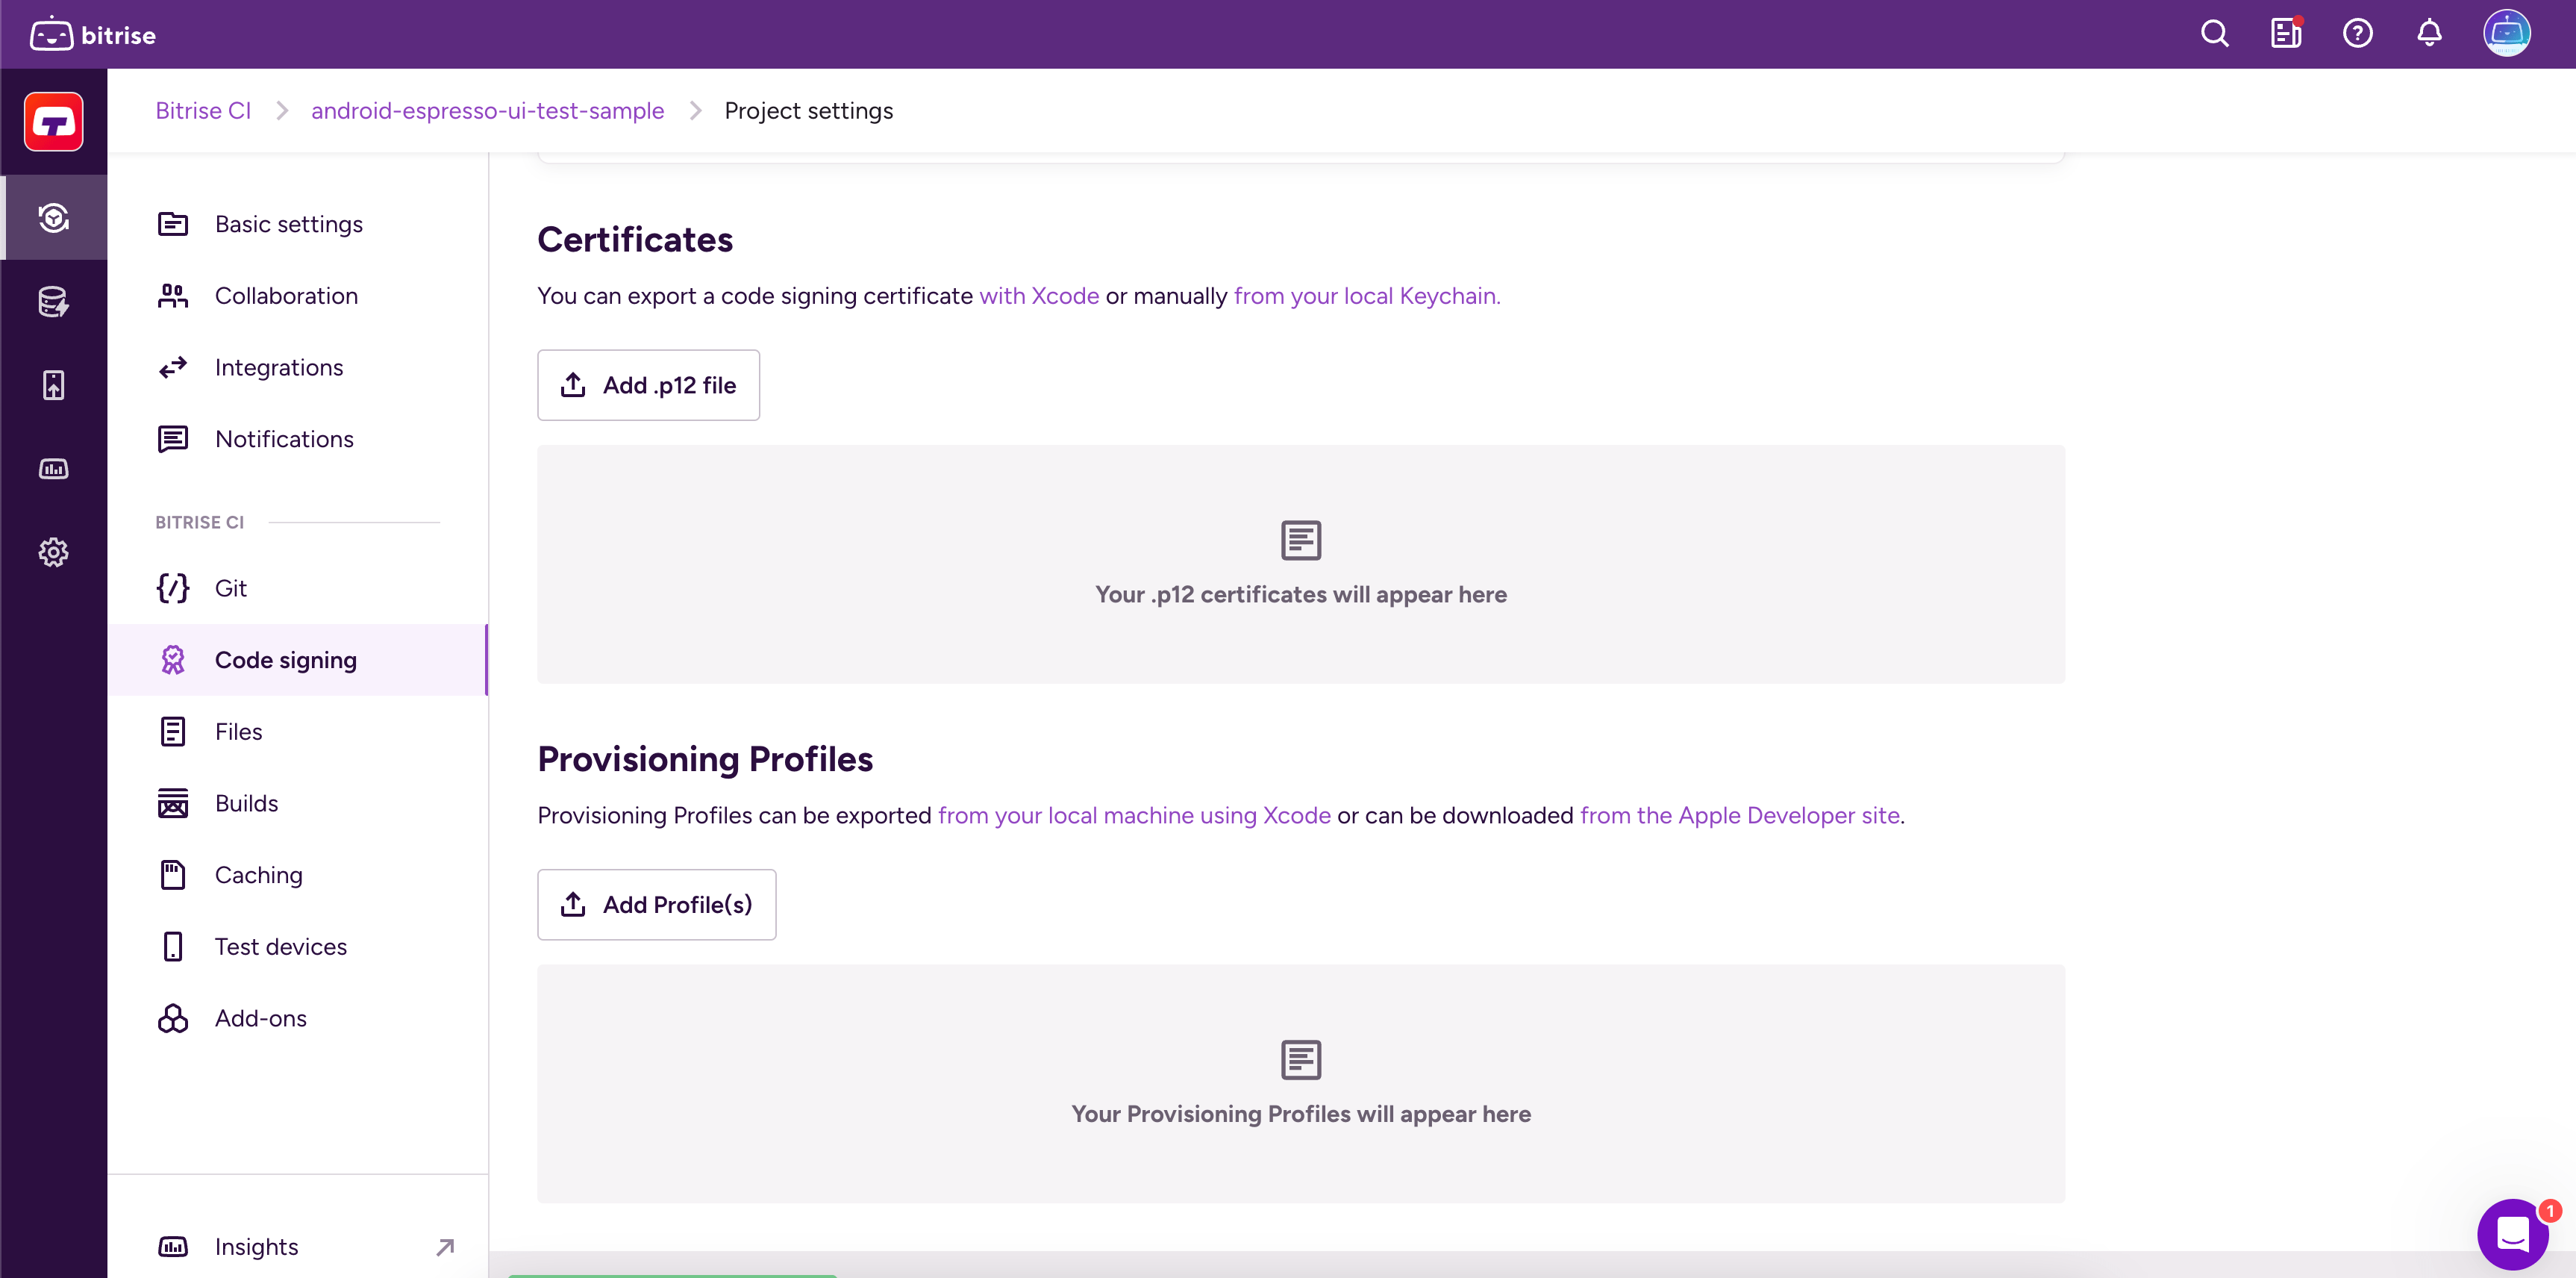
Upload the files to bitrise.io: open the Project settings page and select Code signing on the left. Upload a certificate and a provisioning profile.
-
Make sure you have the Certificate and profile installer Step in your Workflow.
-
Add the Generate cordova build configuration Step to your Workflow. It must come after the Certificate and profile installer Step.
-
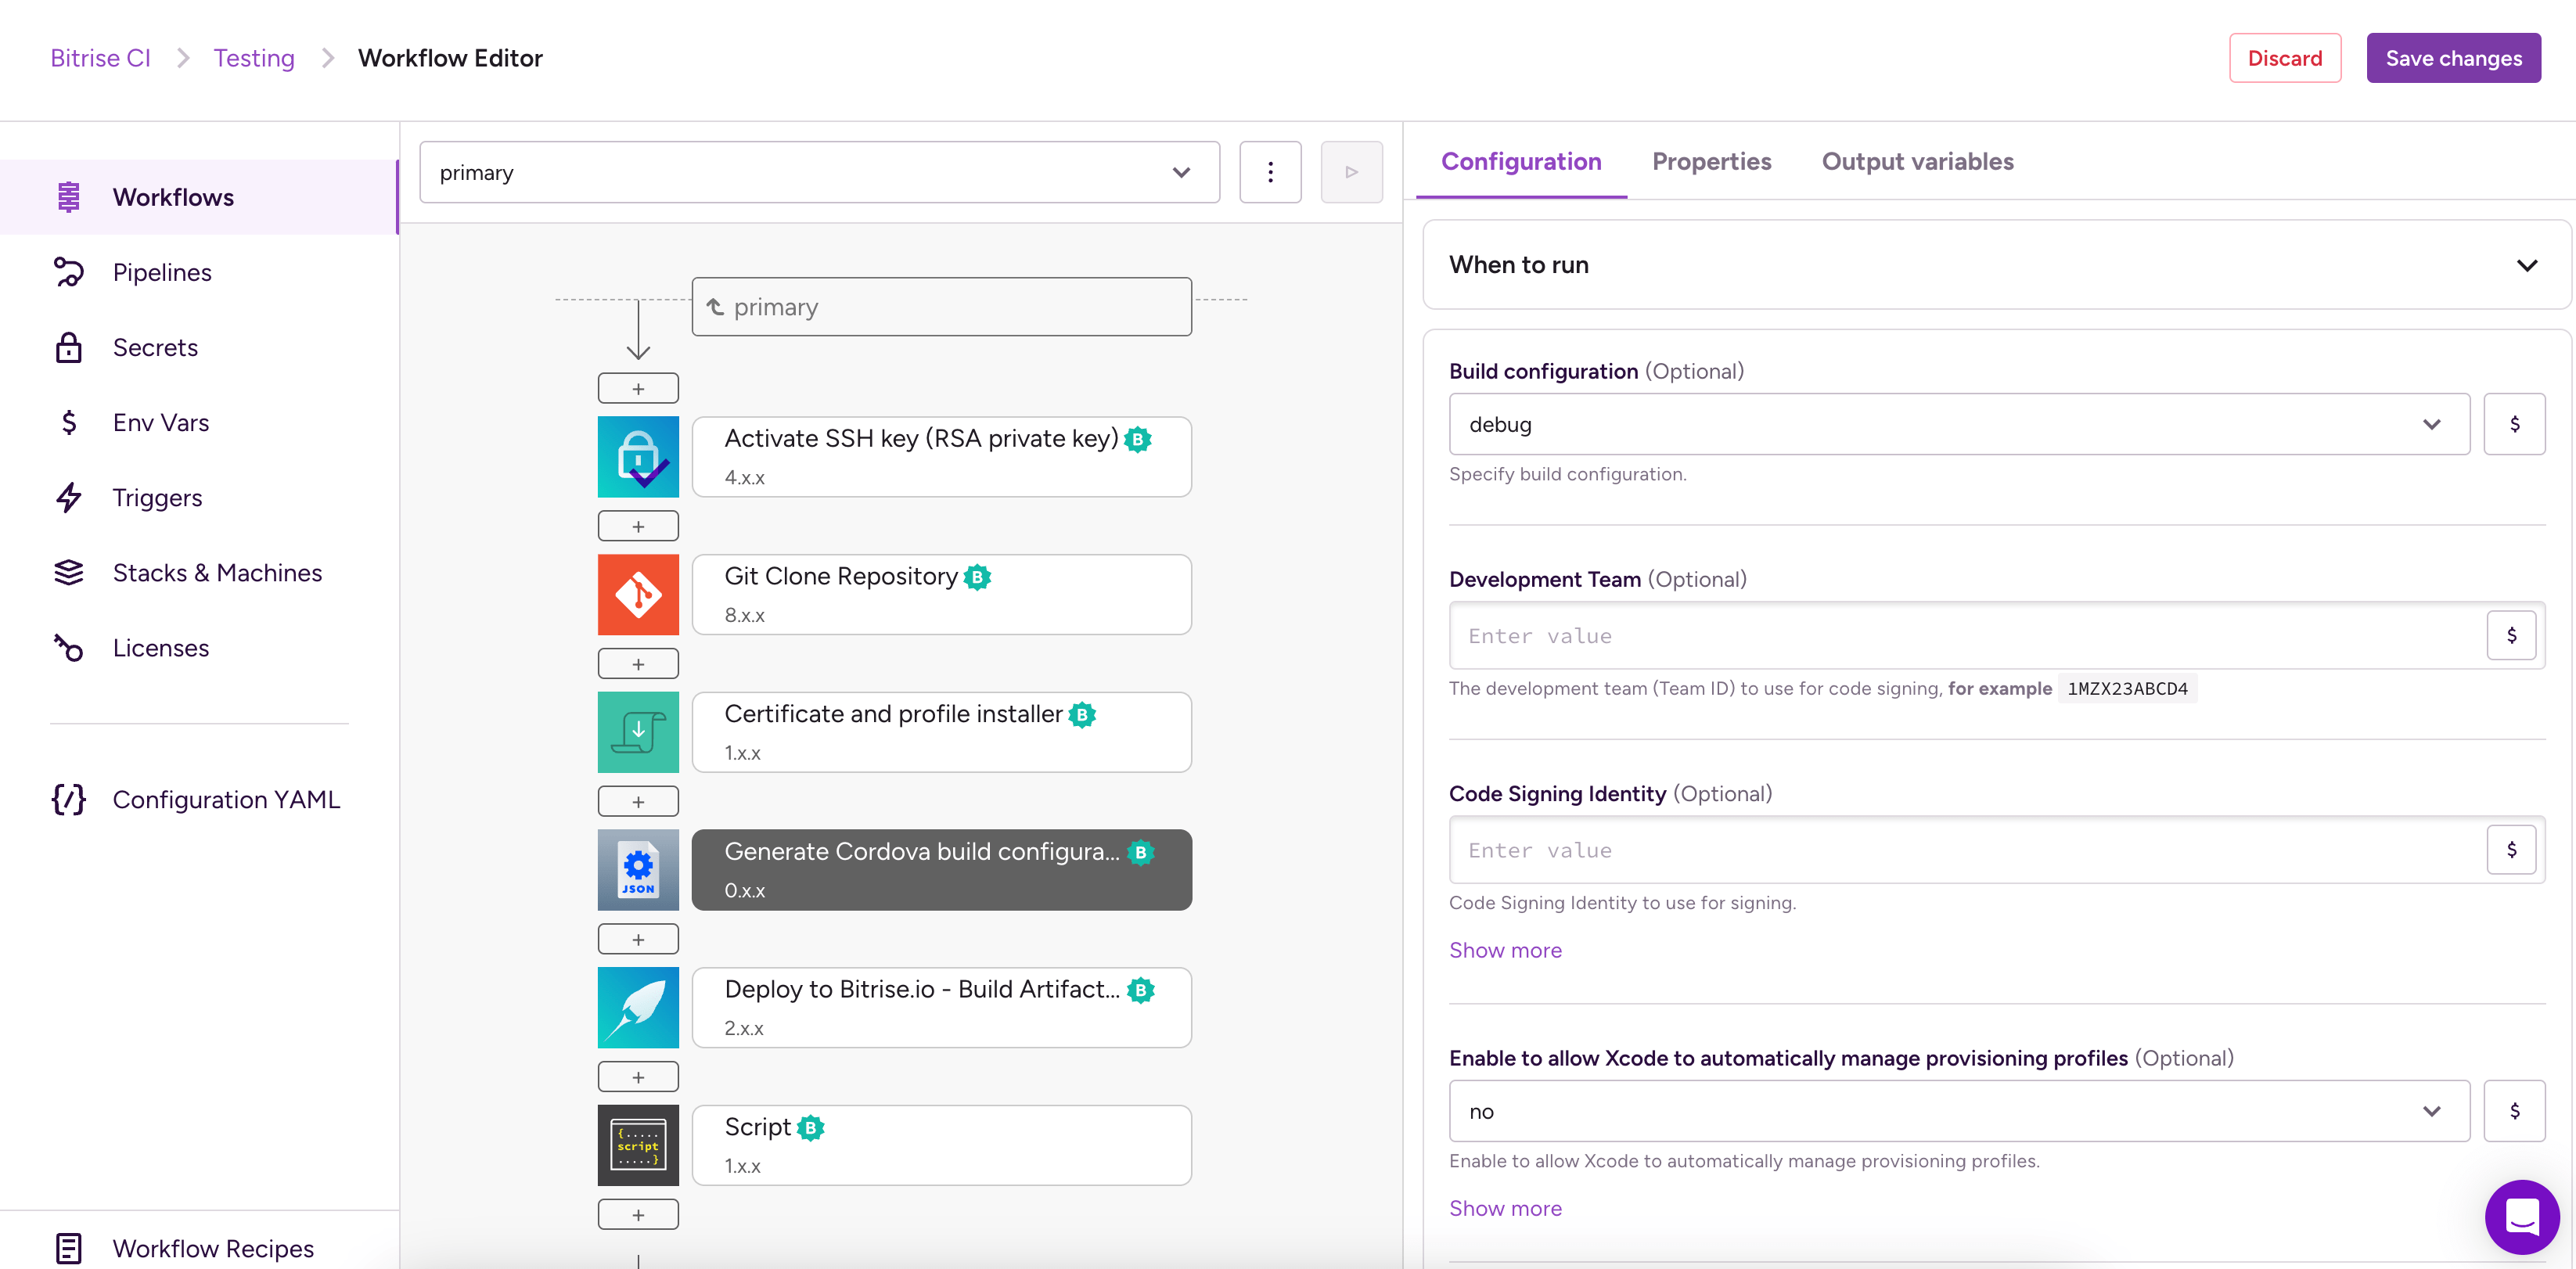
Fill in the required inputs for the Step. Please note that both the Code Signing Identity and the Provisioning Profile are required inputs for iOS apps even though they are not marked as such.
-
Build configuration: you can set it to either
debugorrelease. -
Code Sign Identity: enter a Developer or a Distribution identity.
-
Provisioning Profile: enter the appropriate provisioning profile.
-
Packaging Type: this controls what type of build is generated by Xcode. Set the type of code signing you need.
-
-
Add the Cordova archive or the Ionic archive Step to your Workflow.
-
Fill in the required inputs.
- The Platform input needs to be set to:
device. - The Build command configuration input must match the Build configuration input of the Generate cordova build configuration Step.
This Step must come after the Generate cordova build configuration Step in the Workflow.
- The Platform input needs to be set to:
-
Run your build!
Ionic/Cordova code signing with automatic code signing asset managementClick to copy link
-
Make sure your .p12 signing certificates are uploaded to bitrise.io.
-
Add the Cordova prepare or the Ionic prepare Step to your Workflow. These Steps call the
platform rmandplatform addcommands. -
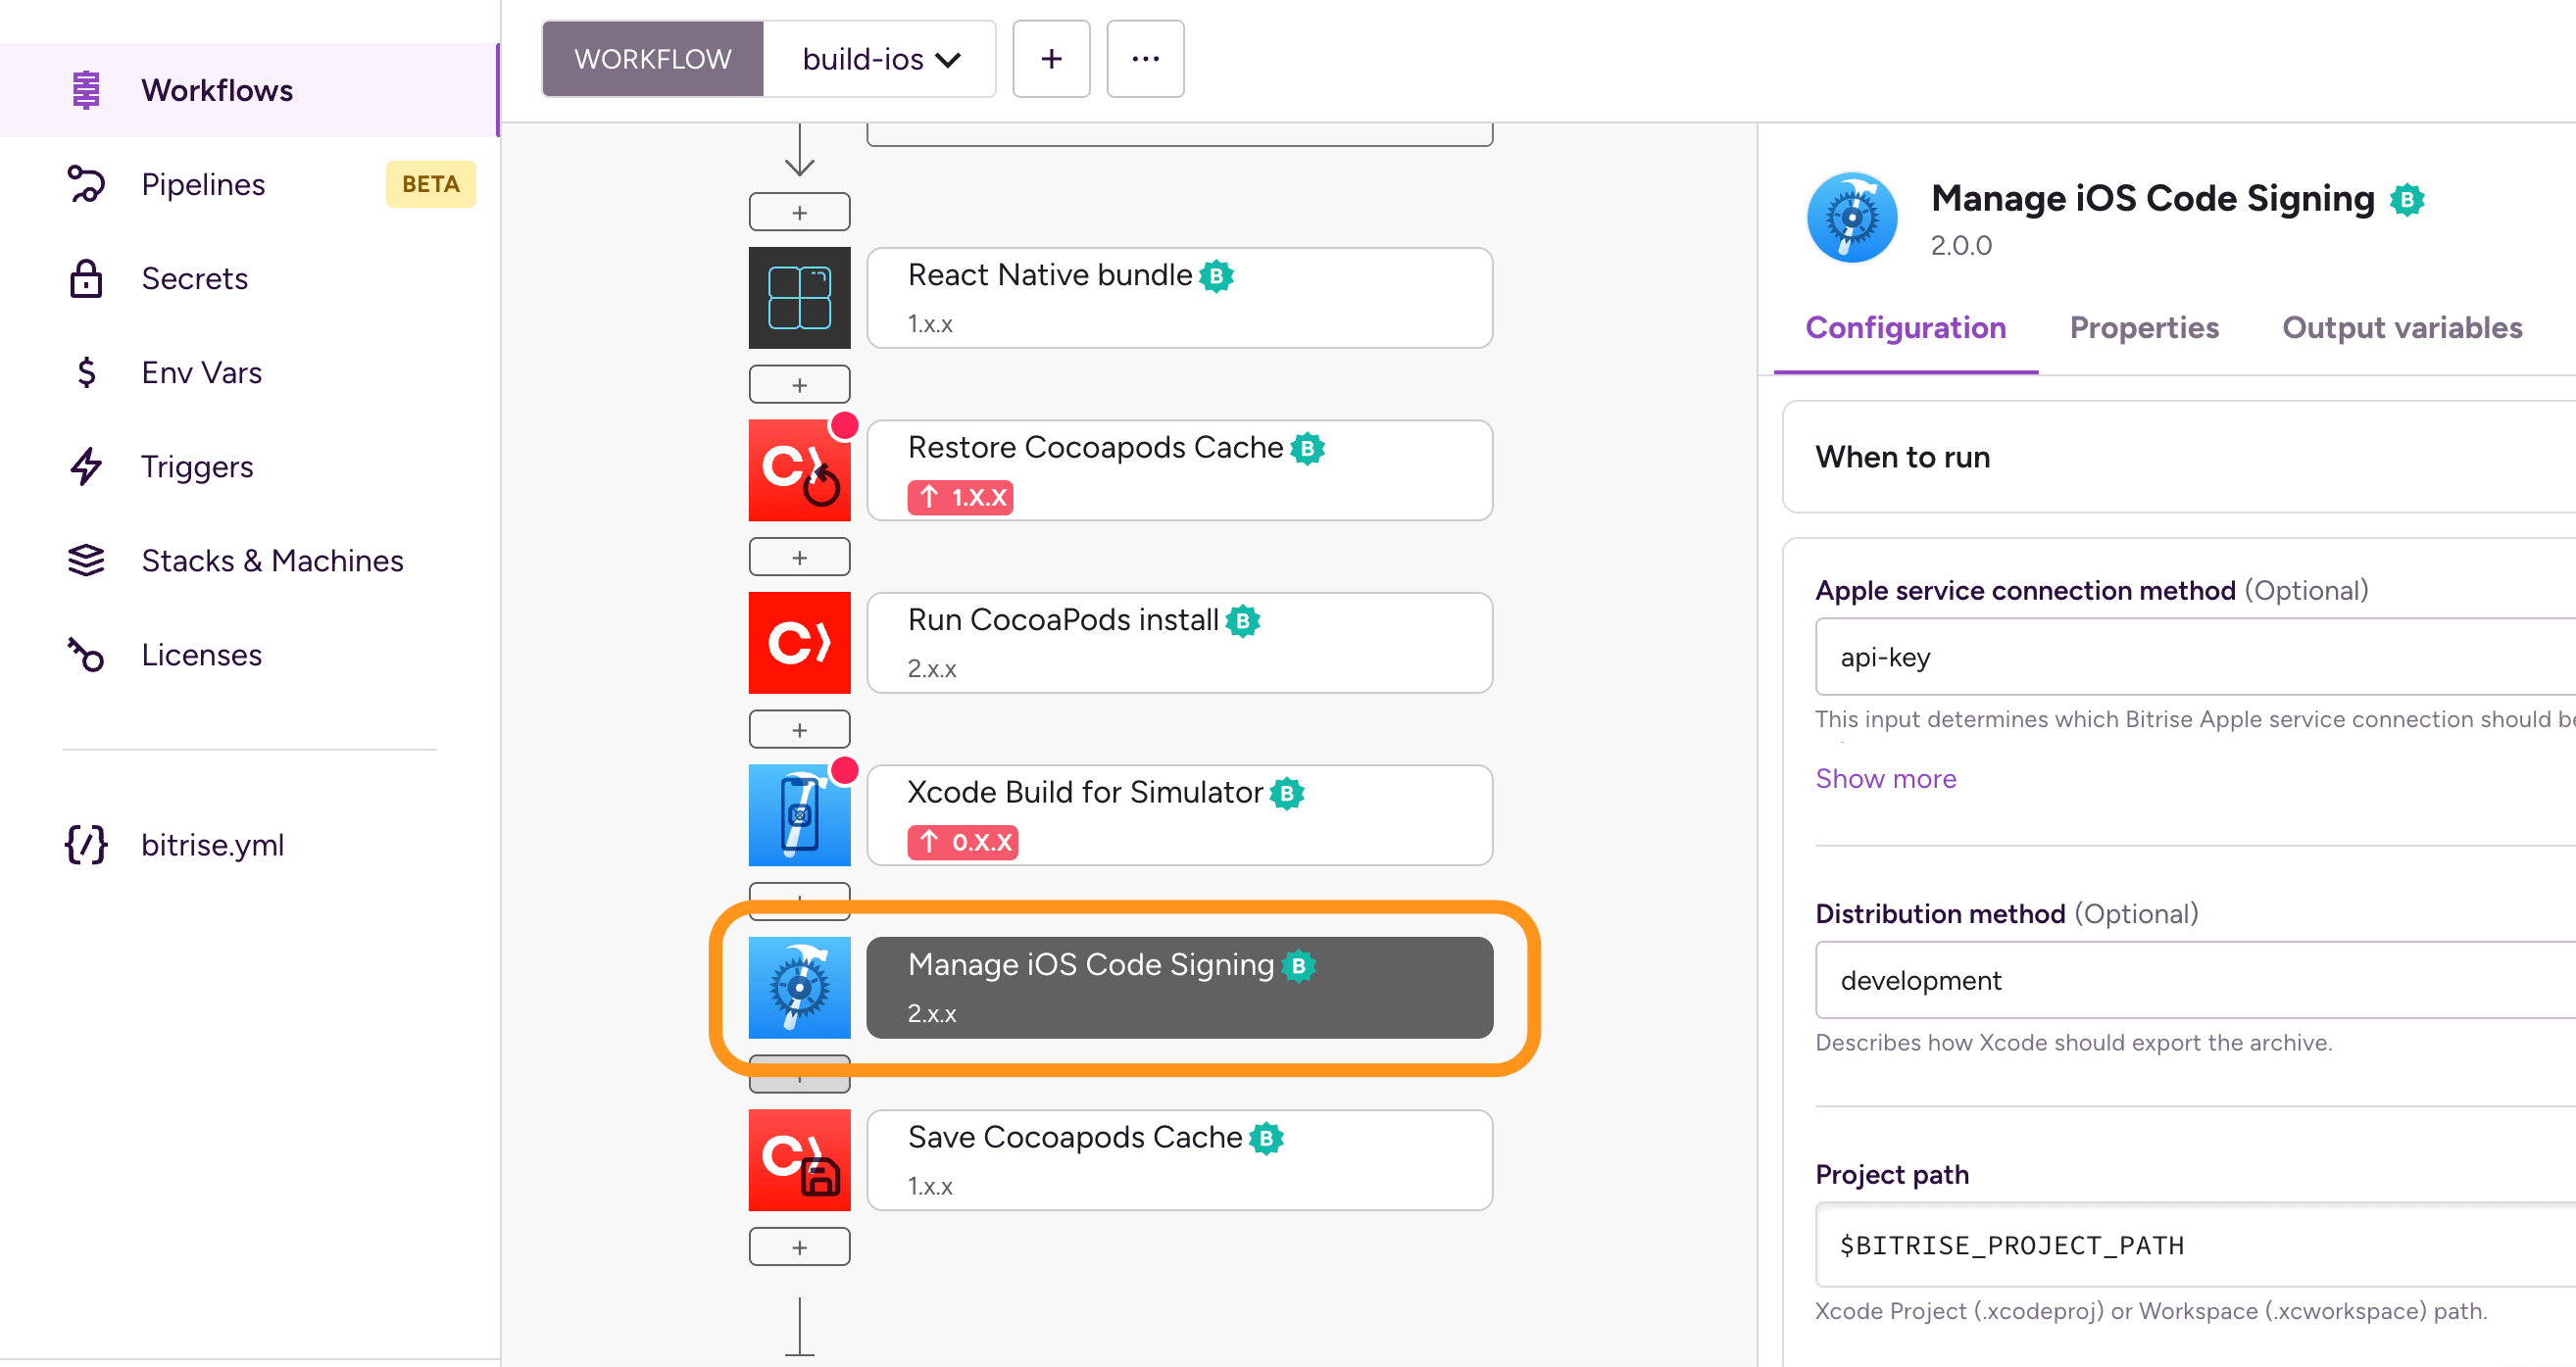
Add the Manage iOS Code Signing Step to your Workflow. If you have both the Certificate and Profile Installer and the Manage iOS Code Signing Steps in your Workflow, your build might encounter unexpected issues.
The Step will export:
- The project’s development team.
- The installed codesign identity’s name.
- The installed provisioning profile.
One code signing Step onlyIf you have both the Certificate and profile installer and the Manage iOS Code Signing Steps in your Workflow, your build might encounter unexpected issues.
-
Select the Apple service connection method (based on the Apple service you have set up in Bitrise) and the Distribution method.
-
Add the Generate cordova build configuration Step to your Workflow.
-
Configure the Step to use the code signing settings exported by the Manage iOS Code Signing Step:
Development distribution example:
- generate-cordova-build-configuration:inputs:- development_team: $BITRISE_DEVELOPER_TEAM- package_type: development- code_sign_identity: iPhone Developer- configuration: debugProduction distribution example:
- generate-cordova-build-configuration:inputs:- development_team: $BITRISE_DEVELOPER_TEAM- package_type: app-store- code_sign_identity: iPhone Developer- configuration: release -
Add the Cordova Archive or the Ionic Archive Step to your Workflow.
-
Fill in the required inputs.
-
The Platform input needs to be set to:
device. -
The Build command configuration input must match the Build configuration input of the Generate cordova build configuration Step.
-
-
Set the Should remove platforms as prepare step? to
false. This is crucial: it ensures the Step will not remove and re-add the platform of the native projects generated in the Cordova prepare or the Ionic prepare Step. -
Run your build!
Android code signing using the Android Sign StepClick to copy link
You can create a signed APK using the Android Sign Step in your Bitrise Workflow. This Step is configured to run if you have already uploaded your keystore file to Bitrise.
The Android Sign Step is not required if signing is configured in your project’s build.gradle file. If so, running the Android Build Step (or the Gradle Runner Step) signs the output (APK or AAB) automatically. Nevertheless, we recommend that you use the Android Sign Step to sign your project in an easy and secure way.
APKs can be signed with either jarsigner or apksigner. For APKs, if you wish to use apksigner to sign your project, then in the Android Sign Step you have to first set the Enables apksigner input to true and leave the APK Signature Scheme input on automatic. This way apksigner checks your APK’s minimum and target SDK versions and chooses the required schemes. It signs your project with V1 scheme if your minimum supported version is low and it also signs with other schemes for newer systems.
Please note that AAB files can only be signed with jarsigner. The Step uses jarsigner if it detects a file ending with .aab
-
Add the Android Sign Step to your Workflow after the Step that builds your APK or AAB file.
Bitrise uses the above Environment Variables and sets them as inputs into the respective fields of the Android Sign Step. Once the Step runs, it produces either a signed APK or an AAB. The signed APK or AAB is used in deploy Steps, for example, theGoogle Play Deploy Step or the Deploy to Bitrise.io Step. The latter deploys the APK/AAB on the Artifacts tab. You can also use Release Management to deploy your app once you built an installable artifact.
You can download your keystore file to the project directory using the File Downloader Step:
- file-downloader:
   inputs:
   - source: $BITRISEIO_ANDROID_KEYSTORE_URL
   - destination: "$HOME/keystores/my_keystore.jks" #native android#
If a Step requires the keystore file, make sure to include that Step AFTER the File Downloader Step.
After this Step, my_keystore.jks will be available at $HOME/keystores/my_keystore.jks.
Deploying Ionic/Cordova appsClick to copy link
To build and deploy an Ionic or Cordova app on Bitrise, you need to digitally sign both the Android and iOS project (if you're building both) and then use the Cordova Archive or the Ionic Archive Step to build the app before deploying it.
You can deploy the successfully built app to:
- Online stores, such as the Google Play Store or Apple's App Store.
- Bitrise.io: the generated binaries will be available on the Artifacts tab of the build's page. You can download them from there or share them with others via the public install page.
Deploying a cross-platform app to bitrise.ioClick to copy link
The Deploy to bitrise.io Step uploads all the artifacts related to your build into the Artifacts tab on your Build’s page.
You can share the generated binary file (APK for Android or an IPA file for iOS) with your team members using the public install page. The public install page is a URL you can share with others who can install the generated app binary on their device. You can also notify user groups or individual users that your APK or IPA file has been built.
The Deploy to Bitrise.io Step does not use Expo commands and doesn’t publish to expo.io. This Step publishes artifacts to Bitrise and is not specific to a particular platform.
If you need to publish to expo.io, set the Run expo publish after eject? input of the Expo Eject Step to yes. Be aware that in that case you have to provide your username and password for your Expo account to publish to expo.io.
-
Log in to Bitrise and select Bitrise CI on the left, then select your project.
-
Click the Workflows button on the main page.
-
Make sure you have the Deploy to bitrise.io Step in your Workflow.
-
In the Notify: User Roles, add the role so that only those get notified who have been granted with this role. Or fill out the Notify: Emails field with email addresses of the users you want to notify.
Make sure you set those email addresses as Secrets! These details can be also modified under Notifications if you click the eye icon next to your generated binary in the Artifacts tab.
-
If you want the Step to generate a public install page for you, set the Enable public page for the App? input to
true.
Deploying your Android project to Google PlayClick to copy link
You can use the Deploy to Google Play Step in your Workflow to upload your digitally signed AAB/APK to the Google Play Store.
-
Add the Cordova archive or the Ionic archive Step to your Workflow.
Note that if you’re building for both iOS and Android in one project, and either of your apps fails, the whole Cordova archive/Ionic archive Step will fail.
-
Fill in the required inputs.
- Set Platform to use in cordova-cli commands (Cordova) or Platform to use in ionic-cli commands (Ionic) to android (or ios,android if building for both platforms).
- Set Build command target to device.
- The Build command configuration input must match the Build configuration input of the Generate cordova build configuration Step.
The archive Step must come after the Generate cordova build configuration Step in the Workflow.
-
Configure code signing for your app.
-
You only need to do this for your very first Google Play deployment of the app.
-
Make sure you have the Deploy to Google Play Step after the Android Sign and Cordova Archive or Ionic Archive Step in your Workflow.
-
Fill out the required input fields as follows:
- Service Account JSON key file path: This field can accept a remote URL so you have to provide the Env Var which contains your uploaded service account JSON key. For example:
$BITRISEIO_SERVICE_ACCOUNT_JSON_KEY_URL. - Package name: The package name of your Android app.
- Track: The track where you want to deploy your APK (for example, alpha/beta/rollout/production or any custom track you set).
- Service Account JSON key file path: This field can accept a remote URL so you have to provide the Env Var which contains your uploaded service account JSON key. For example:
Deploying your iOS project to the App StoreClick to copy link
-
Add the Cordova archive or the Ionic archive Step to your Workflow.
Note that if you’re building for both iOS and Android in one project, and either of your apps fails, the whole Cordova archive/Ionic archive Step will fail.
-
Fill in the required inputs.
- The Platform input needs to be set to device.
- The Build command configuration input must match the Build configuration input of the Generate cordova build configuration Step.
The archive Step must come after the Generate cordova build configuration Step in the Workflow.
-
Configure iOS code signing for your iOS project.
-
Add the Deploy to App Store Connect - Application Loader (formerly iTunes Connect) Step to your Workflow, after the Xcode Archive & Export for iOS Step but preferably before the Deploy to Bitrise.io Step.
-
Provide your Apple credentials in the Deploy to App Store Connect - Application Loader (formerly iTunes Connect) Step.
The Step will need your:
- Apple ID.
- Password or, if you use two-factor authentication on App Store Connect, your application password.
Don’t worry, the password will not be visible in the logs or exposed.