Getting started with iOS projects
Developing for iOS is complex - our aim is to make it as easy as possible for you! In this guide, we’ll walk you through how to add an iOS project to Bitrise, how to run Xcode tests, manage your code signing files, and deploy the finished app to bitrise.io and to the App Store.
Adding an iOS project to BitriseClick to copy link
Add your project the same way as any other: see Adding a new project for the full walkthrough of the wizard. This section covers what's specific to iOS.
How the scanner detects an iOS projectClick to copy link
The project scanner looks for .xcodeproj files and .xcworkspace directories, then checks each one's build settings: if SDKROOT is set to iphoneos (or SUPPORTED_PLATFORMS includes it), the scanner registers the project as iOS. A project that's already a member of a workspace isn't listed separately, since the workspace covers it.
If your repository has no Xcode project or workspace, the scanner falls back to a Package.swift file and treats it as a Swift package. It also detects a Podfile for CocoaPods and a Cartfile for Carthage, and adjusts the generated Workflow to install those dependencies.
What you can configureClick to copy link
During the CI configuration stage, the wizard shows:
- Project or workspace path: the
.xcodeproj,.xcworkspace, orPackage.swiftfile to build. - Scheme name: any shared scheme found in your project or workspace. The scanner can only detect shared schemes, not user-specific ones.
- Distribution method: how Bitrise exports your app, for example App Store, Ad Hoc, Enterprise, or Development. This option isn't shown for Swift packages, since those aren't archived.
Testing your iOS appClick to copy link
If you have test targets defined, the default Workflows of an iOS project include the two Steps you need to run your Xcode tests, and view their results on bitrise.io:
- Xcode Test for iOS
- Deploy to Bitrise.io
The Xcode Test for iOS Step runs the pre-defined Xcode tests. It has a default configuration that does not need to be modified: if the tests are written correctly, they will work. You can find the same configuration options in Xcode, too.
We recommend checking that the stack selected for your project has the same Xcode version you used to build the project. For example, if your simulator test fails with the Ineligible destinations for the scheme message, then make sure the Xcode version in the Stacks & Machines section is correct. You can read more about our stacks: Build stacks.
The Deploy to Bitrise.io Step will deploy the following to the Logs and Artifacts tab of the build:
- Your Xcode test results.
- Your raw xcodebuildoutput log.
The Deploy to Bitrise.io Step also exports the results of the Xcode Test for iOS Step to test reports.
Creating a signed IPA for Xcode projectsClick to copy link
For a comprehensive overview on what Steps are available for code signing asset management, visit the iOS code signing page.
You can easily create a signed IPA file for your Xcode project with Bitrise.
- You have set up Apple service connection on Bitrise.
- Your code signing files are managed correctly.
- You set the relevant inputs of our Xcode Archive & Export for iOS Step.
We strongly recommend uploading BOTH the development and distribution signing certificates for your project. If you don't have an uploaded development signing certificate, Steps with automatic provisioning options will generate one on the fly every time you start a build. This can eventually lead to reaching the maximum number of certificates, blocking you from starting new builds.
If you’re all set, proceed to setting up IPA export in your Workflow.
- Workflow Editor
- Configuration YAML
-
Make sure the necessary code signing files have been collected and uploaded.
-
Make sure you have the Xcode Archive & Export for iOS Step in your Workflow.
-
Set the Distribution method input of the Step.
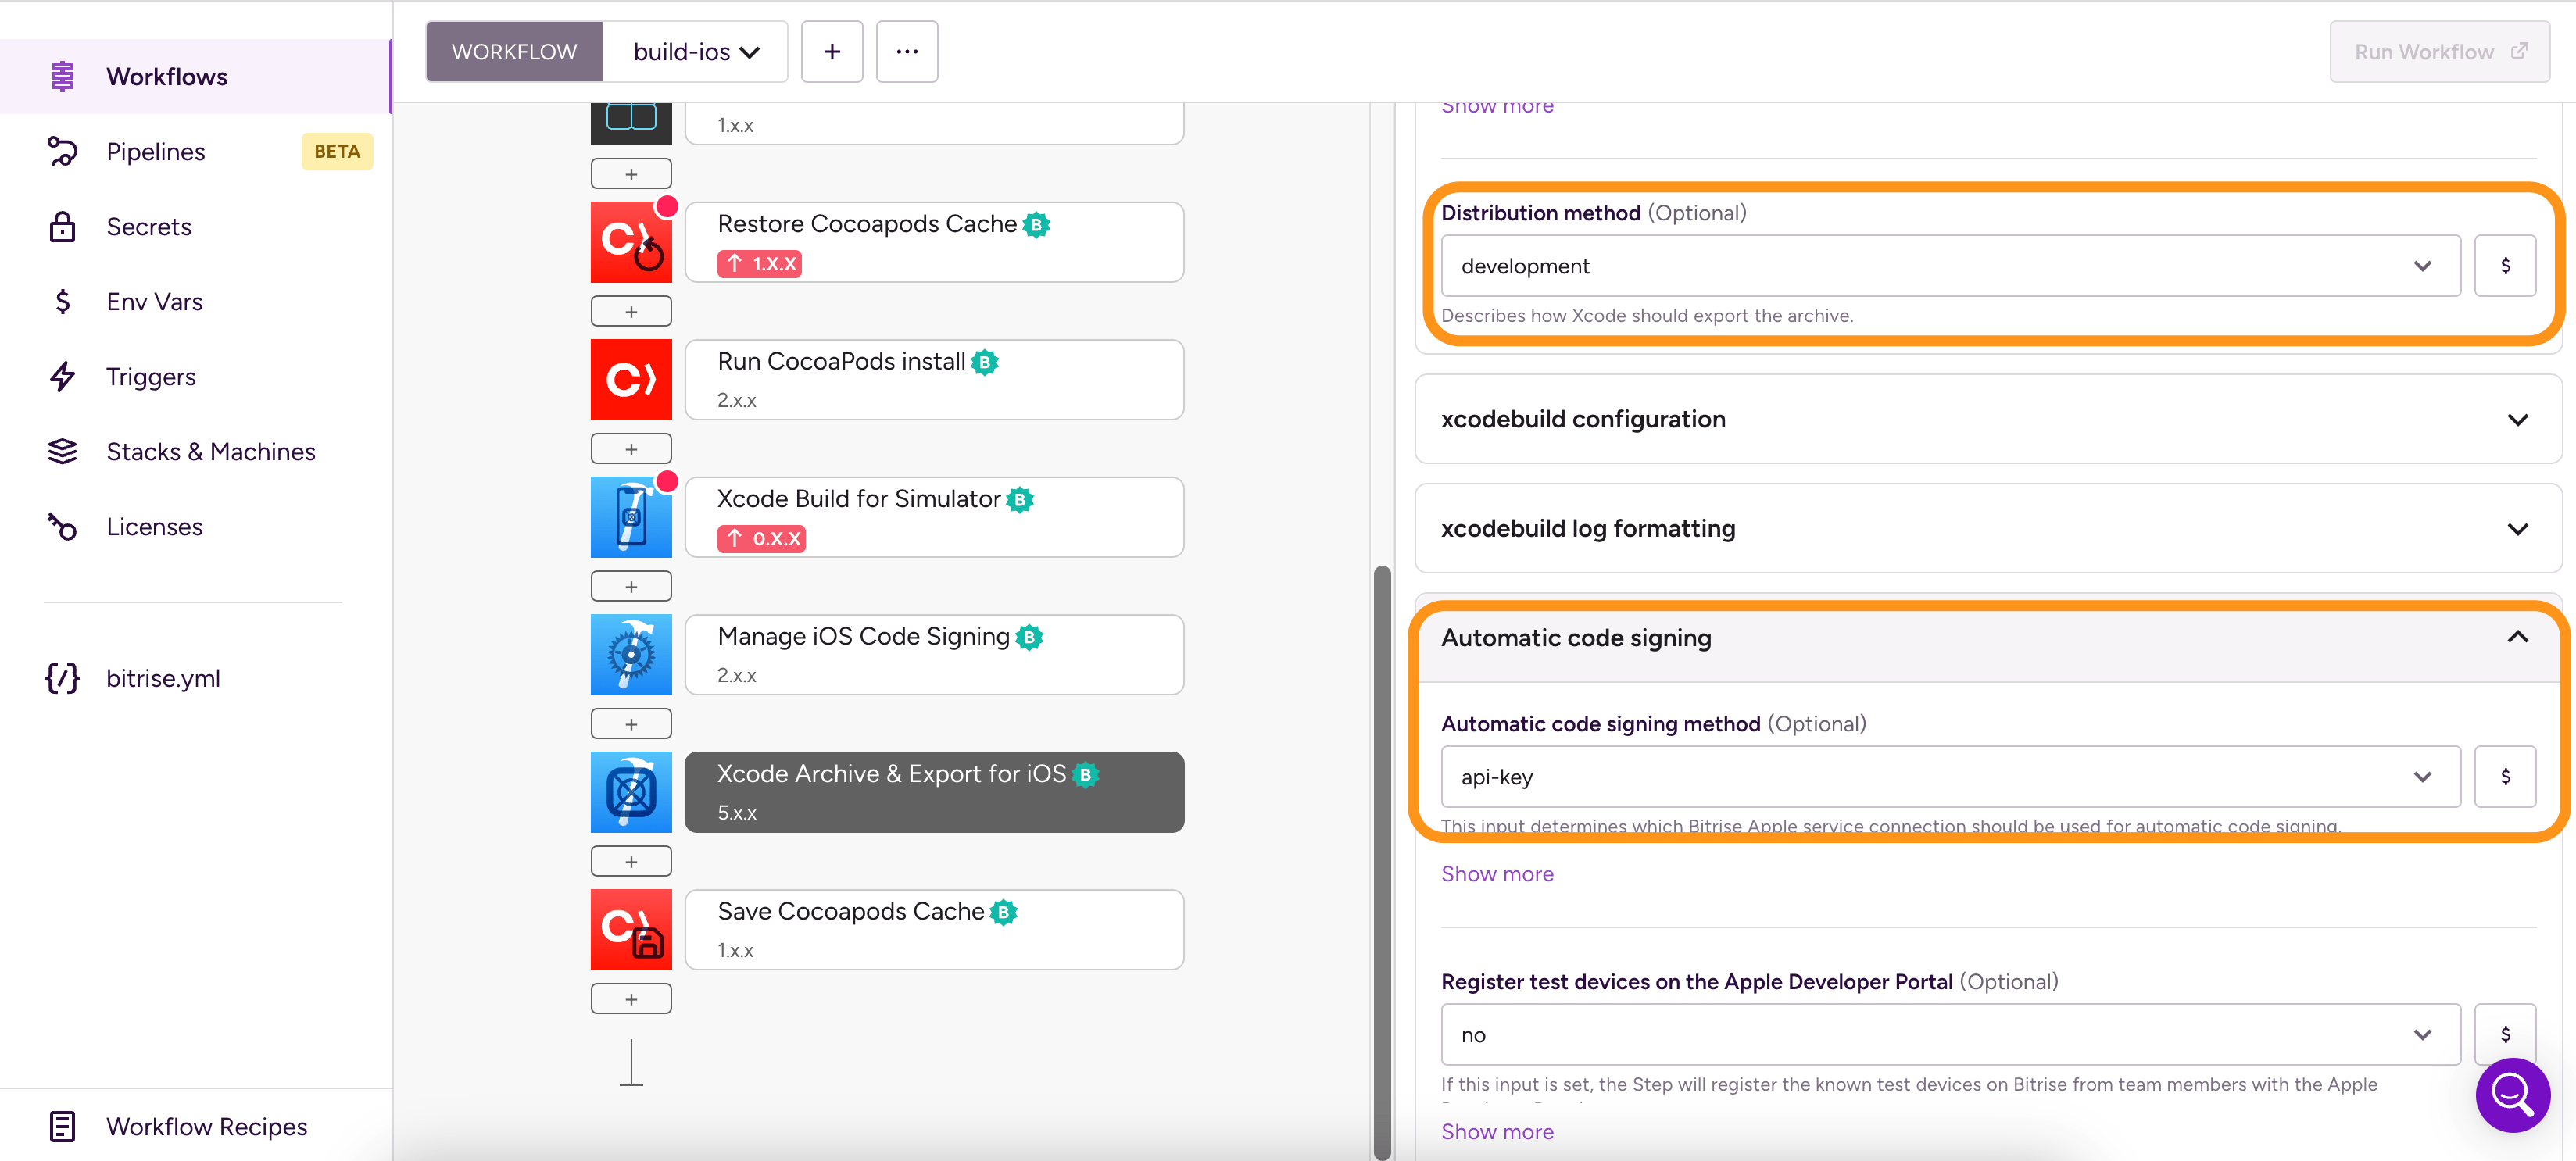
The options are:
app-store: Choose this if you want to deploy the app to the App Store. Requires a Distribution certificate and an App Store provisioning profile.ad-hoc: Choose this if you want to deploy the app to ad-hoc testers. Requires a Distribution certificate and an Ad Hoc provisioning profile.enterprise: Choose this if you have an Apple Enterprise account and want to use that to distribute your app.development: Choose this for internal testing. Requires a Developer certificate and a Development provisioning profile.
-
Set the Automatic code signing input to the Apple service connection you want to use for code signing. The available options are:
offif you don’t use automatic code signing.api-keyif you use API key authorization.apple-idif you use Apple ID authorization.
-
Save the Workflow, and start a new build.
-
Make sure all the necessary code signing files are available for your build.
-
Open the
bitrise.ymlfile of your app. -
Make sure you have the
xcode-archiveStep in your Workflow.my-workflow:steps:- xcode-archive:inputs: -
Set the
distribution_methodinput to the correct value. The available options are:app-store: Choose this if you want to deploy the app to the App Store. Requires a Distribution certificate and an App Store provisioning profile.ad-hoc: Choose this if you want to deploy the app to ad-hoc testers. Requires a Distribution certificate and an Ad Hoc provisioning profile.enterprise: Choose this if you have an Apple Enterprise account and want to use that to distribute your app.development: Choose this for internal testing. Requires a Developer certificate and a Development provisioning profile.
my-workflow:steps:- xcode-archive:inputs:- distribution_method: development -
Set the
automatic_code_signinginput to the Apple service connection you want to use for code signing. The available options are:offif you don’t do automatic code signing.api-keyif you use API key authorization.apple-idif you use Apple ID authorization.
my-workflow:steps:- xcode-archive:inputs:- automatic_code_signing: api-key- distribution_method: development
That’s all. Xcode will automatically select the right signing files based on your project’s Bundle ID and Team ID settings, and the export method you set.
Signing an IPA file with a different team’s code signing fileClick to copy link
You might want to sign the IPA file with a different team’s code signing files. For example:
- If you use your company’s code signing files for internal builds, but your client’s code signing files are used for App Store distribution.
- If you use Apple ID for automatic code signing and the Apple ID belongs to multiple teams, use The Developer Portal team to use for this export input to specify which team should be used for automatic code signing asset management.
To do so:
- Make sure the right code signing files of the new development team are uploaded to Bitrise.
- Set the The Developer Portal team to use for this export option as well (in addition to the Distribution method).
- Set the Distribution method.
Deploying the app to App Store ConnectClick to copy link
Keep in mind that every time you want to push an app to App Store Connect, it must have a unique build and version number: increment either or both before deploying.
-
Make sure you have a working connection to your Apple Developer account.
-
Generate an IPA file on your own machine at least once.
-
Upload all necessary code signing files to Bitrise.
To deploy an app to App Store Connect, you need a Distribution type certificate and an App Store type provisioning profile.
-
Make sure the Xcode Archive & Export for iOS Step is in your Workflow.
-
Set the Automatic code signing input to the Apple service connection you want to use for code signing. The available options are:
offif you don’t use automatic code signing, or if you exclusively use Step inputs for Apple service authentication.api-keyif you use API key authorization.apple-idif you use Apple ID authorization.
-
Set the Distribution method input of the Step to
app-store.The Step will store the path of the exported .ipa file in the $BITRISE_IPA_PATH Environment Variable.
-
Add the Deploy to App Store Connect Step to your Workflow.
-
Fill the required inputs.
- Either the app’s Apple ID or its Bundle ID is a required input. One of the two must be provided.
- If you set the Submit for Review to
yes, the Step will wait for your submission to be processed on App Store Connect and then submit the given version of the app for review. - The default value of the Skip App Version Update input is
No. Change it only if you incremented the app version number in another way. - If you use an App Store Connect account that is linked to multiple teams, provide either a Team ID or a Team name!
-
Start a build.
If all goes well, your app will be submitted to App Store and you can distribute it via Testflight or via the App Store!