ビルド中にVPNに接続する
ビルド中にVPNに接続するには、OpenVPNサーバーのセットアップなどのVPN接続を確立するステップがあることを確認してください。
サーバーに接続できるようにするには、ビルドにVPN接続が必要になる場合があります。 git clone リポジトリまたはプライベートAPIにアクセスします。
VPNに接続するには、次のことを行う必要があります。
-
ローカルネットワークのアドレス空間がと衝突しないことを確認してください Bitrise仮想マシンのアドレス空間 これはVPNでエラーを引き起こす可能性があるためです。
-
必要なVPNコンポーネントをインストールして構成します。
-
VPNに接続します。
もちろん、VPN接続を使用する前に、ワークフローのどこにでもVPNを構成して接続できます。たとえば、リポジトリにアクセスするためにVPN接続が必要な場合は、 Gitクローン ステップ。
SSHセッション
VPNツールを選択してセットアップ/構成を行うときは、既存のSSHセッションを再起動したり中止したりしないように注意する必要があります。 NS bitrise.io ビルドのコントロール/マスターマシンとビルド仮想マシン間のSSH接続が終了すると、ワーカーはビルドを中止します。
VPN経由でリポジトリにアクセスする
アプリケーションのリポジトリにVPN経由でのみアクセスできる場合は、何よりも注意すべき点が2つあります。
-
ビルド中は、リポジトリを仮想マシンに複製する前にVPN接続を確立する必要があります。実際には、これは、接続を確立するステップを、 Gitクローン ワークフローにステップインします。
-
新しいアプリを追加するときは、回避策が必要です。アプリの追加プロセス中にVPNなしでアクセスできるダミーリポジトリを使用します。
この回避策を実行してみましょう!
-
VPN接続なしでアクセスできる空のリポジトリを作成します。
-
このリポジトリをソースとして使用して、新しいアプリを追加します。プライベートアプリであることを確認してください! Webhookを登録する必要はありません。
-
Bitriseでアプリを開くには、 管理者 アプリチームでの役割。
-
に移動します 設定 タブ。
-
左側で、 全般的。
-
ポップアップウィンドウで、新しいリポジトリのURLを貼り付けます。
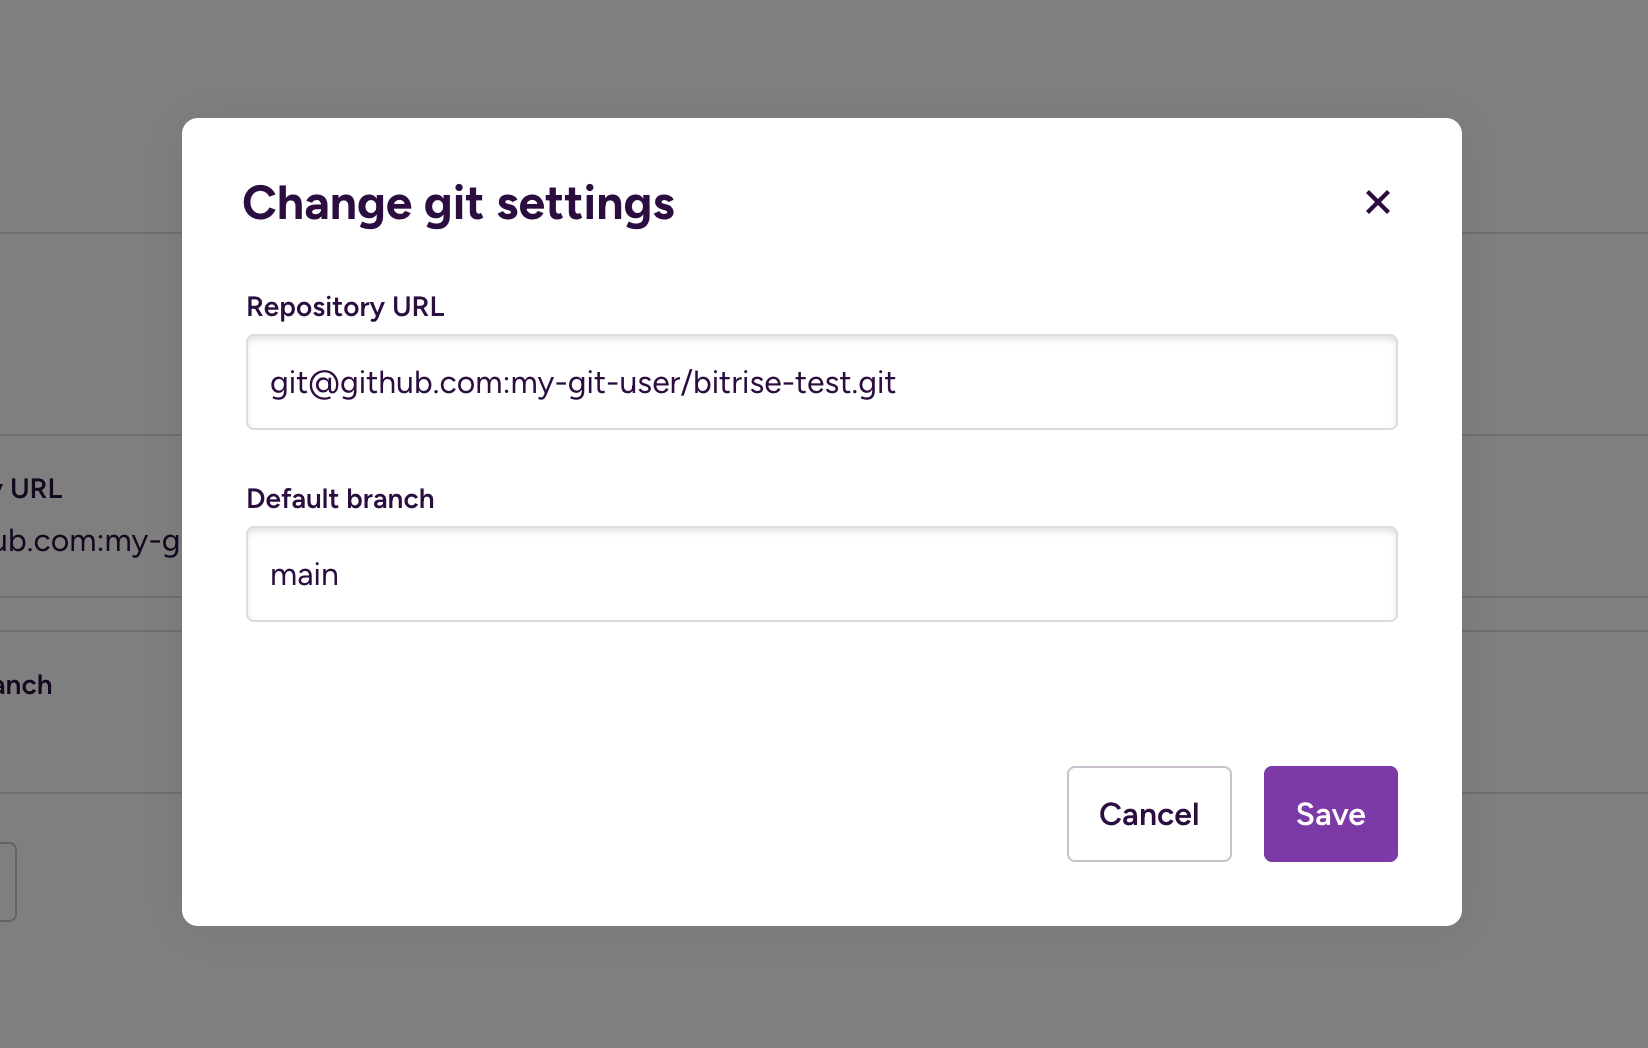
-
クリック 変更内容を保存。
-
ワークフロー内のリポジトリにアクセスする必要があるステップの前に、VPN接続を確立する1つまたは複数のステップを配置します。
これで完了です。 VPN接続を確立するさまざまな方法については、構成例をご覧ください。
VPN構成の例
このセクションでは、ビルド中にVPNに接続するための3つの構成例を示します。
OpenVPNサーバーへの接続手順の使用
を使用するには OpenVPNサーバーに接続します ステップでは、事前にOpenVPNサーバーを構築してから、証明書ファイルと秘密鍵をエンコードする必要があります。
-
Base64で以下をエンコードします。
-
CA証明書
-
クライアント証明書
-
クライアントの秘密鍵
次のコマンドを使用して、ファイルをbase64エンコードできます。
$ base64 <filepath>
-
-
Bitriseでアプリを開き、 ワークフロー タブ。
-
エンコードされた証明書とキーを次のように登録します 秘密。
次のキーはVPNステップのデフォルト入力であるため、使用することをお勧めします。
-
CA証明書:
$VPN_CA_CRT_BASE64 -
クライアント証明書:
$VPN_CLIENT_CRT_BASE64 -
秘密鍵:
VPN_CLIENT_KEY_BASE64
-
-
追加します OpenVPNサーバーに接続します ワークフローに進みます。
VPN接続が必要になる可能性のあるステップの前にステップを追加します。
-
以前に作成したシークレットをそれぞれの入力に追加します。
-
Base64でエンコードされたCA証明書
-
Base64でエンコードされたクライアント証明書
-
Base64でエンコードされたクライアント秘密鍵
推奨キーを使用してシークレットを作成した場合は、入力を変更する必要はありません。
-
-
その他の必要な入力を入力します。
-
ホスト:OpenVPNサーバーのIPまたはホスト名
-
港:OpenVPNサーバーのポート番号
-
プロトコル:OpenVPNサーバープロトコル
-
StrongswanVPNの使用
これは、リポジトリに保存してそこから実行するか、コンテンツをコピーして貼り付けることができるサンプルスクリプトです。 スクリプトステップ あなたの中で bitrise 構成 (bitrise.yml /ワークフロー)。
このスクリプトは、Strongswan VPN を使用して VPN に接続します。 macOS または Linux で動作します。スクリプトが正常に実行されると、後続の Bitrise ステップは VPN 接続を介してデバイスとサービスにアクセスできます。
#!/usr/bin/env bash
set -e

echo "WAN IP"
# This prints the servers Internet IP adress to the log, useful for debugging
curl http://httpbin.org/ip

case "$OSTYPE" in
  linux*)
    echo "Configuring for Linux"

    # Variables
    etc_dir=/etc
    etc_sudo='sudo' # Sudo is needed for Linux Strongswan configuration

    # Install strongswan
    echo "Installing Strongswan..."
    sudo apt-get install -y strongswan

    ;;
  darwin*)
    echo "Configuring for Mac OS"

    # Variables
    etc_dir=/usr/local/etc
    etc_sudo='' # Sudo is NOT needed for Mac OS Strongswan configuration

    # Install Strongswan using homebrew
    echo "Installing OpenSSL..."
    # Manually install OpenSSL first to save time, since installing Strongswan directly compiles OpenSSL from source instead
    brew install openssl
    echo "Installing Strongswan..."
    brew install strongswan

    ;;
  *)
    echo "Unknown operative system: $OSTYPE, exiting"
    exit 1
    ;;
esac


# Method for rendering a template string file (when run, returns the input string with $VARIABLES replaced from env)
render_template() {
  eval "echo \"$(cat $1)\""
}

# Create a temporary directory to hold files
temp_dir=/tmp/vpn-config
mkdir $temp_dir

# IPsec config file, see examples at https://wiki.strongswan.org/projects/strongswan/wiki/IKEv1Examples and https://wiki.strongswan.org/projects/strongswan/wiki/IKEv2Examples
echo "Downloading ipsec.conf..."
wget https://www.example.com/ipsec.conf.template -O $temp_dir/ipsec.conf.template
# IPsec credentials file, see documentation at https://wiki.strongswan.org/projects/strongswan/wiki/IpsecSecrets
echo "Downloading ipsec.secrets..."
wget https://www.example.com/ipsec.secrets.template -O $temp_dir/ipsec.secrets.template
# In some cases you might need to download the certificate, or certificate chain, of your other VPN endpoint
echo "Downloading server.crt..."
wget https://www.example.com/server.crt -O $temp_dir/server.crt

echo "Rendering config templates"
render_template $temp_dir/ipsec.conf.template > $temp_dir/ipsec.conf
render_template $temp_dir/ipsec.secrets.template > $temp_dir/ipsec.secrets

echo "Installing configuration"
$etc_sudo cp $temp_dir/ipsec.conf $etc_dir/ipsec.conf
$etc_sudo cp $temp_dir/ipsec.secrets $etc_dir/ipsec.secrets
$etc_sudo cp $temp_dir/server.crt $etc_dir/ipsec.d/ocspcerts/server.crt

# Start the ipsec service
echo "Starting ipsec"
sudo ipsec start

# We're sleeping between commands, mostly since Mac OS seems to have some problems otherwise
sleep 1

# Output some helpful status to the log
echo "Status ipsec"
sudo ipsec statusall

sleep 1

# Switch out myconnection with the name of your connection in ipsec.conf
echo "Initiating VPN connection"
sudo ipsec up myconnection

sleep 1

case "$OSTYPE" in
  linux*)
    ;;
  darwin*)
    # In Mac OS El Capitan, the `sudo ipsec up` command consistently fails the first time, but succeeds after a restart of the ipsec service
    echo "Restarting ipsec"
    sudo ipsec restart

    sleep 1

    echo "Initiating VPN connection"
    sudo ipsec up myconnection

    sleep 1

    # This step might apply if you are routing all traffic trough the IPsec connection (that is, if your remote IP range is 0.0.0.0/0)
    # Mac OS El Capitan seems to have problems getting the DNS configuration from the Strongswan interface. Also IPv6 sometimes causes issues. So we're manually turning off IPv6 and forcing a new DNS configuration.
    echo "Disabling IPv6 and forcing DNS settings"
    # Fetch main interface
    main_interface=$(networksetup -listnetworkserviceorder | awk -F'\\) ' '/\(1\)/ {print $2}')
    # Completely disable IPv6
    sudo networksetup -setv6off "$main_interface"
    # Switch 10.0.0.1 with your DNS server
    sudo networksetup -setdnsservers "$main_interface" 10.0.0.1
    ;;
  *) ;;
esac

# Your VPN connection should be up and running. Any following steps of your Bitrise workflow can access devices over your VPN connection 🎉
CiscoVPNの使用
あなたは使用することができます CiscoVPN接続 手順:vpncを使用して、VPN3000コンセントレーター、Juniper / Netscreen、IOS、およびPIXが提供するCiscoVPNに接続します。
-
でアプリを開きます ビットライズ。
-
クリック メインページのボタン。
-
追加します CiscoVPN接続 ワークフローの開始時にステップします。
-
次のいずれかの方法で、ステップに必要なVPNクライアント設定と資格情報を提供します。
-
既存のvpnc構成ファイルの使用:
vpnc.conf -
を使用して コマンドラインオプション ステップの入力。この入力で指定されたオプションは、構成ファイルよりも優先されます。
-
vpncの設定の詳細については、 vpncホームページ そしてその vpncマニュアル。