OIDC for AWS
Generate OIDC tokens during your Bitrise build to exchange them for scoped access tokens with
Generate OpenID Connect (OIDC) tokens during your Bitrise build to exchange them for AWS Identity and Access Management (IAM) roles with AWS-scoped permissions.
To use OIDC tokens for AWS, you'll need to:
-
Create an IAM OIDC provider in your AWS account.
-
Add a custom trust policy: this means writing the rules for the identity tokens.
On Bitrise, you can get the tokens by using either the Get OIDC identity token Step or the Authenticate with AWS Step.
Adding an OIDC identity provider in IAM
Set up an IAM OIDC provider in your AWS account.
AWS user guide
Read more about IAM OIDC providers in the official AWS user guide.
-
Log in to your AWS account.
-
Go to IAM.
-
On the left, find Access Management and select Identity providers.
-
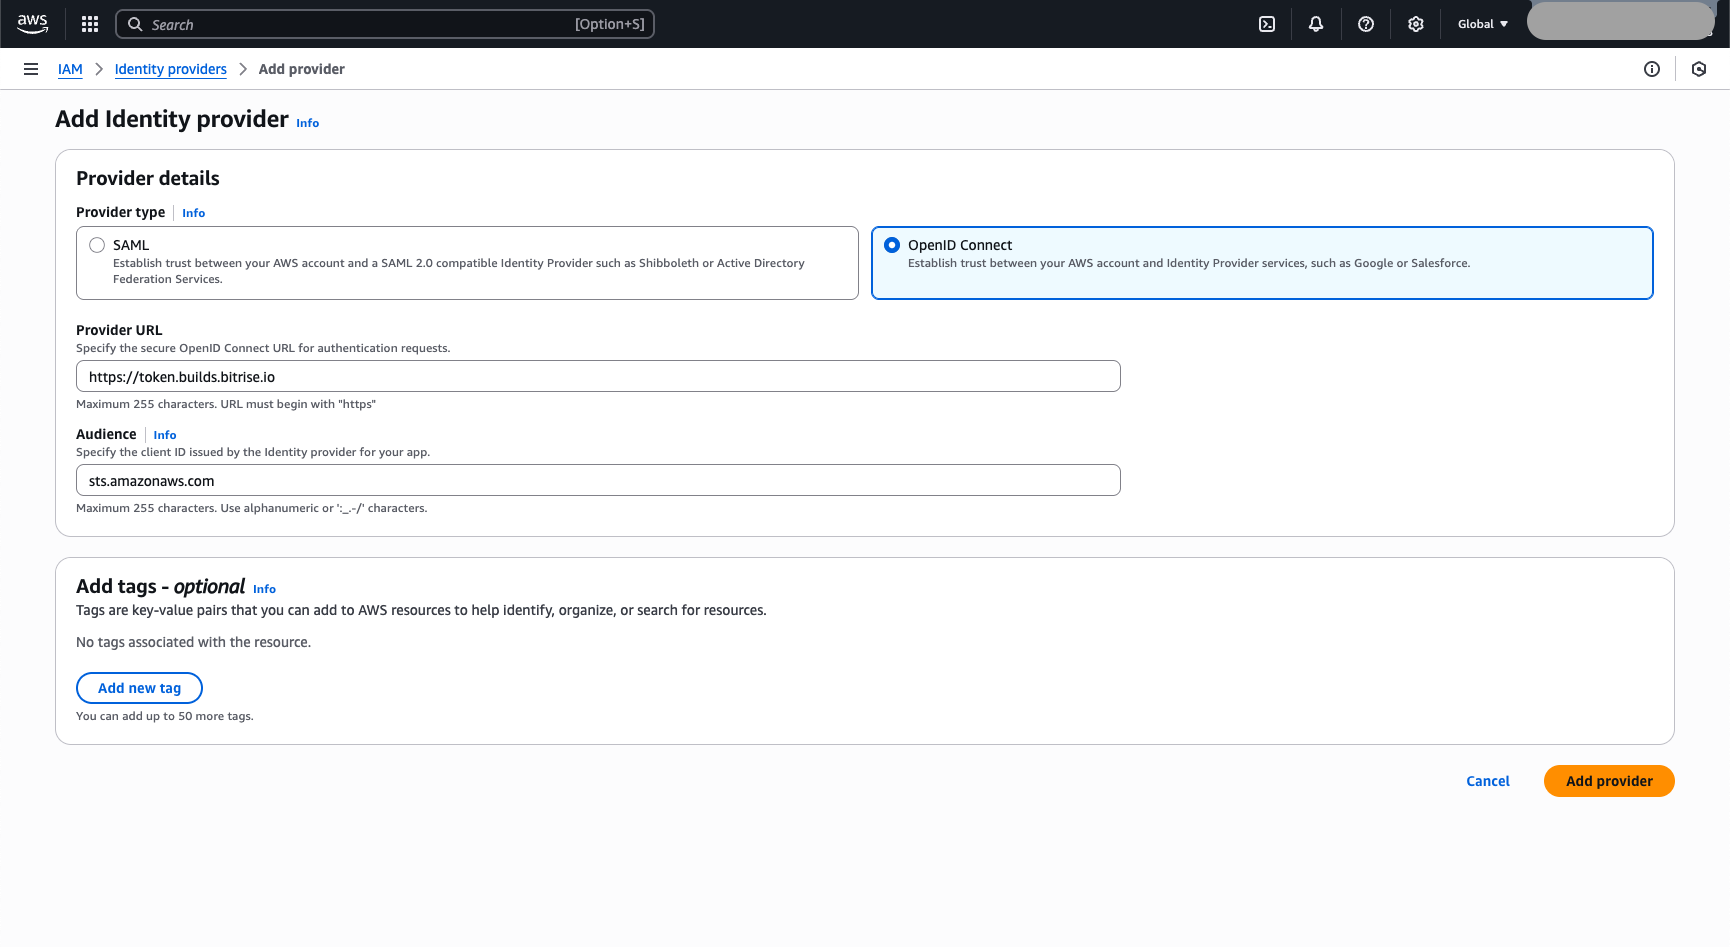
Click .
-
Select OpenID Connect.
-
Set the Provider URL field to
https://token.builds.bitrise.io. -
Set the Audience field to
sts.amazonaws.com. -
Click .
-
On the Identity providers page, select the newly created identity provider and copy the ARN.
The ARN looks something like this:
arn:aws:iam::ACCOUNT_NUMBER:oidc-provider/token.builds.bitrise.io.
Adding a custom trust policy
Add a custom trust policy in AWS IAM to write the rules for the Bitrise identity tokens.
AWS docs
Our guide helps you set up your AWS policy for your Bitrise builds. You can read more about trust policies in the AWS documentation: Create a role using custom trust policies.
-
Log in to your AWS account.
-
Go to IAM.
-
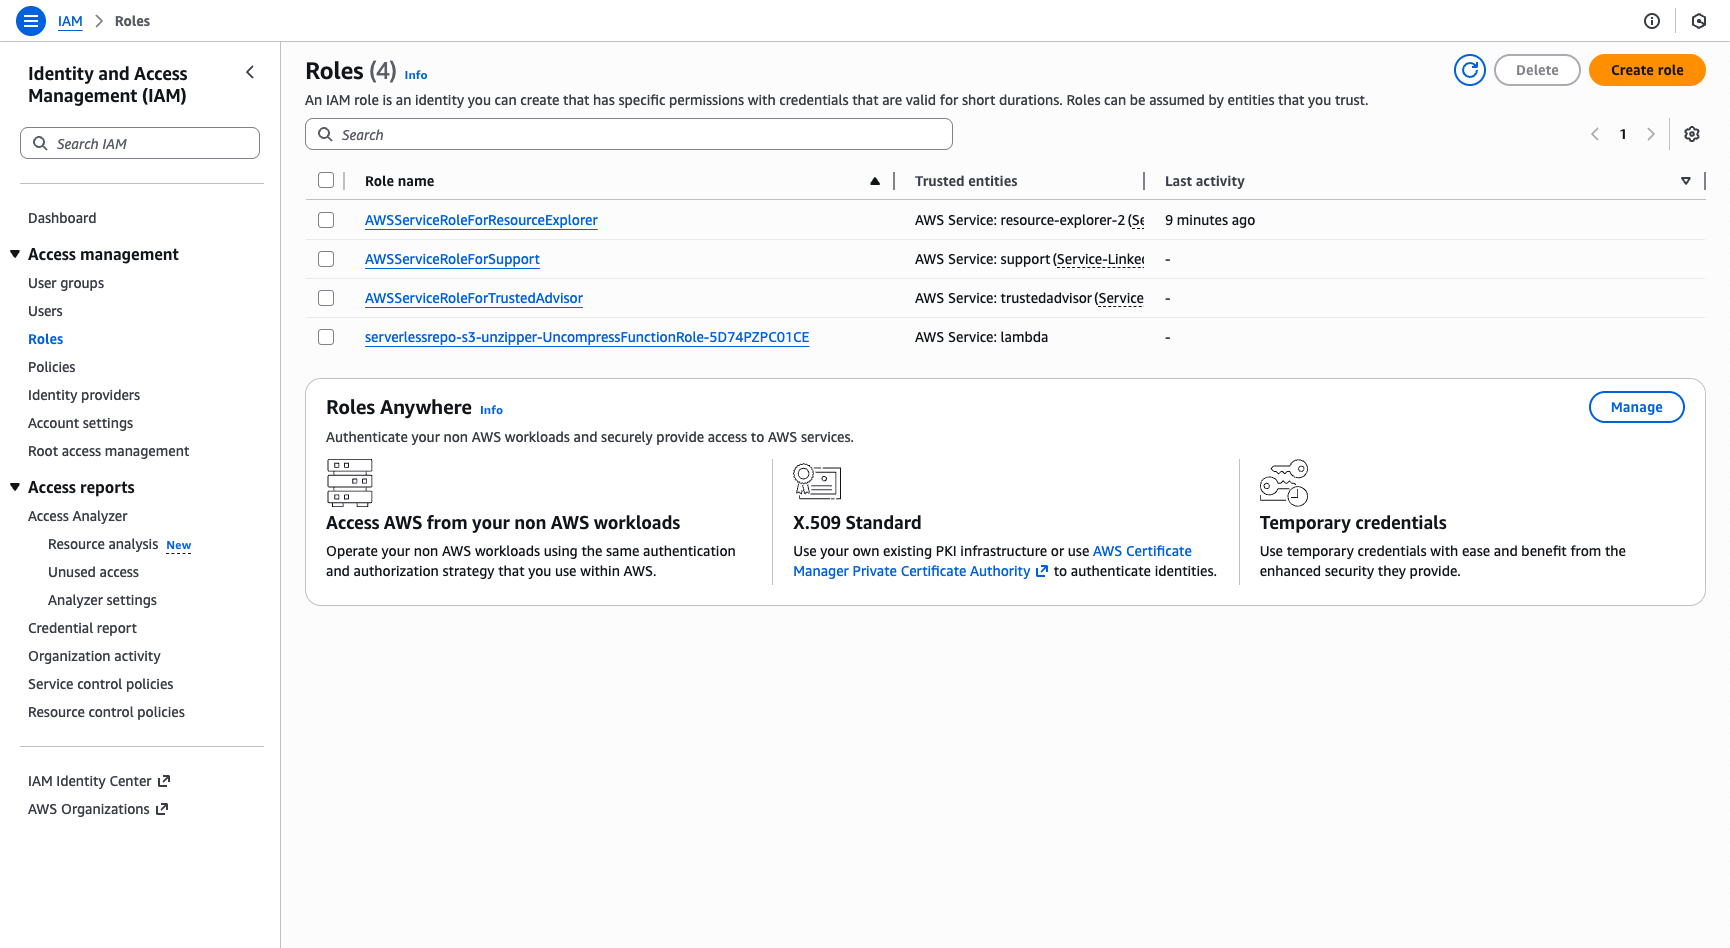
On the left, find Access Management and select Roles.
-
Click .
-
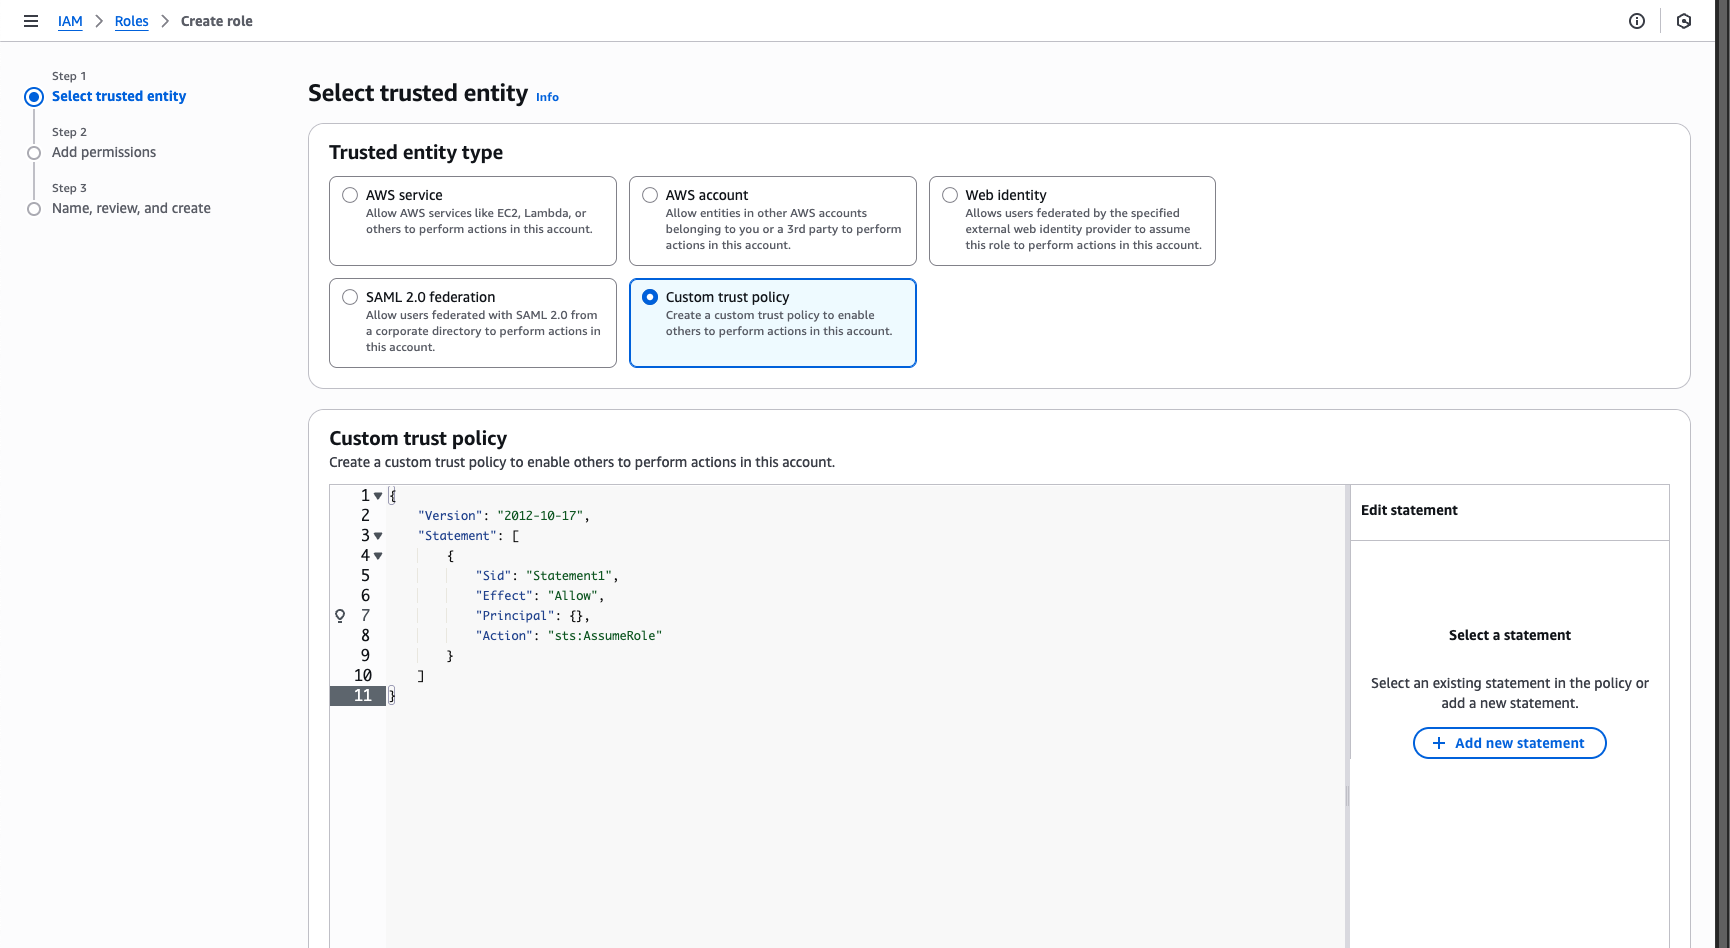
Select Custom trust policy.
-
Create a statement in the custom trust policy editor to set the rules for OIDC tokens:
Creating policies
You can read detailed information about how to create policies in the AWS documentation: Creating IAM policies.
-
Add a
Principal: the type should be a federated user session, with your previously created ARN. SeeFederatedin the example below. -
Add an
Actionwith thests:AssumeRoleWithWebIdentityvalue. -
Under
Conditions, match against the claims in the identity token.Limitation
As Bitrise is considered a generic identity provider, AWS keeps only two claims from our token:
audandsub. You can only use these in your policies.You can find more information about claim fields in the AWS documentation.
The example below checks the audience, the Bitrise project slug, and the Workflow name:
{
    "Version": "2012-10-17",
    "Statement": [
        {
            "Effect": "Allow",
            "Principal": {
                "Federated": "arn:aws:iam::ACCOUNT_NUMBER:oidc-provider/token.builds.bitrise.io"
            },
            "Action": "sts:AssumeRoleWithWebIdentity",
            "Condition": {
                "StringEquals": {
                    "token.builds.bitrise.io:aud": "sts.amazonaws.com",
                    "token.builds.bitrise.io:sub": "app:APP_SLUG:workflow:run-tests"
                }
            }
        }
    ]
}
You can also use wildcards with the
StringLikeoperation instead ofStringEquals: Wildcard matching. -
-
When done, click .
-
Select the required permission for the role.
The required permission depends on what service you're trying to access on AWS. For example, to upload files to an S3 bucket during a build, you can select AmazonS3FullAccess.
Custom access policy
You can also create your own custom policy in AWS to set up the exact permissions you need.
-
When done, click .
-
Name your role and optionally, add a description.
-
Click when done.
Fetching and exchanging tokens
After you successfully configured an OIDC identity provider with a custom trust policy on AWS, your Bitrise builds can exchange tokens with the service of your choice. You can:
-
Use the Authenticate with AWS Step to handle the whole process.
-
Fetch the token with Get OIDC Identity Token Step, then perform the credential exchange with a script.
Information in the OIDC token
Bitrise includes the following claims in the OIDC token: Information in the OIDC token.
Using the Authenticate with AWS Step
The Authenticate with AWS Step requests an OIDC token and performs the credential exchange with AWS. That means you don't have to create your own script to perform the authentication, the Step will handle it for you.
-
Open the Workflow Editor on Bitrise.
-
Add the Authenticate with AWS Step to your Workflow.
-
Set the Token audience input to
sts.amazonaws.com. -
Set the AWS Role ARN to the value of the IAM role ARN that you created earlier.
Docker login
Another convenience feature of the Step is that it can log in Docker to the EC2 Container Registry automatically. Find the Docker input group in the Step configuration, and set it to
true.This is only supported on Linux stacks.
The Step will expose the credentials in the right format. After that, any kind of action through the AWS CLI will simply work.
Using the Get OIDC Identity Token Step
The Get OIDC Identity Token Step exposes an Environment Variable called BITRISE_IDENTITY_TOKEN. You can use this Env Var in a script to exhange credentials with AWS.
-
Open the Workflow Editor on Bitrise.
-
Add the Get OIDC Identity Token Step to your Workflow.
-
Set the Token audience input to
sts.amazonaws.com. -
Use the
BITRISE_IDENTITY_TOKENEnvironment Variable: it can be fed to any CLI tool or API endpoint.You can create a script in a Script Step to perform the token exchange and extract credentials from the response. You'll need three Env Vars as credentials:
-
AWS_ACCESS_KEY_ID -
AWS_SECRET_ACCESS_KEY -
AWS_SESSION_TOKEN
After they are exported, the AWS CLI will automatically pick them up and use them. Any kind of action through the CLI will just simply work.
For example, getting short term credentials and printing the current authenticated session details with the AWS CLI would look like this:
# Perform the token exchange and save the response AWS_RESPONSE=$(aws sts assume-role-with-web-identity \ --role-arn "arn:aws:iam::065600603509:role/OIDC-TEST" \ --role-session-name "bitrise-${BITRISE_BUILD_NUMBER}" \ --web-identity-token "$BITRISE_IDENTITY_TOKEN" \ --output json) # Extract the credentials from the reponse export AWS_ACCESS_KEY_ID=$(echo "$AWS_RESPONSE" | jq -r '.Credentials.AccessKeyId') export AWS_SECRET_ACCESS_KEY=$(echo "$AWS_RESPONSE" | jq -r '.Credentials.SecretAccessKey') export AWS_SESSION_TOKEN=$(echo "$AWS_RESPONSE" | jq -r '.Credentials.SessionToken') # The AWS cli will automatically pick up the env vars from the section above aws sts get-caller-identity -