OIDC for GCP
Generate OIDC tokens during your Bitrise build to exchange them for scoped access tokens with Google Cloud Platform
Generate OIDC tokens during your Bitrise build to exchange them for scoped access tokens with Google Cloud Platform (GCP).
To use OIDC tokens for GCP, you'll need to:
-
Create a workload identity pool.
-
Connect a Google service account to the identity pool.
On Bitrise, you can get the tokens by using either the Get OICD identity token Step or the Authenticate with GCP Step.
Creating a workload identity pool
Create a workload identity pool in GCP to enable Workload Identity Federation.
Workload Identity Federation
Read more about how authentication with Workload Identity Federation works on GCP in the official Google documentation.
-
In the Google Cloud console, go to IAM & Admin then Workload Identity Federation.
-
In the Create an identity pool section, enter a value for the following fields:
-
Name: The name for the pool. The name is used as the pool ID and you can't change the pool ID later.
-
Description: The purpose of the pool.
-
-
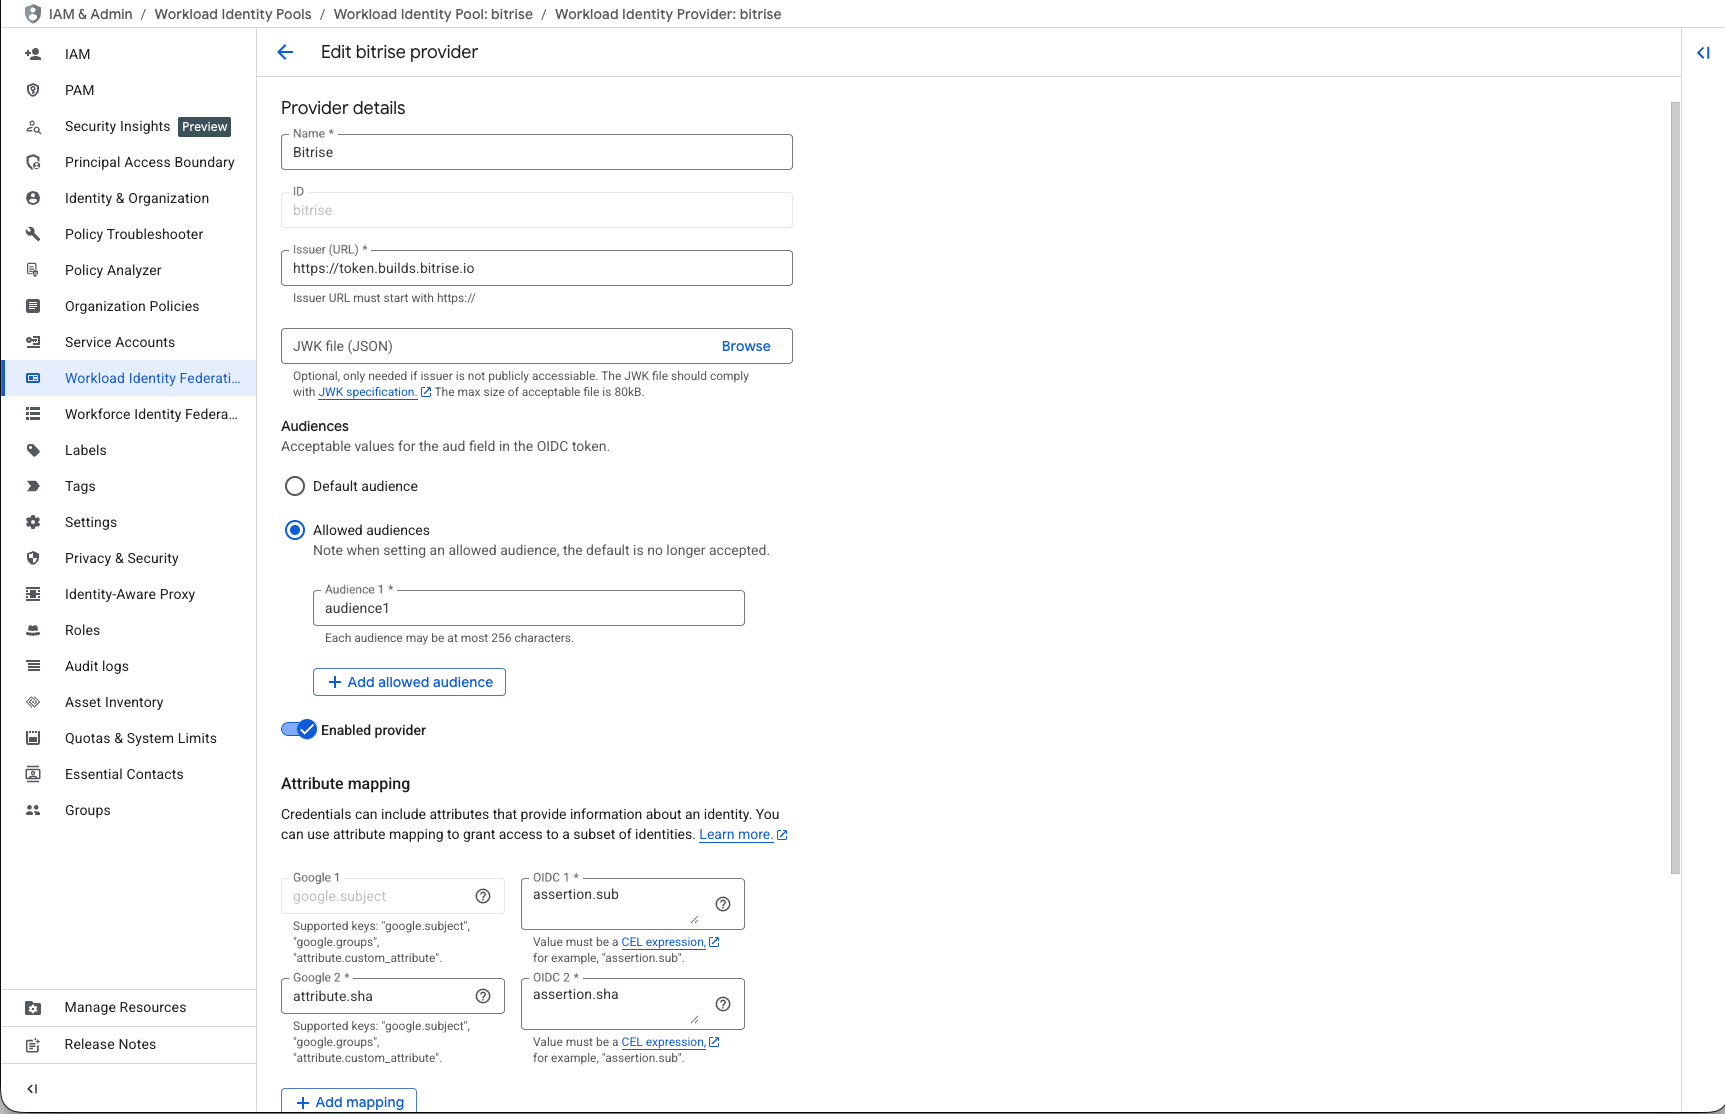
Under Add a provider to pool, add Bitrise as a provider:
-
In the Select a provider field, select OpenID Connect (OIDC).
-
Provider name: Enter a name. For simplicity, we recommend using
Bitrise. -
Issuer URL:
https://token.builds.bitrise.io. -
Audience: Select Allowed audience. When using the token, GCP will check if the allowed audience matches the audience encoded in the
audclaim. On Bitrise, you can set the audience in our Steps providing OIDC services: Fetching and exchanging tokens with GCP.
-
-
Click .
-
Under Configure provider attributes, configure the required attribute mapping values:
-
The
google.subjectkey is a unique identifier for the user. You can useassertion.subto identify the build that requests the token. -
Use the
attribute.NAMEformat to add up to 50 custom attributes, each with a value in theassertion.VALUEformat. You can find the list of available attributes in the Bitrise token here: Information in the OIDC token.
Explicit mapping required
You must map all the attributes you want to use. Google only lets you use the attributes which are explicitly mapped. Read more about attribute mappings in Google's documentation.
-
-
Optionally, add attribute conditions. You will also be able to filter identity tokens based on attributes directly at the pool level when creating the service account.
Your final configuration might look something like this:

Connecting a Google service account to the workload identity pool
To start using OIDC authentication for GCP services, you need to connect a workload identity pool to a Google service account. This involves:
-
Creating a service account.
-
Granting access to the identity pool using a service account impersonation.
Create a service account
-
In Google Cloud console, go to IAM & Admin and then Service accounts.
-
Click Create service account.
-
Add a display name, a unique service account ID, and a description.
-
Click .
-
Under Permissions, add all roles that you need.
IAM conditions
Optionally, you can add IAM conditions based on the previously mapped attribute values by clicking Add IAM condition.
-
Click .
Granting access to the workload identity pool
-
In Google Cloud console, go to IAM & Admin and then Workload Identity Federation.
-
Select your identity pool.
-
Click .
-
Select the Grant access using service account impersonation option.
-
Select the service account you've created.
-
Select the principals: identities that can access the service account.
The available options are limited to the keys from the provider attribute mapping of the identity pool. For example, if you use the attribute mapping
google.subject=assertion.sub, set Attribute name to subject and Attribute value tosub. You can see the available values in the Bitrise token here: -
Click .
-
In the dialog, select the provider you created for Bitrise OIDC tokens.
-
Add the OIDC ID token path:
https://token.builds.bitrise.ioand set the format to text. -
Click and save the file somewhere you can access it.
Fetching and exchanging tokens with GCP
After you successfully configured a workload identity pool and connected it to a Google service account, your Bitrise builds can exchange tokens with GCP. You can:
-
Use the Authenticate with GCP Step to handle the whole process.
-
Fetch the token with Get OIDC Identity Token Step, then perform the credential exchange with a script.
Information in the OIDC token
Bitrise includes the following claims in the OIDC token: Information in the OIDC token.
Using the Authenticate with GCP Step
-
Open the Workflow Editor on Bitrise.
-
Add the Authenticate with GCP Step to your Workflow.
-
Set the Client config and the Token audience inputs:
-
The token audience should match the allowed audience you set when configuring the workload identity pool on Google Cloud.
-
The Client config input should point to the file you downloaded at the end of the process.
-
The Step will expose the credentials in the right format. After that, any kind of action through the gcloud CLI will simply work.
Using the Get OIDC Identity token Step
The Get OIDC Identity Token Step exposes an Environment Variable called BITRISE_IDENTITY_TOKEN. You can use this Env Var in a script to exhange credentials with AWS.
-
Open the Workflow Editor on Bitrise.
-
Add the Get OIDC Identity Token Step to your Workflow.
-
Use the
BITRISE_IDENTITY_TOKENEnvironment Variable: write it to a file and update the client library configuration file to reference the file containing the Env Var. You can set this up in a Script Step:tmpfile="$(mktemp)" printf '%s' "$BITRISE_IDENTITY_TOKEN" > "$tmpfile" # Replace the token path in client library configuration gcloud auth login --cred-file=/path/to/updated-client-library-config.json gcloud auth list
After, the gcloud CLI will automatically pick them up and use them. Any kind of action through the CLI will just simply work.